Quick Guide To Installing and Configuring RTPProxy: CentOS 7.3
Configuring an RTP Proxy is one of the most confusing topic’s around setting up Kamailio. The goal of this article is to help you select the correct RTP Proxy implementation to install, discuss one common use case/pattern that RTP Proxy is used for and then setup up a RTP Proxy implementation to work with Kamailio.
Note: We offer paid support for designing, configuring and supporting VoIP infrastructures that contain Kamailio.
You can purchase support from Here
The Scenario
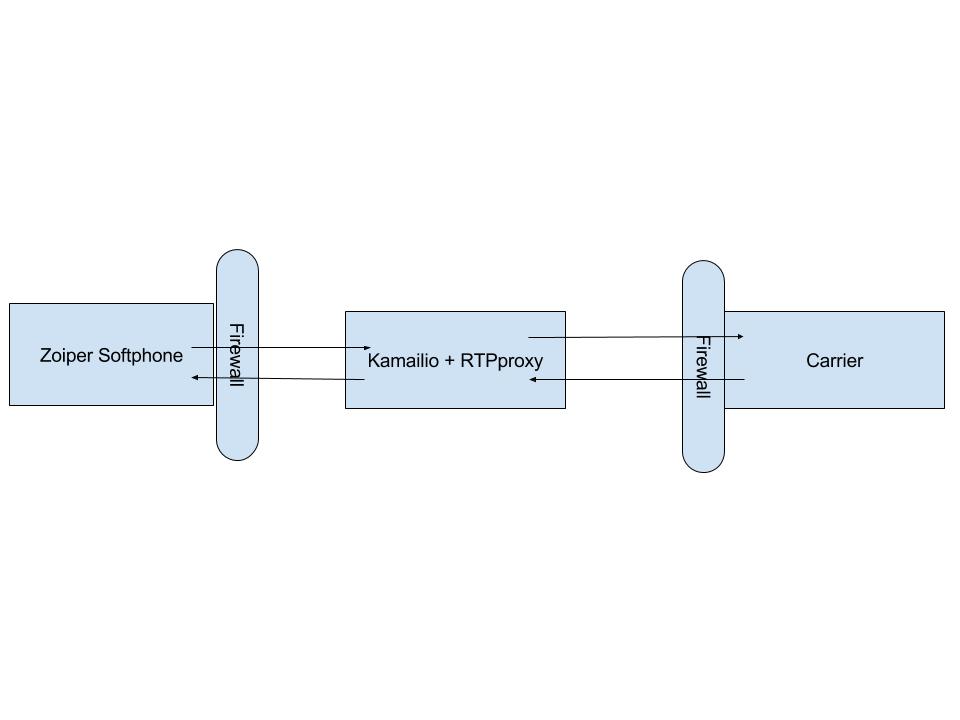
There are multiple use cases for using a RTP Proxy. However, in efforts to demonstrate how to use a RTP Proxy we are going to look at a simple use case where Kamailio is handling user registration and then passing the call directly to a carrier for making the outbound call, which is depicted below:

In this scenario, the User Agent is passing the SIP INVITE thru Kamailio. However, the SDP contains the local ip address of the User Agent because Kamailio is simply doing its job and passing the traffic thru without touching the requests. This means that the carrier can’t send the RTP traffic back to the User Agent because it’s sitting behind a firewall and the internal ip address is being sent in the SDP. Therefore, we need to install and configure a RTP Proxy. In the next section we will select the a RTP Proxy implementation to implement.
Select a RTP Proxy Implementation
There are 2 main versions of RTPProxy and it’s very confusing for a newbie to figure out which version you should implement.
| Name | Pro’s | Con’s | REPO |
|---|---|---|---|
| RTPProxy | not sure | Doesn’t seem to be well documented | download |
| RTPEngine (formedly mediaproxy-ng) | Works with WebRTC clients | Not well documented | download |
Since we are not going to implement WebRTC we can use RTPProxy.
Installing RTPProxy
Install pre-req’s and rtpproxy repo using yum package manager:
yum -y update
yum -y install gcc gcc-c++ bison openssl-devel libtermcap-devel ncurses-devel doxygen      \
            curl-devel newt-devel mlocate lynx tar wget nmap bzip2 unixODBC unixODBC-devel      \
            libtool-ltdl libtool-ltdl-devel mysql-connector-odbc mysql mysql-devel mysql-server \
            flex libxml2 libxml2-devel pcre pcre-devel git
From here you can either install using yum or from source.
We recommend installing from src as there are needed patches in new releases.
Installing RTPProxy from Source
Clone and compile the latest from github
cd /usr/src/
git clone --recursive https://github.com/sippy/rtpproxy.git
cd rtpproxy
./configure
make
make install
Copy the init script to init.d/ directory
/bin/cp -f rpm/rtpproxy.init /etc/rc.d/init.d/rtpproxy &&
chmod +x /etc/rc.d/init.d/rtpproxy
Create the rtpproxy user and group
mkdir -p /var/run/rtpproxy
groupadd rtpproxy
useradd -d /var/run/rtpproxy -M -s /bin/false rtpproxy
chown rtpproxy:rtpproxy -R /var/run/rtpproxy
Change the config file to use the rtpproxy binary.
You may need to replace if you installed in custom location.
sed -i 's:rtpproxy=/usr/bin/:rtpproxy=/usr/local/bin/:' /etc/rc.d/init.d/rtpproxy
I had to manually add the path of the program, as follows:
cat << 'EOF' > /etc/profile.d/rtpproxy.sh
#!/bin/sh
#
# Set an alias for compiled version of rtpproxy

# Change if installed in custom location
rtpproxy_prog="/usr/local/bin/rtpproxy"

if [ -f "$rtpproxy_prog" ] && [ -x "$rtpproxy_prog" ]; then
    export PATH=$PATH:$rtpproxy_prog
fi
EOF
Source your global shell environment configs;
source /etc/profile & source ~/.bashrc
Make rtpproxy start on boot:
chkconfig rtpproxy on
Replace startup options with whatever you want rtpproxy to start with:
local_ip=your.local.i.p
external_ip=your.external.i.p
echo 'OPTIONS="-F -s udp:127.0.0.1:7722 -l $local_ip -A $external_ip -m 10000 -M 20000 -d DBUG:LOG_LOCAL0"' > /etc/sysconfig/rtpproxy
Enabling NAT within Kamailio Configuration File
We used Flowroute for our carrier here. other carriers would be similar. If using Flowroute, you will need to login to your Flowroute account and obtain your techprefix.
We will assume that you are using the default kamailio.cfg file that ships with Kamailio.
- vi /etc/kamailio/kamailio.cfg
- add the following to the top of your config, beneath #!KAMAILIO
#!define WITH_MYSQL
#!define WITH_AUTH
#!define WITH_NAT
#!define WITH_USRLOCDB
#!define WITH_FLOWROUTE
- save the configuration
Update the port kamailio listens on:
- vi /etc/kamailio/kamailio.cfg
- find the line that starts with: #listen=udp:10.0.0.10:5060
- after that line add: listen=udp:yourlocalip:5060 advertise yourpublicip:5060
- save the file
Add the carrier routing logic:
- vi /etc/kamailio/kamailio.cfg
- in the routing logic section find “route[PSTN] {“
- add the following inside that function, replace with your own values:
#!ifdef WITH_FLOWROUTE
        $var(sip_prefix) = "<Flowroute carrier prefix>";  #Leave empty if your carrier doesn't require it
        $var(carrier_ip) = "216.115.69.144"; #Signaling IP for Flowroute. Replace with your carrier info

        # add prefix to rU
        $rU = $var(sip_prefix) + $rU;

        # forward to flowroute
        forward($var(carrier_ip), 5060);
        exit;
#!endif
Startup
Start rtpproxy:
service rtpproxy start
Restart kamailio:
You need to restart Kamailio if you make changes to rtpproxy configuration. In our case, we just installed it. So, you need to restart Kamailio in order for it to connect to the RTPProxy.
kamctl restart
Testing RTPProxy and Kamailio
First off make sure both Kamailio and Rtpproxy are running:
ps -ef | grep rtpproxy
ps -ef | grep kamailio
If either service fails to start check your logs while starting the service.
Open another terminal and run the following:
# terminal 2
tail -f /var/log/messages
Then in your original terminal start the services one by one.
You will see errors labeled. One of those will lead to your problem.
Add a test extension to Kamailio
If you already have a test extension in Kamailio you can skip this section.
“test” is our pw for extension “1001”:
kamctl add 1001@your.domain.com test
Now try to register a softphone with the extension you added.
Once registered run the following cmd and you should see your extension:
kamctl ul show
Try to make calls using that extension and capture the traffic. We will assume that you have either sngrep or ngrep installed already.
Your INVITE and 200 OK messages should be rewritten correctly.