Configuring Panasonic KX-TGP600
The purpose of this tutorial is to explain how to configure a Panasonic KX-TGP600 phone with FreePBX or Asterisk. We will assume that you have the extension already configured in FreePBX or Asterisk. Therefore, we will focus on the steps needed to configure the phone.
The high-level steps needed to complete this are listed below. We will go into detail for each section.
- Enable Web Management GUI
- Accessing the Web Management GUI
- Configure the phone settings via the Web Management GUI
Enable Web Management GUI
The first step is to enable the embedded web function on the phone. This is done by using the cordless phone’s handset and following the steps listed below:
- Turn on the phone and select the Menu function
- Select the Setting Handset option
- Select the Other option
- Select the Embedded Web option
- Select the On option
Important Note: The Embedded command that you select on the phone, will only last less than 5 minutes before it switches back off. If, at some point, you are unable to log into the Web Management GUI or you find that the Management GUI loses connection, then repeat the instructions for Enabling the Web GUI listed above to turn the Embedded Web feature back on. Refresh the web page or log back in.
Once these steps are completed, you are now ready for the next step which is Accessing the Web Management GUI in order to program your phone.
Accessing the Web Management GUI
Before you are able to access the Web Management GUI, you must first know the cordless phone’s IP address. An easy way to get this, is using the phone’s handset again and following the steps listed below:
- Turn on the handset and select the Menu option
- Select the System Settings icon
- Select the Status option
- Select the IPv4 Settings option
- Select the IP Address option
You now have access to the IP address for your Panasonic phone.
Configure the phone settings via the Web Management GUI
The IP address listed on the handset’s display, is what you will type into your web browser in order to access the Web Management GUI.
After entering in the phone’s IP address, a window will popup asking for the phone’s User Name and Password.
The default login for the Panasonic KX-TGP600 phone is:
User Name: admin
Password: adminpass
- Once you are logged in, select the VoIP tab
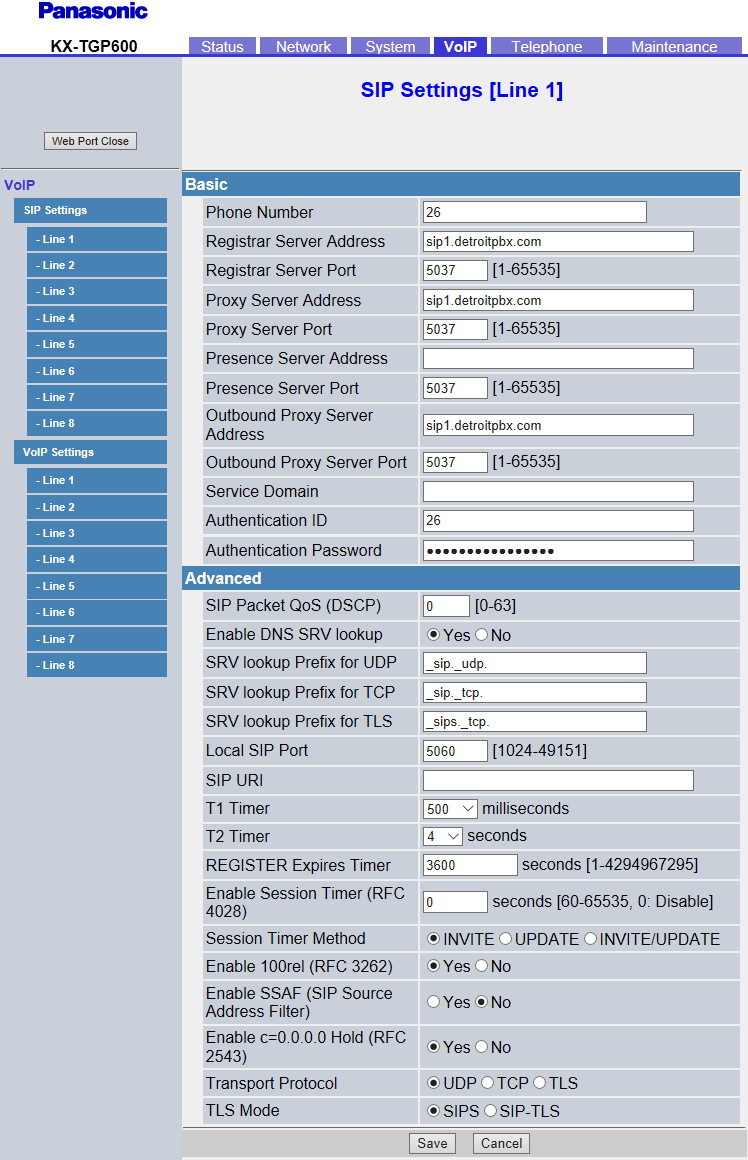
- Under the SIP Settings listed on the left side under VoIP, click on the Line 1 option. The screen should now be titled SIP Settings [Line 1]
- Enter the extension number in the fields labeled Phone Number and Authentication ID
- Enter the SIP address in the fields labeled Registrar Server Address, Proxy Server Address and Outbound Proxy Server address
- Enter the Server Port in the fields labeled Registrar Server Port, Proxy Server Port, Presence Server Port and the Outbound Proxy Server Port
- Enter the extension’s secret (the password for the phone) into the field labeled Authentication password.
- Click on the button labeled Save at the bottom of the page.
- Restart the phone. Wait for it to finish loading back up. You will hear a dial-tone when it is finished and ready for use.
Congrats, your phone is now configured and is ready to move on the next section, Testing the Phone.
Here is an example of a completed Web Management GUI screen:
Testing the phones
Once you have entered all of the information above, clicked on the Web Management GUI’s save button, you are now free to test the phone by making incoming and outgoing phone calls.
