Trusted Services
We are trusted by 100's of customers
Mon-Fri 9am-8pm
+1800-907-2085
Well Experienced
Started in 2010

Our Services

We provide the best services

Support Services

We offer a number of support services for Kamailio, FreeSWITCH and Asterisk

Development

We build custom modules for Kamailio and FreeSWITCH

Recent Updates

Our Latest News

Hands-on Kamailio Deployment Course
The self-paced videos for this course are below. Thank you for purchasing the course! Enjoy -Mack Hendricks Section 1 – Intro: This video provides an overview of the course. The video mentions dSIPRouter.org, which is a UI built for Kamailio that makes it easier to install, configure and manage Kamailio. Section 2 – Kamailio Architecture: […]
To access this post, you must purchase Hands-on Kamailio Deployment Course - Self Paced.
RTPEngine Basics Course
The self-paced videos for this course are below. Thank you for purchasing the course! Enjoy -Mack Hendricks Section 1 – RTP Basics: This video sets the stage and gives you a basic understanding of RTP. It’s a great review if you haven’t worked with RTP in a while. Section 2 – RTPEngine Architecture: The section […]
dSIPRouter and Twilio Elastic Trunking Integration
We have made it super simple to connect dSIPRouter to Twilio Elastic SIP Trunking (ESIPT). The main component that makes this happen is the new CarrierGroup API. This API allows you to programmatically add carriers to dSIPRouter. This API follows the same format as our other dSIPRouter API. In this article, I will explain how to connect to Twilio ESIPT from the dSIPRouter UI and explain how to use the underlying API.

Installing dSIPRouter

The best way to install dSIPRouter is to use the one line installation commands which can be found here or use Terraform to deploy.

Get Twilio Credentials

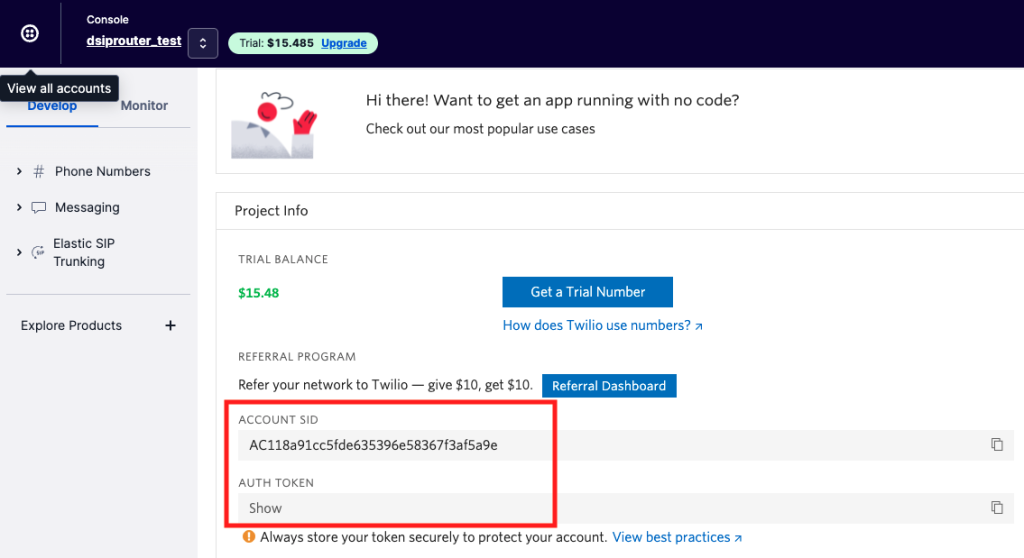
You can obtain Twilio credentials from the Twilio Console
  1. Create a Twilio account or login to the Twilio Console if you have an existing account.
  2. Save the Account SID and Auth Token from the Twilio Console somewhere safe. You will need them to later

Create Carrier Group for Twilio

Now that dSIPRouter is installed let’s login and create a Carrier Group. This will allow you to setup a SIP connection between dSIPRouter and Twilio.
  1. Click Carrier Groups
  2. Click Add
  3. You will need to enter a name for the Carrier Group, select Twilio from the Plugin, enter in the Twilio Account SID and Account Token that we saved in the last section.
  4. Click Add
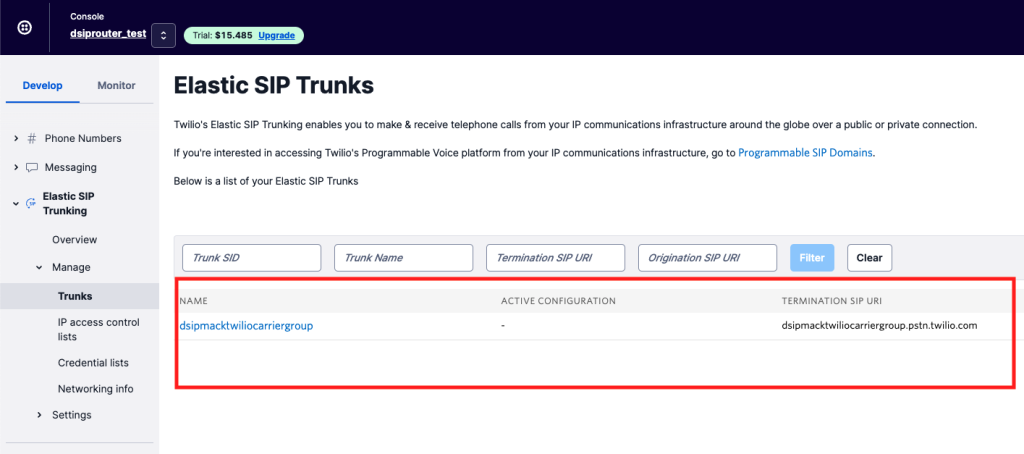
This will trigger an API to Twilio Elastic SIP Trunking that will create an Elastic SIP Trunk which can be seen in the Twilio Console.

Setup Default Outbound Route

Now make your new Twilio Carrier Group the default outbound route
  1. Click “Outbound Routes”
  2. Select the first rule and change the route to the MackTwilioCarrierGroup
  3. Click Update
  4. Click “Reload Kamailio” in the upper right of the UI

Testing: Setup an Endpoint Group

We can now test a call by creating an End Point Group using IP Auth or Username/Password Auth. I will use IP Auth
  1. Click Endpoint Groups
  2. Click Add
  3. Click Endpoints Tab
  4. Add your IP address and click Save
  5. Click Add
  6. Click “Reload Kamailio” in the upper right of the UI

Testing: Place a Call

We are going to use Zoiper to place a test call
  1. Start Zoiper
  2. Add Account
  3. Just add a Domain and Username. Note, the username is the Caller ID that will be sent when you place a test call. Note, Twilio will only send calls to validated numbers on the account when your account is in Trial mode.
  4. Place a call. Make sure the number is e.164 format, which looks like this +19544242424
Build dSIPRouter Using Terraform

Introduction

The purpose of this article is to show you how to automate the deployment of dSIPRouter using HashiCorp Terraform.  We ship a Terraform script with dSIPRouter because we do all of our development and testing against Digital Ocean.  Also, we wanted to provide you with an example of how you could implement this for other cloud providers since Terraform has providers for all of the major public clouds and on-premise environments as well.

Assumptions

  • You have a Digital Ocean API Key
  • You have a SSH Key Pair uploaded to Digital Ocean and you know it’s name

Download Terraform and Setup Environment

For congruency, we will be doing this from Windows, but doing so from Linux should be similar.  Please download the following packages (uniformity between OS’s):
  • GitBash – https://git-scm.com/download/win
  • Terraform – https://www.terraform.io/downloads
You will need to place your terraform.exe or executable in C:\Windows\System32 or /usr/local/bin or /usr/sbin, or adjust your windows host system environment variables to the download location of terraform.exe. To do so do the following: Right click This PC(MyComputer)
—>properties 
—>advanced system settings
—>environment variables
—>system variables
—>path–edit–>new

Get Repository and Setup Terraform Variables

Open a terminal window / command prompt and type the following:
export DIGITALOCEAN_TOKEN=<Digital Ocean token key>
git clone https://github.com/dOpensource/dsiprouter
cd dsiprouter/resources/terraform/do
copy terraform.tfvars.sample terraform.tfvars
terraform init
This will install the Digital Ocean provider since our terraform script is configured to work with Digital Ocean. Edit the terraform.tfvars file, which sets the values of variables needed by the terraform script.
pvt_key_path="C:/Users/alems/Working/andrew" (adjust using path format, andrew is actually the pvt key)
dsiprouter_prefix="dev"
number_of_environments=1
pub_key_name="andrew"
Once modified, you should have all you need to deploy an instance via Terraform.

Build dSIPRouter Using Terraform

Execute the following commands to build dSIPRouter from the master branch using terraform:
terraform apply
If you want to build from another branch you would pass in the branch variable with the value of the branch like this
terraform apply -var branch=v0.643
This is what it will look like as it starts to build: This is what it will look like after it’s completed: You will now be able to login to dSIPRouter using the credentials generated.

Login to dSIPRouter

You can login to dSIPRouter using the dSIPRouter WEB GUI URL and the dSIPRouter GUI Username and dSIPRouter GUI Password generated by the installer.  Enjoy!
Load Balancing FusionPBX Outbound Gateways
In certain situations you want to load balance SIP traffic between multiple SIP endpoints. These SIP endpoints are typically a Session Border Controller (SBC) in your organization or an upstream SIP provider. In any case, you need some logic that will distribute the traffic between the SIP endpoints. In the FusionPBX world (which is based on FreeSWITCH) this module is called Distributor (mod_distributor). In this article we will explain how to configure it.

Assumptions

  • You have at least two gateways defined within FusionPBX, which represents the SIP endpoints that you want to distribute traffic between.

Configuration Steps

  1. Login to FusionPBX and make sure the mod_distributor module is enabled. You can do so by going under Advanced -> Modules. Distributor should be an option to choose from, but should be disabled.  It will need to be enabled. “Enabled” should read True on the distributor line once it’s enabled.
  2. Get Gateway ID’s – right click on the Gateway name and click “Copy Address”. Open up a text editor and paste the address. The Gateway ID is the string after “id=” in the URL. Do this for all of the gateways you want to distribute traffic too.
3. Changing the mod_distributor config xml:
  • SSH to your FusionPBX server, make your way into the /etc/freeswitch directory
  • Using your favorite editor, edit autoload_configs/distributor.conf.xml and add the following:
<list name="my_list_001" total-weight="2">
<node name="978fefdd-45cd-4457-8ecd-5d82eaea3b12" weight="1"/> <!-- my_gateway_001 - its just comment with actual GW name -->
<node name="1a8d448d-e06e-2dab-b6f9-4421a98e4d8e" weight="1"/> <!-- my_gateway_002 -->
</list>
4. Save and run the following commands from the FreeSWITCH cli
fs_cli > reloadxml
fs_cli > distributor_ctl reload
5. Updated your Outbound Routing setting. You have something like this now: But, you want to change the last line to something like this: The Distributor command above takes a string value that contains a list that was defined in distributor.conf.xml and returns a gateway based on the weight defined in the configuration. In this case, “my_list_001” is the list used. This module can be used for other use cases where you need to generate random/weighted values.
Using SIPp To Load Test With a Kamailio Proxy
SIPp is a free open source tool for generating SIP traffic usually for the purpose of load testing SIP components such as a PBX.  In this walkthrough we will detail two methods of running tests using built in settings, or alternatively a generated SIPp xml file. It includes basic user agent scenarios (UAC and UAS). Also, you can use these basic agent scenarios to build call flow scenarios that fit your use cases. The scenario files are basic files that allows you to subscribe simple to very complex call flows. We will touch on a couple scenarios with a focus on load testing a SIP element such as a PBX with a Kamailio Proxy in front of it. SIPp generates SIP traffic according to the scenario specified. You can control the number of calls that are started per second. We will focus on the use of the builtin UAC scenario. At starting time, you can control the rate by specifying parameters on the command line:
  • “-sn” to specify the built in call flow scenario
  • “-sf” to specify a custom scenario file
  • “-r” to specify the call rate in number of calls per seconds
  • “-rp” to specify the “rate period” in milliseconds for the call rate (default is 1000ms/1sec). This allows you to have n calls every m milliseconds (by using -r n -rp m).
In our example, we will run SIPp at 7 calls every 2 seconds (3.5 calls per second) to a SIP Server, without a proxy:
sipp -sn uac -r 7 -rp 2000 <ip of server>
In another example, we will run SIPp at 7 calls every 2 seconds using a SIP Proxy such as Kamailio and OpenSIPS friendly scenario file. If you need help building a scenario file please contact us and we can estimate the about of hours needs to build a scenario file to meet your requirements :
sipp -sf sipproxyfriendly.xml -r 7 -rp 2000 <ip of server>
You can pause the traffic by pressing the ‘p’ key. SIPp will stop placing new calls and wait until all current calls end. You can resume the traffic by pressing ‘p’. To quit SIPp, press the ‘q’ key. SIPp will stop placing new calls and wait until all current calls end. SIPp will then exit. You can also force SIPp to quit immediately by pressing the ‘Q’ key. Current calls will be terminated by sending a BYE or CANCEL message (depending if the calls have been established or not). The same behaviour is obtained by pressing ‘q’ twice.
dSIPRouter Media Server API v1

We are introducing a new API that will enable the provisioning of extensions within a backend media server. The API will provide an abstraction layer for provisioning different backend media servers. The first release will focus on FusionPBX.

dSIPRouter has a concept of an Endpoint Group. An endpoint group can be mapped to a FusionPBX Cluster. When this happens the domains from FusionPBX is automatically sync’d with dSIPRouter. We will leverage the existing connection to enable the ability to provision and update Domains and Extensions within FusionPBX. In the future, we will support FreePBX and other media servers as well. Hence, giving users one API for provisioning users and dSIPRouter handles the complexity of translating the request into the backend media server.

The feature will be available in 0.642. You can provide comments and feedback on the API by submitting comments in the GitHub issue which can be found here

The API endpoints for this release are:

/mediaserver/domain/
/mediaserver/extension/

The Payload for this release:

Payload for Domain

{
   domain_id:
   name: string,
   enabled: boolean,
   description: string,
   config_id: endpointgroup_id | conf_id
}

Payload for Extension

{
    type: single| multiple,
    num_of_extensions: integer,
    attributes: {

      domain_id: string | null,
      account_code: string,
      extension: string,
      password: string|null ,
      outbound_caller_number: string|null,
      outbound_caller_name: string:null,
      vm_enabled: boolean,
      vm_password: string,
      vm_notify_email: string,
      enabled: boolean,
      config_id: endpointgroup_id | conf_id
    }
}

Example Usage

The following example will provision a new Endpoint Group in dSIPRouter and a Domain and Extension in FusionPBX. Note, that the API will also support updating and deleting as well.

1) The user will create an endpoint group to represent a FusionPBX standalone instance or a FusionPBX cluster

https://{{DSIP_ADDR}}:5000/api/v1/endpointgroups

They will receive an endpoint group id, which will be used for provisioning the backend media server

2) The user can then create a new domain

https://{{DSIP_ADDR}}:5000/api/mediaserver/domain/

{
   domain_id: null
   name: AprilandMackCo,
   enabled: true,
   description: "April and Mack Co,
   config_id: 64
}

The user will receive the domain_id, let’s assume its 98

3) The user can create one user or a set of users. We are going to create 10 users

https://{{DSIP_ADDR}}:5000/api/mediaserver/extension/

{
    type: "multiple",
    num_of_extensions: 10,
    attributes: {

      domain_id: 98,
      account_code: "124-24245",
      extension: "1000",
      password: "starterpassword" ,
      outbound_caller_number: "8889072085",
      outbound_caller_name: "dOpenSource",
      vm_enabled: true,
      vm_password: "94145",
      vm_notify_email: "",
      enabled: true,
      config_id: 64
    }
}

This API will create 10 extensions starting from 1000 with the same attributes. You can also create a single extension.

Twilio Elastic SIP Trunking and dSIPRouter

dSIPRouter 0.63 was recently released with out of the box support for Twilio Elastic SIP Trunking. The design goal for the first release of this feature was to make it simple for a user to download dSIPRouter and setup Twilio as the carrier.

Assumptions:

  • dSIPRouter is installed. If not, you can install it within 12 minutes. There is a one-line command that will kick-off the installer and it will take about 12 minutes to install. The details can be found here{:target=”_blank”}

  • You have a Twilio account. It only takes a few minutes to create an account. You can create an account by going here

Setting up Twilio Elastic SIP Trunking

  1. Login to Twilio
  2. Enter Elastic SIP Trunks in the top right search bar and click enter.  Notice that Twilio gives you a double digit Trial Balance.  This is better then most SIP providers that I worked with in the past.

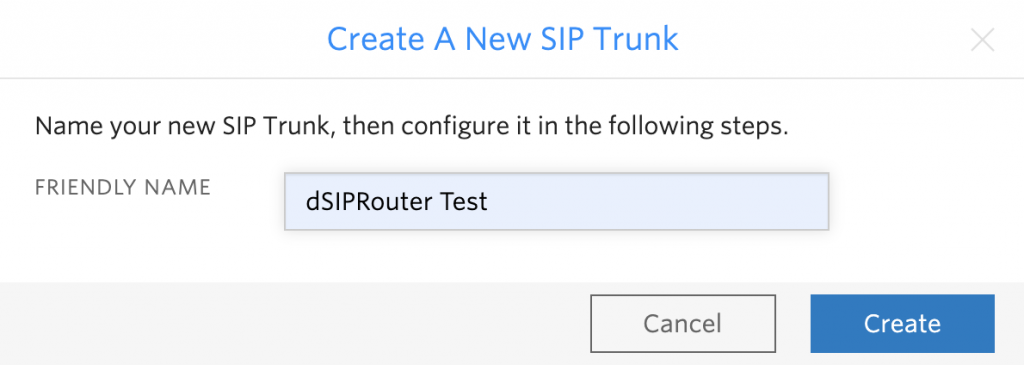
  3. Click the + sign to create a new SIP Trunk.  Enter a name for your SIP Trunk and click “Create”

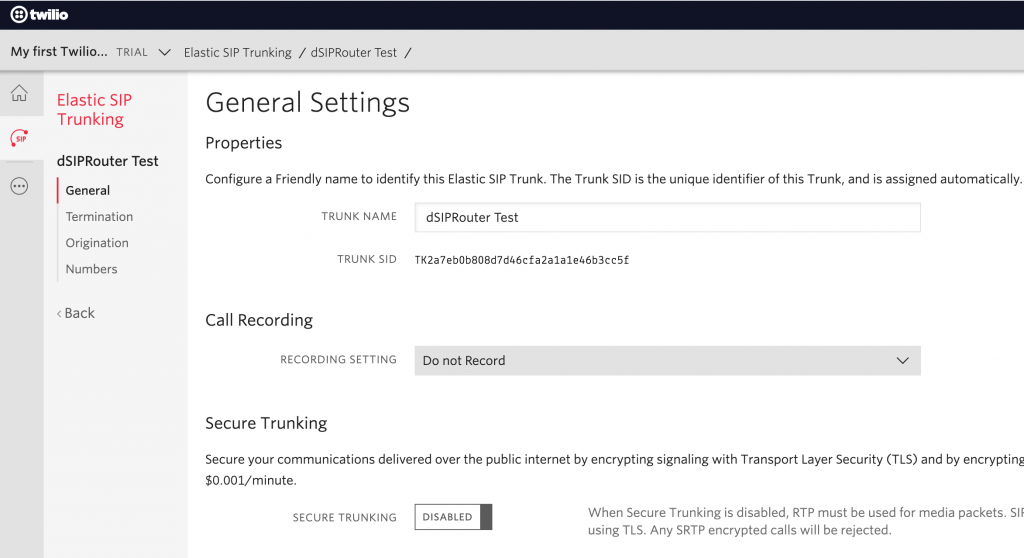
  4. You will see a screen that looks like this

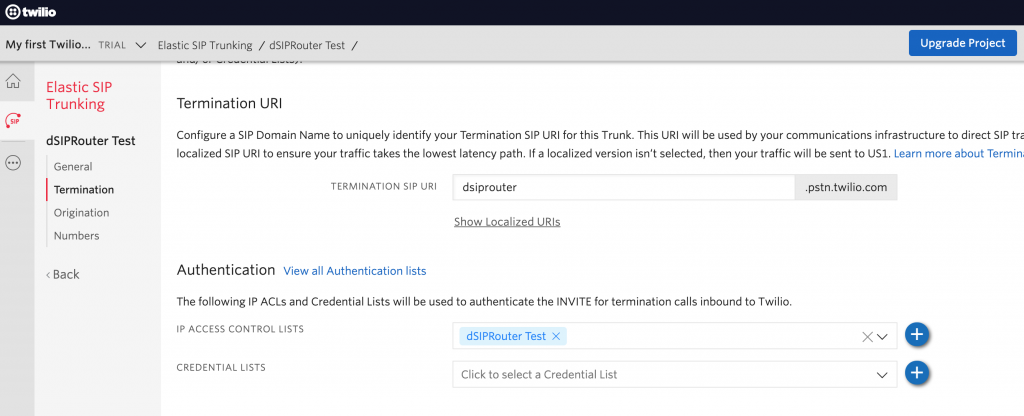
  5. Since we are focused on sending calls outbound we are going to click on the “Termination” menu option.  We are going to use IP Authentication.  So, we just need to define a unique SIP URI for signaling to Twilio. Twilio doesn’t accept SIP requests that come from an IP address.  Also, we need to define an Access Control List that contains the IP address of your dSIPRouter instance.  If you have multiple instances of dSIPRouter then define all of the IP addresses.

This is all we need to do on the Twilio side.  In the next section we will focus on configuring dSIPRouter

Setting up dSIPRouter to work with Twilio Elastic SIP Trunking

Setting up the Carrier Group

  1. Login to dSIPRouter
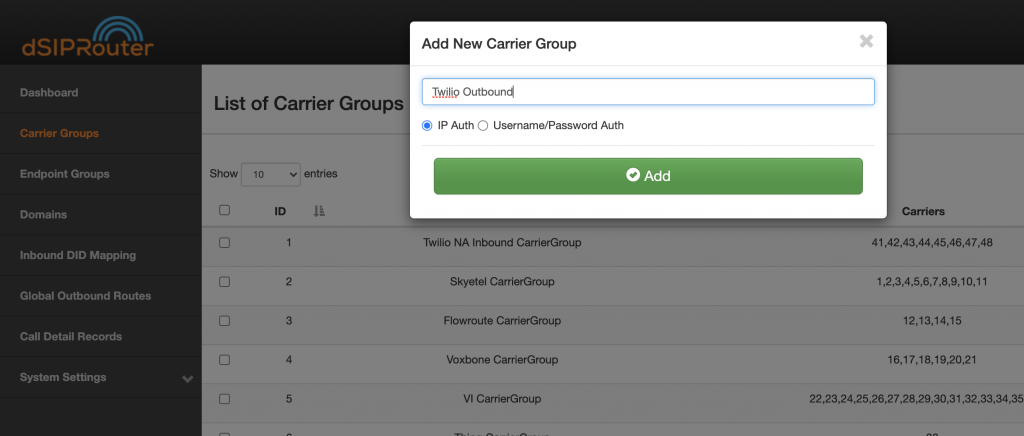
  2. Click Carrier Groups
  3. Click Add
  4. Provide a name for the Carrier Group and click Add

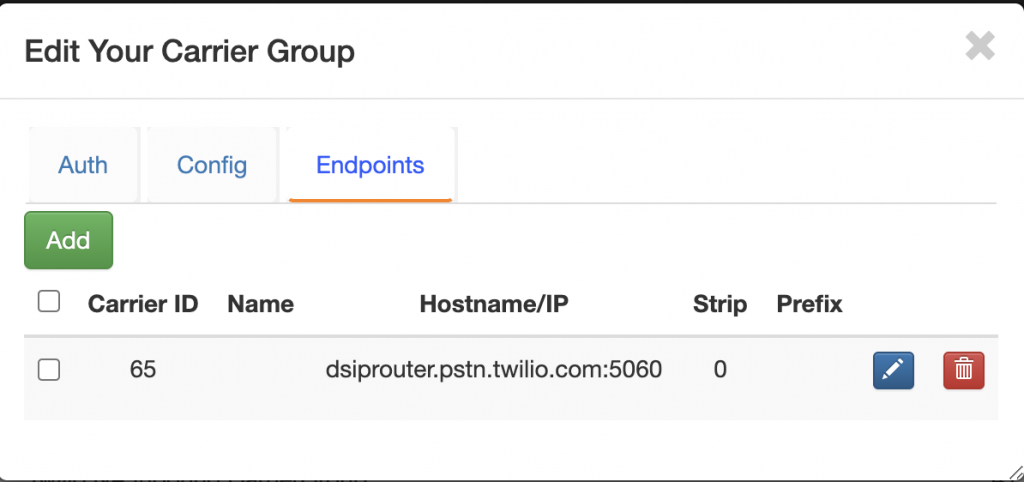
  5. Click on the Carrier Group that you just added

  6. Click on Endpoint and click Add.
  7. Enter the Twilio SIP URI that you defined in the Twilio portal

  8. Click “Reload Kamailio”

Make the Twilio Carrier Group the Default Outbound Carrier

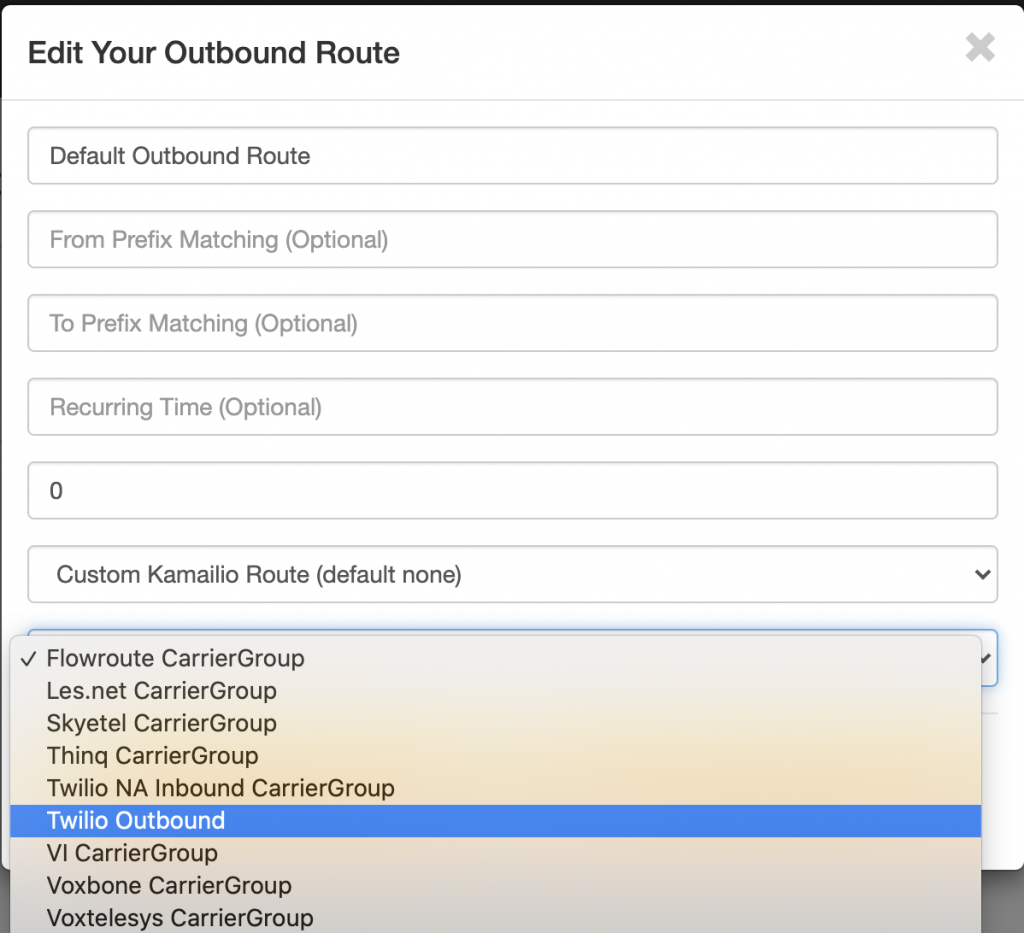
  1. Click on Global Outbound Routes
  2. Click on the Default Outbound Route and select Twilio Outbound

Making an Outbound Call

In this section we are going to use IP authentication to send a call using a softphone.

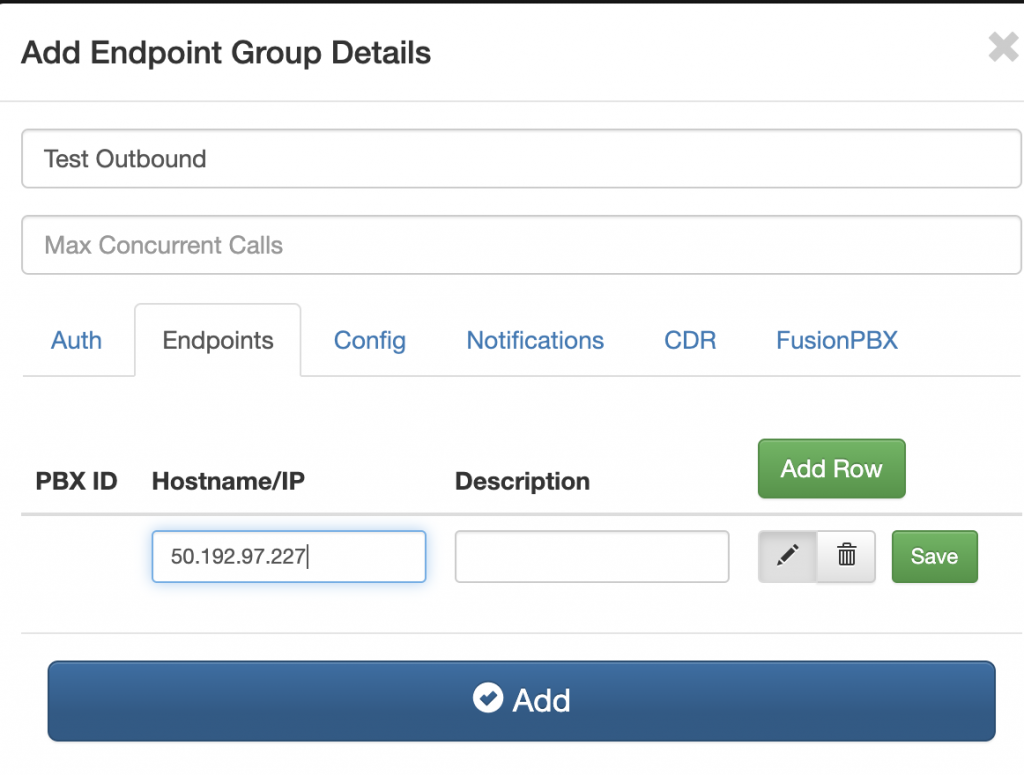
  1. Click Endpoint Groups
  2. Click Add enter “Test Endpoint” as the Friendly Name
  3. Click the Endpoint Tab and enter the IP address you will send calls from
  4. Click Add

  5. Click “Reload Kamailio”

  6. Start your softphone and configure it to send a call to dSIPRouter
Configuring Yealink W60P Cordless DECT IP Phone

The purpose of this tutorial is to explain how to configure the Yealink W60P Cordless DECT IP Phone with FreePBX, Asterisk of FusionPBX.  We will assume that you have the extension already configured in one of the aforementioned systems.  Therefore, we will focus on the steps needed to configure the phone.

I must note that the experience with configuring the Yealink W60P was much better then configuring the Panasonic KX-TGP600

The high-level steps needed to complete this are listed below.  We will go into detail for each section.

  • Locate Web Management UI IP Address
  • Log into theWeb Management UI
  • Configure the phone settings via the Web Management UI

Locate Web Management UI IP Address

  1. Pickup one of the Handsets that is registered to the base station
  2. Click OK
  3. Click OK on the (i) Icon
  4. Click OK on the BASE option
  5. The IP address of the Web Management UI (aka Base station) will be shown

Log into theWeb Management GUI

  1. Open a web browser
  2. Enter http://<IP address of the Web Management UI>
  3. Enter admin/admin as the username and password

Configure the phone settings via the Web Management GUI

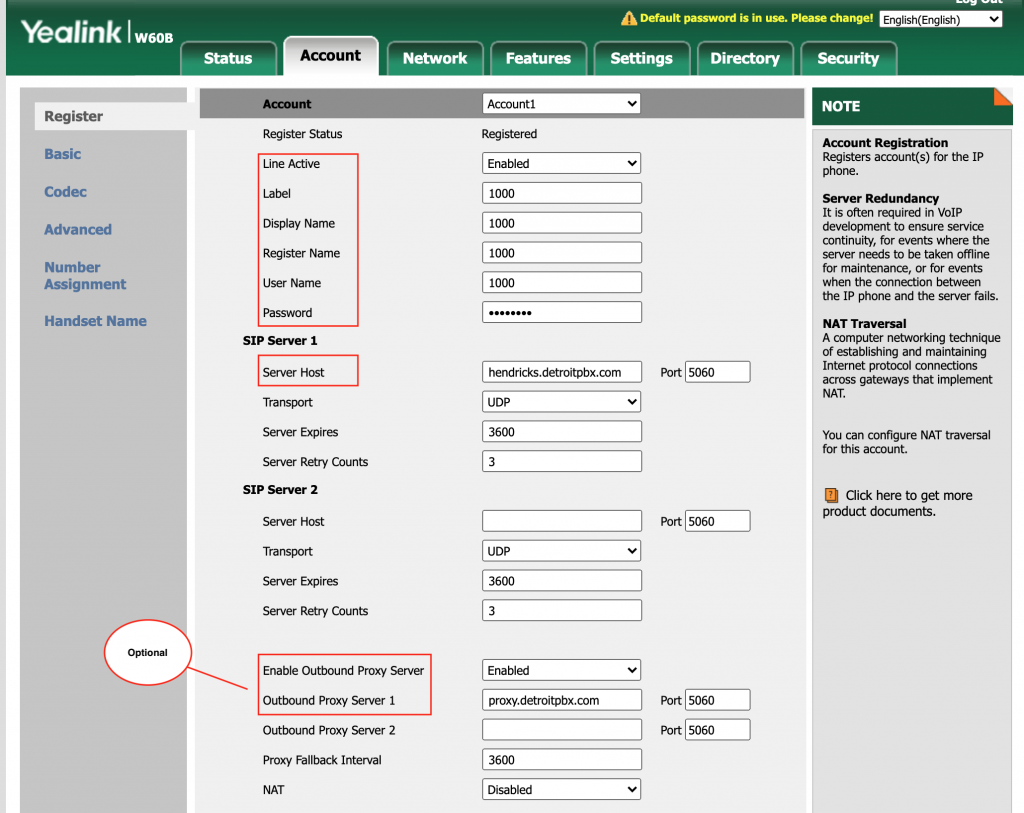
  1. Click Account
  2. Select the Account you want to configure.  We will use Account1
  3. Enter in the following required and optional fields:

Required Fields

Line Action
Label
Display Name
Register Name
Username Name
Password

Optional Fields
These fields are only needed if you have a proxy server in front of your media server such as Kamailio or OpenSIP’s

Enable Outbound Proxy Server
Outbound Proxy Server 1

FusionPBX: Configuring the Call Center Module

We will go over how to setup the call center module. The call center module is used for creating an inbound queue for connecting inbound callers with agents registered to your system.

  1. You will first need to log into your FusionPBX server via the gui

  2. Select the Domain in which you would like to set up the call center in.

  3. Select Apps→ Call Center→ plus sign(+) to add a call queue.

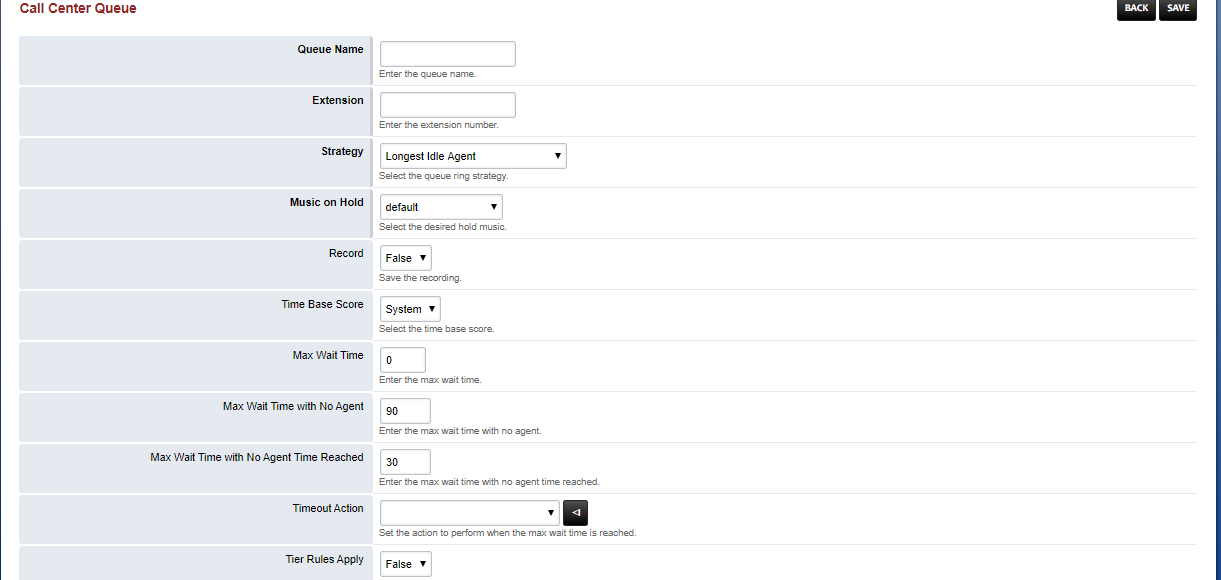
  4. Fill in the necessary information and SAVE:

  • Queue name: Reference name for the queue
  • Extension: Extension number for the queue. Make sure it is unique for the system.
  • Strategy: Strategy is the way the system will hunt for available agents. For example: if longest-idle-agent is selected, the agent who hasn’t been called for the longest time (idle) will be called first.
  • Time Base Score: This is for whether you want to add the extra seconds from the call being established to the agent call time or not. System will add it where queue will keep the time from when the queue is reached.
  • Tier Rules Apply:  Select True if you want to apply the tier rules which we will setup later

All the others fields are pretty much standard. If you would like detailed information for each field you may find it here.


  1. Click “back’ to return to the Call Center Queue then on the top right corner, Click Agent

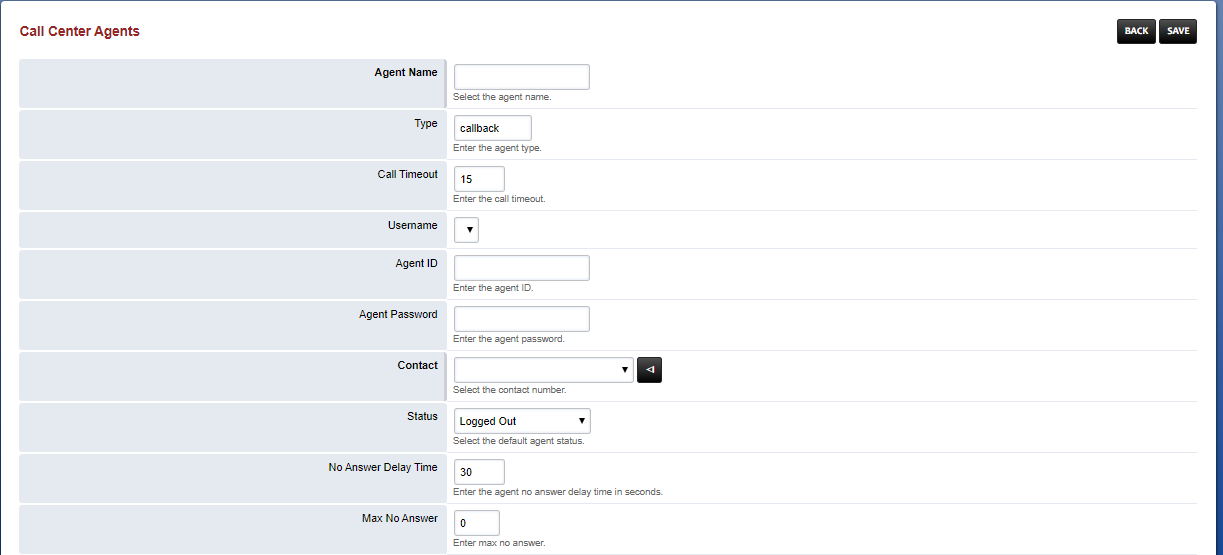
  2. Click the plus sign (+) to add agents in the Call Center Agents screen.

  3. Fill in the necessary fields:

  • Agent Name: Select the corresponding account you have created

  • Type: two types supported, callback and uuid-standby. callback will try to reach the agent via the contact fields value. uuid-standby will try to directly bridge the call using the agent uuid.

  • Contact: Select the extension you want to associate with that agent

  • Status: You can select status from here but it will be interacting with it later so its not an important field for now

  • Agent Logout: This is where you can select a time of the day where automatically the agent will be logged out. As it says it requires a service to enforce it.


While in the Call Center Agent screen you may also add a Agent ID and Password if you would like the agents to be able to log in on their own.

Note: Agent ID can be a string of numbers that will be used to select via the telephone diakpad.

Agent Call Center Log in

Agents can login to call center with *22 from the phone (hardphone or softphone) or via the FusionPBX web interface. Admin and Super Admin accounts can also log other agents in or out.