Hands-on Kamailio Deployment Course

The self-paced videos for this course are below. Thank you for purchasing the course! Enjoy -Mack Hendricks Section 1 – Intro: This video provides an overview of the course. The video mentions dSIPRouter.org, which is a UI built for Kamailio that makes it easier to install, configure and manage Kamailio. Section 2 – Kamailio Architecture: […]
To access this post, you must purchase Hands-on Kamailio Deployment Course - Self Paced.

RTPEngine Basics Course

The self-paced videos for this course are below. Thank you for purchasing the course! Enjoy -Mack Hendricks Section 1 – RTP Basics: This video sets the stage and gives you a basic understanding of RTP. It’s a great review if you haven’t worked with RTP in a while. Section 2 – RTPEngine Architecture: The section […]

Build dSIPRouter Using Terraform

Introduction

The purpose of this article is to show you how to automate the deployment of dSIPRouter using HashiCorp Terraform.  We ship a Terraform script with dSIPRouter because we do all of our development and testing against Digital Ocean.  Also, we wanted to provide you with an example of how you could implement this for other cloud providers since Terraform has providers for all of the major public clouds and on-premise environments as well.

Assumptions

  • You have a Digital Ocean API Key
  • You have a SSH Key Pair uploaded to Digital Ocean and you know it’s name

Download Terraform and Setup Environment

For congruency, we will be doing this from Windows, but doing so from Linux should be similar.  Please download the following packages (uniformity between OS’s):
  • GitBash – https://git-scm.com/download/win
  • Terraform – https://www.terraform.io/downloads
You will need to place your terraform.exe or executable in C:\Windows\System32 or /usr/local/bin or /usr/sbin, or adjust your windows host system environment variables to the download location of terraform.exe. To do so do the following: Right click This PC(MyComputer)
—>properties 
—>advanced system settings
—>environment variables
—>system variables
—>path–edit–>new

Get Repository and Setup Terraform Variables

Open a terminal window / command prompt and type the following:
export DIGITALOCEAN_TOKEN=<Digital Ocean token key>
git clone https://github.com/dOpensource/dsiprouter
cd dsiprouter/resources/terraform/do
copy terraform.tfvars.sample terraform.tfvars
terraform init
This will install the Digital Ocean provider since our terraform script is configured to work with Digital Ocean. Edit the terraform.tfvars file, which sets the values of variables needed by the terraform script.
pvt_key_path="C:/Users/alems/Working/andrew" (adjust using path format, andrew is actually the pvt key)
dsiprouter_prefix="dev"
number_of_environments=1
pub_key_name="andrew"
Once modified, you should have all you need to deploy an instance via Terraform.

Build dSIPRouter Using Terraform

Execute the following commands to build dSIPRouter from the master branch using terraform:
terraform apply
If you want to build from another branch you would pass in the branch variable with the value of the branch like this
terraform apply -var branch=v0.643
This is what it will look like as it starts to build: This is what it will look like after it’s completed: You will now be able to login to dSIPRouter using the credentials generated.

Login to dSIPRouter

You can login to dSIPRouter using the dSIPRouter WEB GUI URL and the dSIPRouter GUI Username and dSIPRouter GUI Password generated by the installer.  Enjoy!

Load Balancing FusionPBX Outbound Gateways

In certain situations you want to load balance SIP traffic between multiple SIP endpoints. These SIP endpoints are typically a Session Border Controller (SBC) in your organization or an upstream SIP provider. In any case, you need some logic that will distribute the traffic between the SIP endpoints. In the FusionPBX world (which is based on FreeSWITCH) this module is called Distributor (mod_distributor). In this article we will explain how to configure it.

Assumptions

  • You have at least two gateways defined within FusionPBX, which represents the SIP endpoints that you want to distribute traffic between.

Configuration Steps

  1. Login to FusionPBX and make sure the mod_distributor module is enabled. You can do so by going under Advanced -> Modules. Distributor should be an option to choose from, but should be disabled.  It will need to be enabled. “Enabled” should read True on the distributor line once it’s enabled.
  2. Get Gateway ID’s – right click on the Gateway name and click “Copy Address”. Open up a text editor and paste the address. The Gateway ID is the string after “id=” in the URL. Do this for all of the gateways you want to distribute traffic too.
3. Changing the mod_distributor config xml:
  • SSH to your FusionPBX server, make your way into the /etc/freeswitch directory
  • Using your favorite editor, edit autoload_configs/distributor.conf.xml and add the following:
<list name="my_list_001" total-weight="2">
<node name="978fefdd-45cd-4457-8ecd-5d82eaea3b12" weight="1"/> <!-- my_gateway_001 - its just comment with actual GW name -->
<node name="1a8d448d-e06e-2dab-b6f9-4421a98e4d8e" weight="1"/> <!-- my_gateway_002 -->
</list>
4. Save and run the following commands from the FreeSWITCH cli
fs_cli > reloadxml
fs_cli > distributor_ctl reload
5. Updated your Outbound Routing setting. You have something like this now: But, you want to change the last line to something like this: The Distributor command above takes a string value that contains a list that was defined in distributor.conf.xml and returns a gateway based on the weight defined in the configuration. In this case, “my_list_001” is the list used. This module can be used for other use cases where you need to generate random/weighted values.

Using SIPp To Load Test With a Kamailio Proxy

SIPp is a free open source tool for generating SIP traffic usually for the purpose of load testing SIP components such as a PBX.  In this walkthrough we will detail two methods of running tests using built in settings, or alternatively a generated SIPp xml file. It includes basic user agent scenarios (UAC and UAS). Also, you can use these basic agent scenarios to build call flow scenarios that fit your use cases. The scenario files are basic files that allows you to subscribe simple to very complex call flows. We will touch on a couple scenarios with a focus on load testing a SIP element such as a PBX with a Kamailio Proxy in front of it. SIPp generates SIP traffic according to the scenario specified. You can control the number of calls that are started per second. We will focus on the use of the builtin UAC scenario. At starting time, you can control the rate by specifying parameters on the command line:
  • “-sn” to specify the built in call flow scenario
  • “-sf” to specify a custom scenario file
  • “-r” to specify the call rate in number of calls per seconds
  • “-rp” to specify the “rate period” in milliseconds for the call rate (default is 1000ms/1sec). This allows you to have n calls every m milliseconds (by using -r n -rp m).
In our example, we will run SIPp at 7 calls every 2 seconds (3.5 calls per second) to a SIP Server, without a proxy:
sipp -sn uac -r 7 -rp 2000 <ip of server>
In another example, we will run SIPp at 7 calls every 2 seconds using a SIP Proxy such as Kamailio and OpenSIPS friendly scenario file. If you need help building a scenario file please contact us and we can estimate the about of hours needs to build a scenario file to meet your requirements :
sipp -sf sipproxyfriendly.xml -r 7 -rp 2000 <ip of server>
You can pause the traffic by pressing the ‘p’ key. SIPp will stop placing new calls and wait until all current calls end. You can resume the traffic by pressing ‘p’. To quit SIPp, press the ‘q’ key. SIPp will stop placing new calls and wait until all current calls end. SIPp will then exit. You can also force SIPp to quit immediately by pressing the ‘Q’ key. Current calls will be terminated by sending a BYE or CANCEL message (depending if the calls have been established or not). The same behaviour is obtained by pressing ‘q’ twice.

Enabling Secure WebSockets: FreePBX 12 and sipML5

Assumptions:

  • Using chan_sip
  • Using Chrome as your WebRTC client
  • Asterisk 11.x
  • Using FreePBX 12.0.x
  • CentOS 6.x

Download sipML 5

sipML is the WebRTC Client that we are going to use. We need to download the repository

yum install git
cd /var/www/html/
git clone https://github.com/DoubangoTelecom/sipml5.git
chown -R asterisk:asterisk sipml5/

Enable SSL on Built-in HTTP Server of Asterisk

vim /etc/asterisk/http_custom.conf

tlsenable=yes
tlsbindaddr=0.0.0.0:8089
tlscertfile=/etc/pki/tls/certs/localhost.crt
tlsprivatekey=/etc/pki/tls/private/localhost.key

We also need to give asterisk permissions to read the tls certs

chown asterisk:asterisk /etc/pki/tls/certs/localhost.crt
chown asterisk:asterisk /etc/pki/tls/private/localhost.key

Enable Extension for Secure Web Sockets (WSS)

In older version of freepbx, they do not support wss transports, so this will need to be manually configured in /etc/asterisk/sip_custom.conf replacing SOME_EXTENSION and SOMESECRET. The important line is the transport=wss,udp,tcp,tls, which will have wss as the first entry. dtlscertfile and dtlsprivatekey will need to be pointed at the same key cert and key setup in http_custom.conf

[SOME_EXTENSION]
deny=0.0.0.0/0.0.0.0
secret=1234pccw
dtmfmode=rfc2833
canreinvite=no
context=from-internal
host=dynamic
trustrpid=yes
mediaencryption=yes
sendrpid=pai
type=friend
nat=force_rport,comedia
port=5060
qualify=yes
qualifyfreq=60
transport=wss,udp,tcp,tls
avpf=yes
force_avp=no
icesupport=yes
encryption=yes
callgroup=
pickupgroup=
dial=SIP/1103
permit=0.0.0.0/0.0.0.0
callerid=SOME_EXTENSION
callcounter=yes
faxdetect=no
cc_monitor_policy=generic
dtlsenable=yes
dltsverify=no
dtlscertfile=/etc/pki/tls/certs/localhost.crt
dtlsprivatekey=/etc/pki/tls/private/localhost.key

Configure sipML5 expert mode

Browse to https://<server-name>/sipml5. Make sure you include the https and click on the demo button. You should now be at a registration screen. Enter in the extension you would like to register as in the display name and private identity. The public identity will follow the following format:

sip:<Extensions>@<ip-address>

The password will be the secret set for your extensions and the realm will be the ip address or domain name of your server.

We also need to configure expert mode to set the wss address and stun settings.

Under expert mode, the WebSocket Server URL follows the following syntax:

wss://<ip-of-server>:8089/ws

Then set the ice server to the following google address:

[{stun.l.google.com:19302}]

Finally select Enable RTCWeb Breaker and hit save.

You should now be able to register to your extension. To troubleshoot, you can bring up the console in chrome by right clicking and selecting inspect. Additionally, make sure you have opened the necessary wss and rtp ports in your firewall (8089/tcp, 10000-20000/udp)

Start up two instances of Chrome and test

To make a call between two webrtc phones, you will need to install chromium, an open source version of the Google Chrome browser. You can alternatively use two computers with chrome installed. You can add a second extension in /etc/asterisk/sip_custom.conf following the same syntax as the previous extension. After an asterisk restart, you should be able to register to the new extension using the same methods and place a call between the two browsers.

Site-to-Site VPN Options Using AWS

We recently worked with a customer that had a requirement that their application needed to connect via Site-to-Site VPN to there clients application.  They had a few choices, but they decided to move there application to Amazon Web Services  (AWS) and connect to there clients datacenter from there.  Therefore we setup a Virtual Private Cloud (VPC) within Amazon and started down the path of setting up a Site-to-Site Virtual Private Network (VPN) connection.

There are multiple ways of implementing a VPN within Amazon as discussed here.  In most cases, it’s going to come down to using a AWS Hardware VPN or a Software VPN.  The AWS Hardware VPN can be configured within a couple clicks and it gives you the option to generate the configuration for multiple well known firewalls, which  you can use to configure your firewall or you can provide to your firewall administrator.  The Software VPN consists of running an EC2 instance that has software that implements VPN functionality.

The main factor in deciding AWS Hardware VPN versus Software VPN should be based on who’s initiating the traffic.  In our case, the customers application needed to initiate the request.  This means that we had to leverage the Software VPN approach because the AWS Hardware VPN can not initiate traffic.  It can only accept request.  So, it’s great for a company that wants to migrate systems from there datacenter to Amazon and then have there user access the systems. Hence, their users are the initiators of the traffic.

The installation and setup of a Software VPN isn’t really that difficult, but you have to have some basic understanding of how AWS networking works.  There are a few Software VPN implementations, but we selected OpenSWAN.  There’s a few good articles that we used.

One of the main gotcha’s in setting up OpenSwan are to ensure that the Access Control List (ACL) defined by the far end (the Router that you are establishing the VPN with) matches the Right side configuration parameter within the setup.  Once you read thru the above articles you will know what I mean.

The average time to setup an AWS Hardware VPN is 5 hours.  This includes configuration, testing and turn-up with the far end.

The average time to setup a Software VPN is 10-20 hours.  It really depends on the complexity of the Amazon VPC and how you need traffic to be routed and represented.

About dOpenSource

We provide Amazon Web Services (AWS) consulting with a focus on DevOPs and Infrastructure Migration.
We are proud to be based in Detroit, MI with coverage from 9am-8pm ET.  We have staff on the East and
West Coast.  You can purchase support from us by going to http://dopensource.com/shop

Configuring FreePBX and Aastra Phones

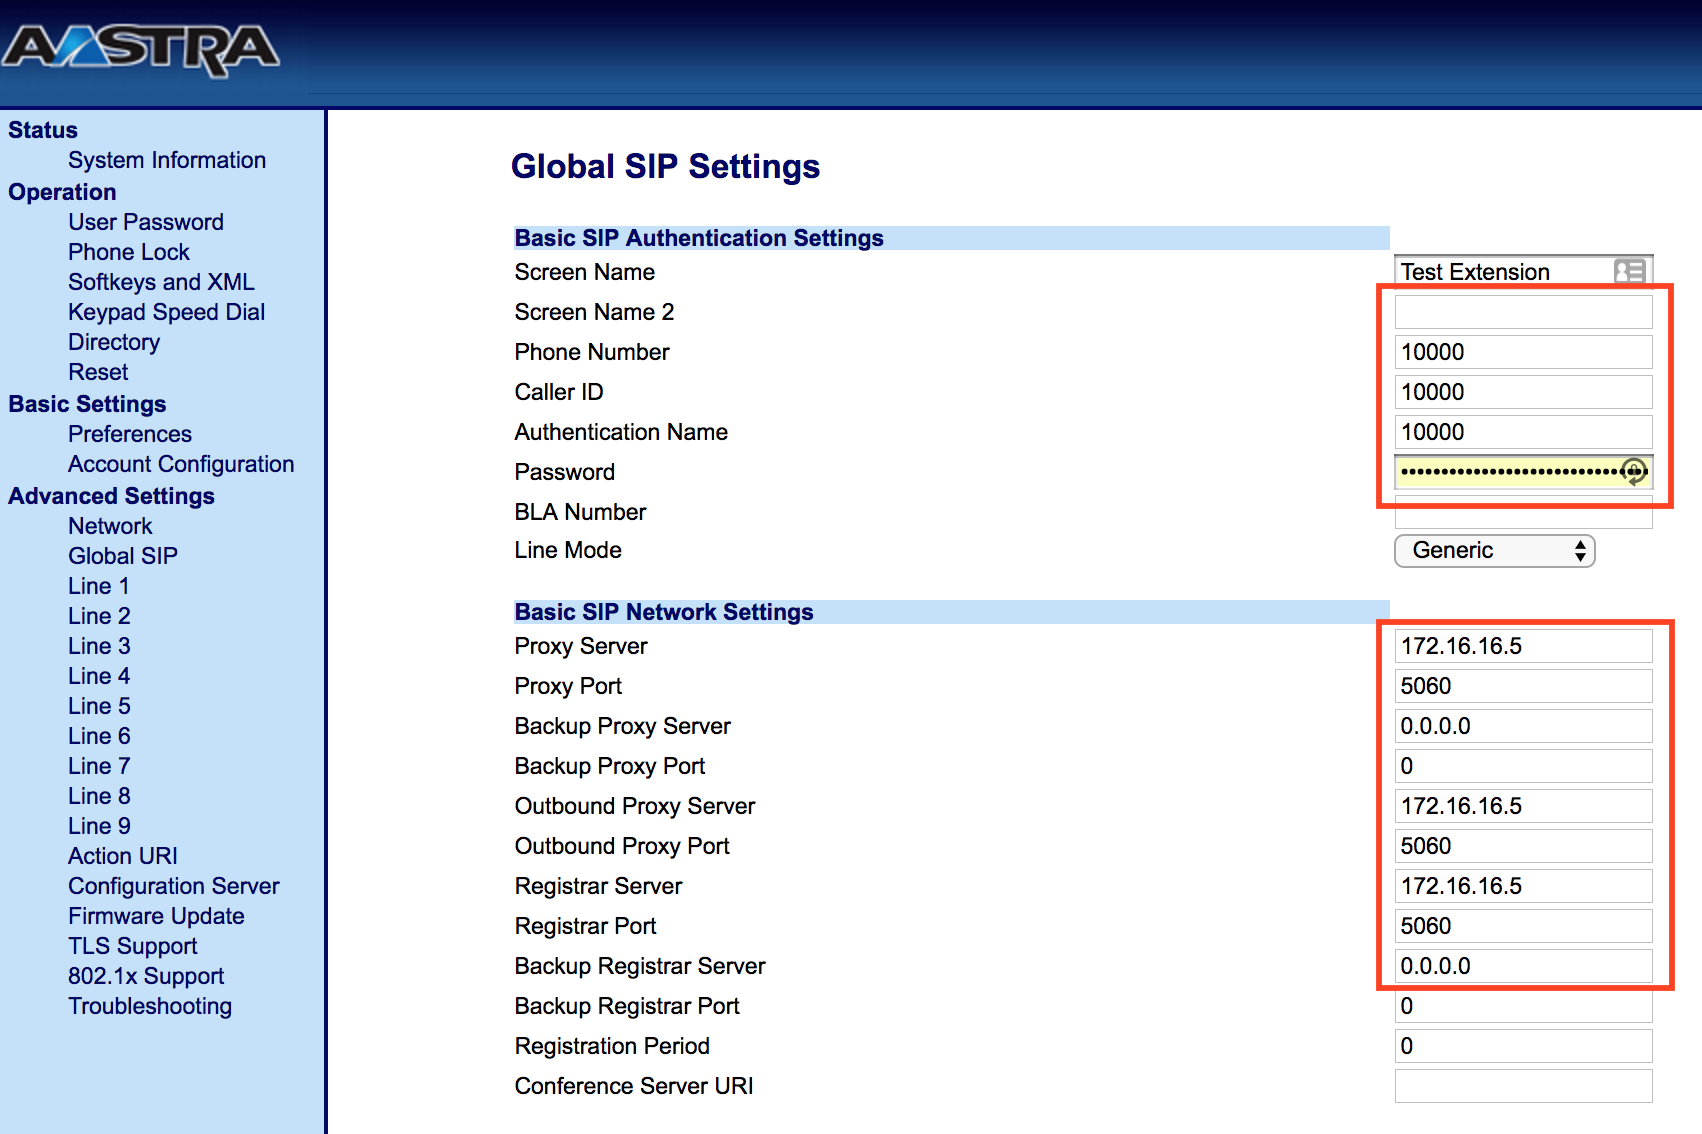
This quick article explains how to configure Aastra phones to register with FreePBX 13.x as an extension.

In order to manually provision phones you need the following basic information:

  • Server IP
  • Server Port (the default is 5060)
  • Extension
  • Secret (the password for the phone)

In our example, lets assume the following internal network info for the FreePBX server:

  • Server IP: 172.16.16.5 |
  • Server Port: 5060

You now need the Extension and Secret. This can be found by logging into the FreePBX GUI and going to extensions section of the interface. You will see a list of extensions. Below we only show one extension, which is 10000

extension list

You can click on that extension and locate the Secret, which is outlined in red.

extension list

Now that you have this information you can login to the Aastra phone and click on “Global SIP”. You will enter the Extension and Secret into the fields that are outlined at the top and the Server IP and Server Port will replace the data outlined at the bottom.

aastra phone global sip settings

Note – you will need to reboot your phone after configuring the phone.

IP Address of XenServer VM’s Using the Command Line

Issue: Needed to get the IP address of a VM running on my XenServer.

Resolution: Execute this command

xe vm-list params=name-label,networks | grep -v "^$"

The command yielded me a list of the VM’s with the ip address.

name-label ( RW) : DevStackOSDomU
networks (MRO): 2/ip: 172.24.4.10; 1/ip: 10.255.255.255; 0/ip: 10.10.10.187
name-label ( RW) : Control domain on host: warrier.dopensource.com
networks (MRO): <not in database>


Note, I only had 1 VM on this Xenserver, but I needed the IP address:


FreeSWITCH 1.6 Quick Install Guide for Debian Jessie

Our Goal

There’s a lot of FreeSWITCH material out on the web.  Our goal is to provide you a concise document that provides the necessary steps or scripts to install the latest stable release of FreeSWITCH.

What is FreeSWITCH

FreeSWITCH is an OpenSource VoIP platform that enables you to build communication platforms that span from a simple PBX to a sophisticated backend communication framework that allows thousands of calls to interconnect per second.

Assumptions

  • Debian Jessie is installed
  • You have root or sudo access via the CLI

Let’s Install (with Explanation of each command)

  • Install Public Key: We need to install the FreeSWITCH public key so that we validate the packages that we are going to install came from FreeSWITCH.org and was not tampered with.
    wget -O - https://files.freeswitch.org/repo/deb/debian/freeswitch_archive_g0.pub | apt-key add -
    
  • Setup Repository: Setup the Debian repository file with the necessary configuration to download the FreeSWITCH packages
    echo "deb http://files.freeswitch.org/repo/deb/freeswitch-1.6/ jessie main" > /etc/apt/sources.list.d/freeswitch.list 
    
  • Install the Packages: We will first update our local repository using apt-get update, which will obtain the metadata of the FreeSWITCH packages since we just added the FreeSWITCH repository. It will also update the metadata for other repositories as well. Lastly, we will install FreeSWITCH using the apt-get install -y freeswitch-meta-all command
    apt-get update && apt-get install -y freeswitch-meta-all
    
  • Secure the Extensions: By default all of the extensions have a password of 1234. FreeSWITCH will warn you that all extensions are using a default password of 1234 and ask that you change it by putting an entry in the /var/log/freeswitch/freeswitch.log file. Also, it will delay any outbound calls for a few seconds. You can change the default password by running these commands.
    sed -i "s/1234/10082013/" /etc/freeswitch/vars.xml
    fs_cli -x reloadxml
    

    Where the extension passwords will now be 10082013. You can change the default password by just replacing 10082013 with your password.

Register SIP Phones

Now we can validate that the install was successful. We can do this by registering 1 or more SIP phones. The default install of FreeSWITCH comes with a set of users. Let’s register extension 1000 and 1001 with two separate VoIP phones and make calls between the sip phones. Remember that your password for each extension is 10082013 or whatever you manually changed it too.