Configuring Yealink W60P Cordless DECT IP Phone

The purpose of this tutorial is to explain how to configure the Yealink W60P Cordless DECT IP Phone with FreePBX, Asterisk of FusionPBX.  We will assume that you have the extension already configured in one of the aforementioned systems.  Therefore, we will focus on the steps needed to configure the phone.

I must note that the experience with configuring the Yealink W60P was much better then configuring the Panasonic KX-TGP600

The high-level steps needed to complete this are listed below.  We will go into detail for each section.

  • Locate Web Management UI IP Address
  • Log into theWeb Management UI
  • Configure the phone settings via the Web Management UI

Locate Web Management UI IP Address

  1. Pickup one of the Handsets that is registered to the base station
  2. Click OK
  3. Click OK on the (i) Icon
  4. Click OK on the BASE option
  5. The IP address of the Web Management UI (aka Base station) will be shown

Log into theWeb Management GUI

  1. Open a web browser
  2. Enter http://<IP address of the Web Management UI>
  3. Enter admin/admin as the username and password

Configure the phone settings via the Web Management GUI

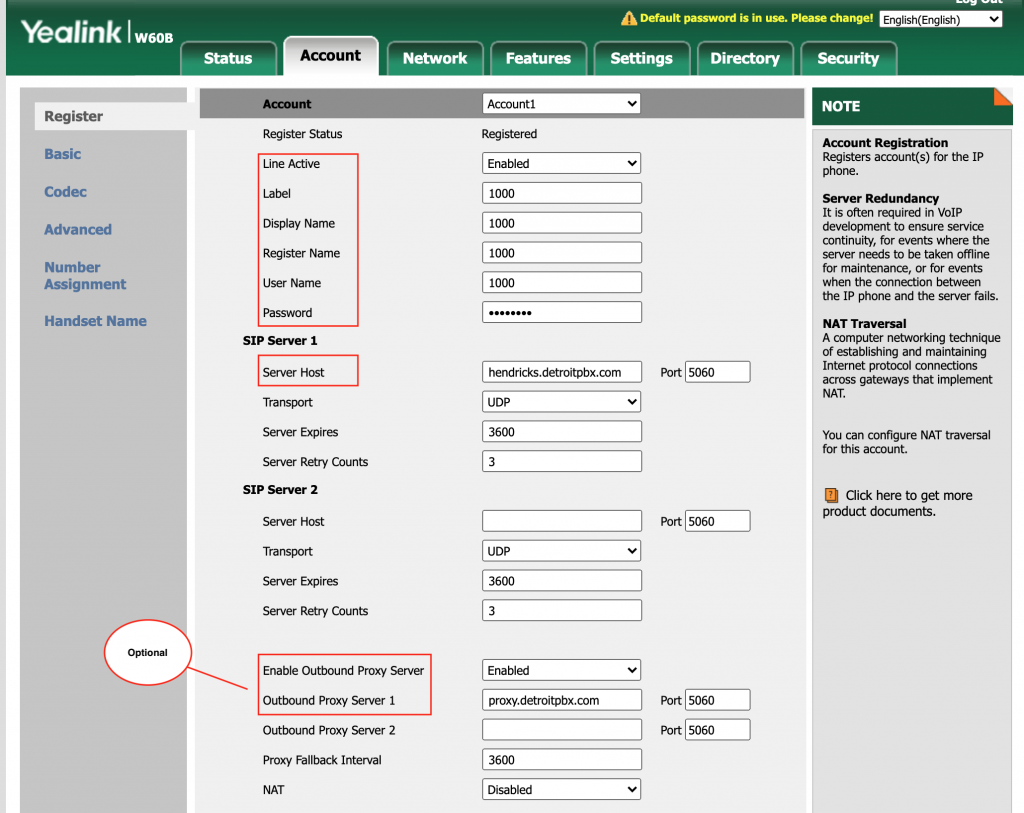
  1. Click Account
  2. Select the Account you want to configure.  We will use Account1
  3. Enter in the following required and optional fields:

Required Fields

Line Action
Label
Display Name
Register Name
Username Name
Password

Optional Fields
These fields are only needed if you have a proxy server in front of your media server such as Kamailio or OpenSIP’s

Enable Outbound Proxy Server
Outbound Proxy Server 1

Debugging A Call In FreePBX / Asterisk

The purpose of this article is to explain how to track down what happened to a call in Asterisk.

Suppose you want a call trace from a specific call that has already happened, so it’s too late to see it in the console live. First locate the call in the CDR, and get the uniquieid from the system column for the call in question:

Login to the Asterisk/FreePBX Server and grep the Asterisk full logs for that value:

[root@34693894 ~]# grep 1518526777.67 /var/log/asterisk/full*
/var/log/asterisk/full-20180214:[2018-02-13 08:59:37] VERBOSE[24184][C-00000001] pbx.c: Executing [s@macro-user-callerid:1] Set("SIP/5002-00000001", "TOUCH_MONITOR=1518526777.67") in new stack
/var/log/asterisk/full-20180214:[2018-02-13 08:59:37] VERBOSE[24184][C-00000001] pbx.c: Executing [700@from-internal:37] QueueLog("SIP/5002-00000001", "700,1518526777.67,NONE,DID,") in new stack

This will return a few lines, which will include the Asterisk CALL-ID (not to be confused with CallerID), the second number in the square brackets. It will also return a file name, as full logs are rotated daily and purged weekly. Perform a second grep on the CALL-ID and filename like:

[root@34693894 ~]# grep C-00000001 /var/log/asterisk/full-20180214
[2018-02-13 08:59:37] VERBOSE[29432][C-00000001] netsock2.c: Using SIP RTP TOS bits 184
[2018-02-13 08:59:37] VERBOSE[29432][C-00000001] netsock2.c: Using SIP RTP CoS mark 5
[2018-02-13 08:59:37] VERBOSE[24184][C-00000001] pbx.c: Executing [700@from-internal:1] Macro("SIP/5002-00000001", "user-callerid,") in new stack
[2018-02-13 08:59:37] VERBOSE[24184][C-00000001] pbx.c: Executing [s@macro-user-callerid:1] Set("SIP/5002-00000001", "TOUCH_MONITOR=1518526777.67") in new stack
[2018-02-13 08:59:37] VERBOSE[24184][C-00000001] pbx.c: Executing [s@macro-user-callerid:2] Set("SIP/5002-00000001", "AMPUSER=5002") in new stack
[2018-02-13 08:59:37] VERBOSE[24184][C-00000001] pbx.c: Executing [s@macro-user-callerid:3] GotoIf("SIP/5002-00000001", "0?report") in new stack

References:

https://wiki.freepbx.org/display/SUP/Providing+Great+Debug

Configuring Panasonic KX-TGP600

The purpose of this tutorial is to explain how to configure a Panasonic KX-TGP600 phone with FreePBX or Asterisk.  We will assume that you have the extension already configured in FreePBX or Asterisk.  Therefore, we will focus on the steps needed to configure the phone.

The high-level steps needed to complete this are listed below.  We will go into detail for each section.

  • Enable Web Management GUI
  • Accessing the Web Management GUI
  • Configure the phone settings via the Web Management GUI

Enable Web Management GUI

The first step is to enable the embedded web function on the phone. This is done by using the cordless phone’s handset and following the steps listed below:

  • Turn on the phone and select the Menu function
  • Select the Setting Handset option
  • Select the Other option
  • Select the Embedded Web option
  • Select the On option

Important Note: The Embedded command that you select on the phone, will only last less than 5 minutes before it switches back off. If, at some point, you are unable to log into the Web Management GUI or you find that the Management GUI loses connection, then repeat the instructions for Enabling the Web GUI listed above to turn the Embedded Web feature back on. Refresh the web page or log back in.

Once these steps are completed, you are now ready for the next step which is Accessing the Web Management GUI in order to program your phone.


Accessing the Web Management GUI

Before you are able to access the Web Management GUI, you must first know the cordless phone’s IP address. An easy way to get this, is using the phone’s handset again and following the steps listed below:

  1. Turn on the handset and select the Menu option
  2. Select the System Settings icon
  3. Select the Status option
  4. Select the IPv4 Settings option
  5. Select the IP Address option

You now have access to the IP address for your Panasonic phone.

Configure the phone settings via the Web Management GUI

The IP address listed on the handset’s display, is what you will type into your web browser in order to access the Web Management GUI.

After entering in the phone’s IP address, a window will popup asking for the phone’s User Name and Password.

The default login for the Panasonic KX-TGP600 phone is:

User Name: admin

Password: adminpass

  1. Once you are logged in, select the VoIP tab
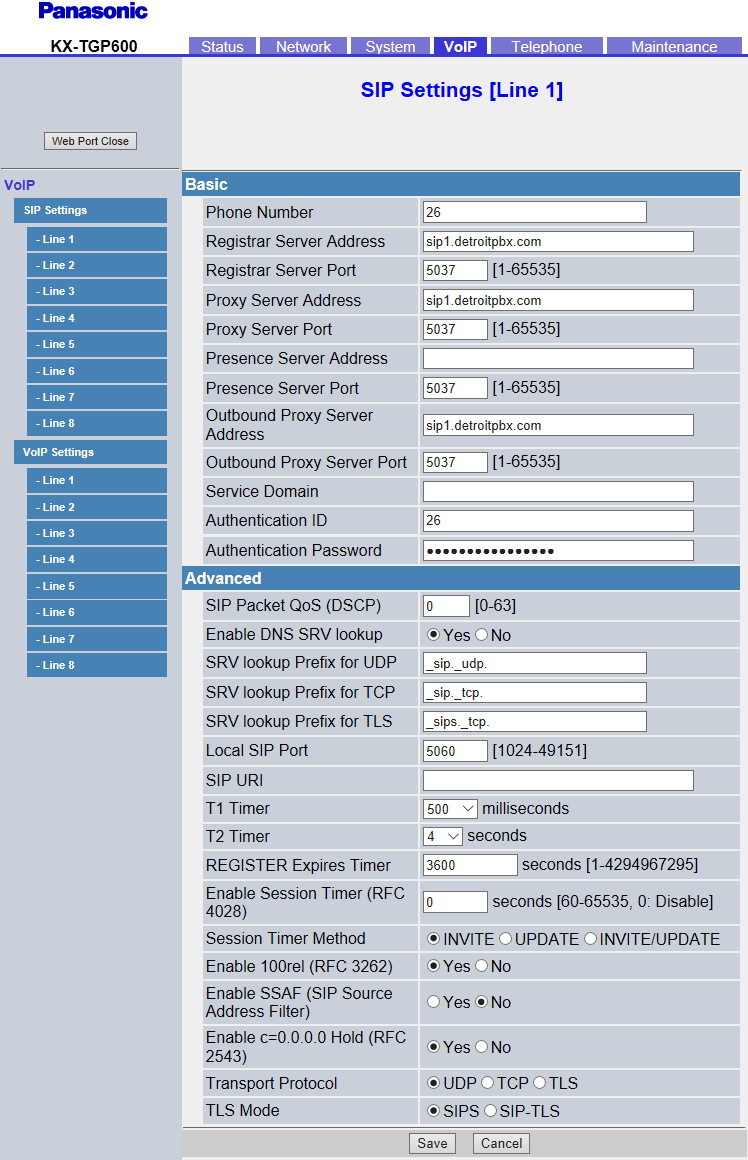
  2. Under the SIP Settings listed on the left side under VoIP, click on the Line 1 option. The screen should now be titled SIP Settings [Line 1]
  3. Enter the extension number in the fields labeled Phone Number and Authentication ID
  4. Enter the SIP address in the fields labeled Registrar Server Address, Proxy Server Address and Outbound Proxy Server address
  5. Enter the Server Port in the fields labeled Registrar Server Port, Proxy Server Port, Presence Server Port and the Outbound Proxy Server Port
  6. Enter the extension’s secret (the password for the phone) into the field labeled Authentication password.
  7. Click on the button labeled Save at the bottom of the page.
  8. Restart the phone. Wait for it to finish loading back up. You will hear a dial-tone when it is finished and ready for use.

Congrats, your phone is now configured and is ready to move on the next section, Testing the Phone.


Here is an example of a completed Web Management GUI screen:


Testing the phones

Once you have entered all of the information above,  clicked on the Web Management GUI’s save button, you are now free to test the phone by making incoming and outgoing phone calls.

Enabling Secure WebSockets: FreePBX 12 and sipML5

Assumptions:

  • Using chan_sip
  • Using Chrome as your WebRTC client
  • Asterisk 11.x
  • Using FreePBX 12.0.x
  • CentOS 6.x

Download sipML 5

sipML is the WebRTC Client that we are going to use. We need to download the repository

yum install git
cd /var/www/html/
git clone https://github.com/DoubangoTelecom/sipml5.git
chown -R asterisk:asterisk sipml5/

Enable SSL on Built-in HTTP Server of Asterisk

vim /etc/asterisk/http_custom.conf

tlsenable=yes
tlsbindaddr=0.0.0.0:8089
tlscertfile=/etc/pki/tls/certs/localhost.crt
tlsprivatekey=/etc/pki/tls/private/localhost.key

We also need to give asterisk permissions to read the tls certs

chown asterisk:asterisk /etc/pki/tls/certs/localhost.crt
chown asterisk:asterisk /etc/pki/tls/private/localhost.key

Enable Extension for Secure Web Sockets (WSS)

In older version of freepbx, they do not support wss transports, so this will need to be manually configured in /etc/asterisk/sip_custom.conf replacing SOME_EXTENSION and SOMESECRET. The important line is the transport=wss,udp,tcp,tls, which will have wss as the first entry. dtlscertfile and dtlsprivatekey will need to be pointed at the same key cert and key setup in http_custom.conf

[SOME_EXTENSION]
deny=0.0.0.0/0.0.0.0
secret=1234pccw
dtmfmode=rfc2833
canreinvite=no
context=from-internal
host=dynamic
trustrpid=yes
mediaencryption=yes
sendrpid=pai
type=friend
nat=force_rport,comedia
port=5060
qualify=yes
qualifyfreq=60
transport=wss,udp,tcp,tls
avpf=yes
force_avp=no
icesupport=yes
encryption=yes
callgroup=
pickupgroup=
dial=SIP/1103
permit=0.0.0.0/0.0.0.0
callerid=SOME_EXTENSION
callcounter=yes
faxdetect=no
cc_monitor_policy=generic
dtlsenable=yes
dltsverify=no
dtlscertfile=/etc/pki/tls/certs/localhost.crt
dtlsprivatekey=/etc/pki/tls/private/localhost.key

Configure sipML5 expert mode

Browse to https://<server-name>/sipml5. Make sure you include the https and click on the demo button. You should now be at a registration screen. Enter in the extension you would like to register as in the display name and private identity. The public identity will follow the following format:

sip:<Extensions>@<ip-address>

The password will be the secret set for your extensions and the realm will be the ip address or domain name of your server.

We also need to configure expert mode to set the wss address and stun settings.

Under expert mode, the WebSocket Server URL follows the following syntax:

wss://<ip-of-server>:8089/ws

Then set the ice server to the following google address:

[{stun.l.google.com:19302}]

Finally select Enable RTCWeb Breaker and hit save.

You should now be able to register to your extension. To troubleshoot, you can bring up the console in chrome by right clicking and selecting inspect. Additionally, make sure you have opened the necessary wss and rtp ports in your firewall (8089/tcp, 10000-20000/udp)

Start up two instances of Chrome and test

To make a call between two webrtc phones, you will need to install chromium, an open source version of the Google Chrome browser. You can alternatively use two computers with chrome installed. You can add a second extension in /etc/asterisk/sip_custom.conf following the same syntax as the previous extension. After an asterisk restart, you should be able to register to the new extension using the same methods and place a call between the two browsers.

Configuring FreePBX and Aastra Phones

This quick article explains how to configure Aastra phones to register with FreePBX 13.x as an extension.

In order to manually provision phones you need the following basic information:

  • Server IP
  • Server Port (the default is 5060)
  • Extension
  • Secret (the password for the phone)

In our example, lets assume the following internal network info for the FreePBX server:

  • Server IP: 172.16.16.5 |
  • Server Port: 5060

You now need the Extension and Secret. This can be found by logging into the FreePBX GUI and going to extensions section of the interface. You will see a list of extensions. Below we only show one extension, which is 10000

extension list

You can click on that extension and locate the Secret, which is outlined in red.

extension list

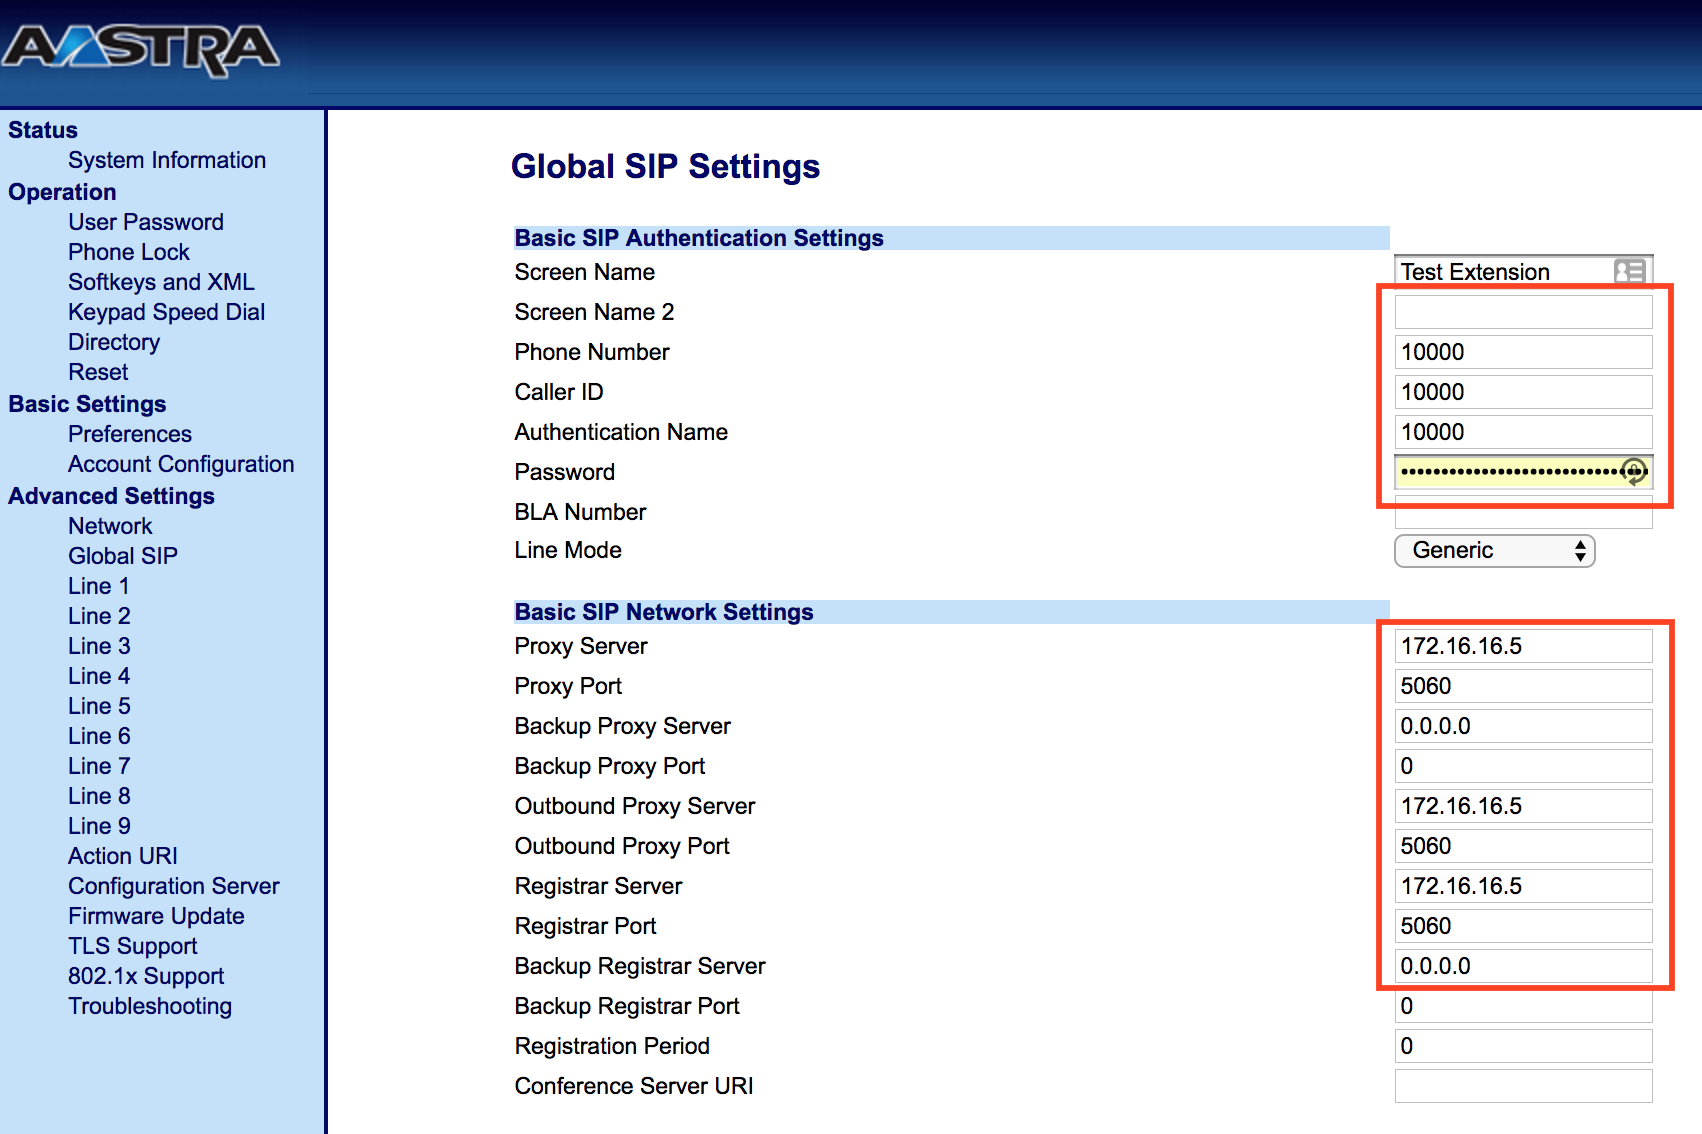
Now that you have this information you can login to the Aastra phone and click on “Global SIP”. You will enter the Extension and Secret into the fields that are outlined at the top and the Server IP and Server Port will replace the data outlined at the bottom.

aastra phone global sip settings

Note – you will need to reboot your phone after configuring the phone.

Installing Asterisk 14 on Debian 8

In this article we will go over how to compile the asterisk 14 beta. There are a few new features to play with in this new release.

I recommend bringing your system up to date before trying out the new version of asterisk.

apt update && apt upgrade

Now we need to make sure we have all the dependencies for asterisk and the capability of compiling new software.

apt install build-essential openssl libxml2-dev libncurses5-dev uuid-dev sqlite3 libsqlite3-dev pkg-config libjansson-dev

I like to put all my source code I plan on compiling in /usr/local/src, so we will start out by downloading the source and un taring.

cd /usr/local/src/
wget http://downloads.asterisk.org/pub/telephony/asterisk/asterisk-14.0.0-beta2.tar.gz
tar -xzf asterisk-14.0.0-beta2.tar.gz
cd asterisk-14.0.0-beta2/

Now we can compile asterisk.

./configure
make
make install 
make samples

Once asterisk is finished you should have an asterisk binary in /usr/sbin/asterisk

root@asterisk-14-deb:/etc/asterisk# whereis asterisk
asterisk: /usr/sbin/asterisk /usr/lib/asterisk /etc/asterisk /usr/include/asterisk /usr/include/asterisk.h /usr/share/man/man8/asterisk.8

The configuration files are stored in /etc/asterisk/

Let’s start by adding some users to register as in /etc/asterisk/sip.conf. Add the following at the end of the file.

[100]
type=friend
username=100
secret=somenewsecret
context=test
host=dynamic
qualify=yes

[101]
type=friend
username=101
secret=somenewsecret
context=test
host=dynamic
qualify=yes
  • You should replace the secret with some other long hash.

In /etc/asterisk/extensions.conf we need to add a dialplan to route calls to these new users.

Add the following at the end of /etc/asterisk/extensions.conf

[test]
exten => 100,1,Dial(SIP/100)
exten => 101,1,Dial(SIP/101)
  • This is creating a new context, test and allowing either phone to dial each other.

Setup systemd for Asterisk.

We will first want to create a user to run asterisk as. It is generally a good idea to not run processes as root unless you need to.

useradd -r -s /bin/false asterisk

We will also need to give the asterisk user permissions over the needed directories.

chown -R asterisk /etc/asterisk/
chown -R asterisk /var/lib/asterisk/
chown -R asterisk /var/run/asterisk/
chown asterisk /usr/sbin/asterisk
chown -R asterisk /var/log/asterisk/

Create a new file at /etc/systemd/system/asterisk.service

vim /etc/systemd/system/asterisk.service

and add the following.

[Unit]
Description=Asterisk PBX And Telephony Daemon
After=network.target

[Service]
User=asterisk
Group=asterisk
Environment=HOME=/var/lib/asterisk
WorkingDirectory=/var/lib/asterisk
ExecStart=/usr/sbin/asterisk -f -C /etc/asterisk/asterisk.conf
ExecStop=/usr/sbin/asterisk -rx 'core stop now'
ExecReload=/usr/sbin/asterisk -rx 'core reload'

[Install]
WantedBy=multi-user.target

We should now be able to control asterisk via systemd. To start asterisk issue the following.

systemctl start asterisk

and to make asterisk start when the server boots

systemctl enable asterisk

You should now be able to register your phones to extension 100 and 101 on your new Asterisk 14 server. Once registered, you can connect to the asterisk console with asterisk -rv.

asterisk -rv
asterisk-14-deb*CLI> sip show peers
Name/username             Host                                    Dyn Forcerport Comedia    ACL Port     Status      Description                      
100/100                   192.168.1.10                            D  Auto (Yes) No             5060     OK (45 ms)                                   
101/101                   (Unspecified)                            D  Auto (No)  No             0        UNKNOWN                                      
2 sip peers [Monitored: 1 online, 1 offline Unmonitored: 0 online, 0 offline]
asterisk-14-deb*CLI>
Autoscaling an Asterisk Cluster Using Docker Images – Part 1: Setting Up the Plumbing

Series Intro

This series of articles will give you the information you need to standup a cluster of Asterisk servers using Docker containers, which we categorize as media servers where traffic will be load balanced by Kamailio.

Part I Intro

In this article we will configure the plumbing of the cluster and deploy a couple of Asterisk containers (media servers). At the end of this article you will understand how to setup a basic Docker cluster that can automatically discover and auto register Asterisk servers to the cluster.

Bootstrapping the Cluster

Let’s start by setting up the main components of the cluster. We will use Consul, which was developed by HashiCorp to provide the plumping for our cluster. This plumbing includes Service Discovery, DNS, Event notification and other services that we may discuss later on in this series. The documentation for Consul can be found at <https://www.consul.io/docs/index.html>

The prerequisite is to have docker installed

We can start the cluster by running:

docker run -d -p 0.0.0.0:8400:8400 -p 0.0.0.0:8500:8500 -p 0.0.0.0:8600:8600/udp --volume=/var/run/docker.sock:/tmp/docker.sock --name consul -h voiphost1 docker.io/consul agent -ui -server -bootstrap-expect 1 -client 0.0.0.0

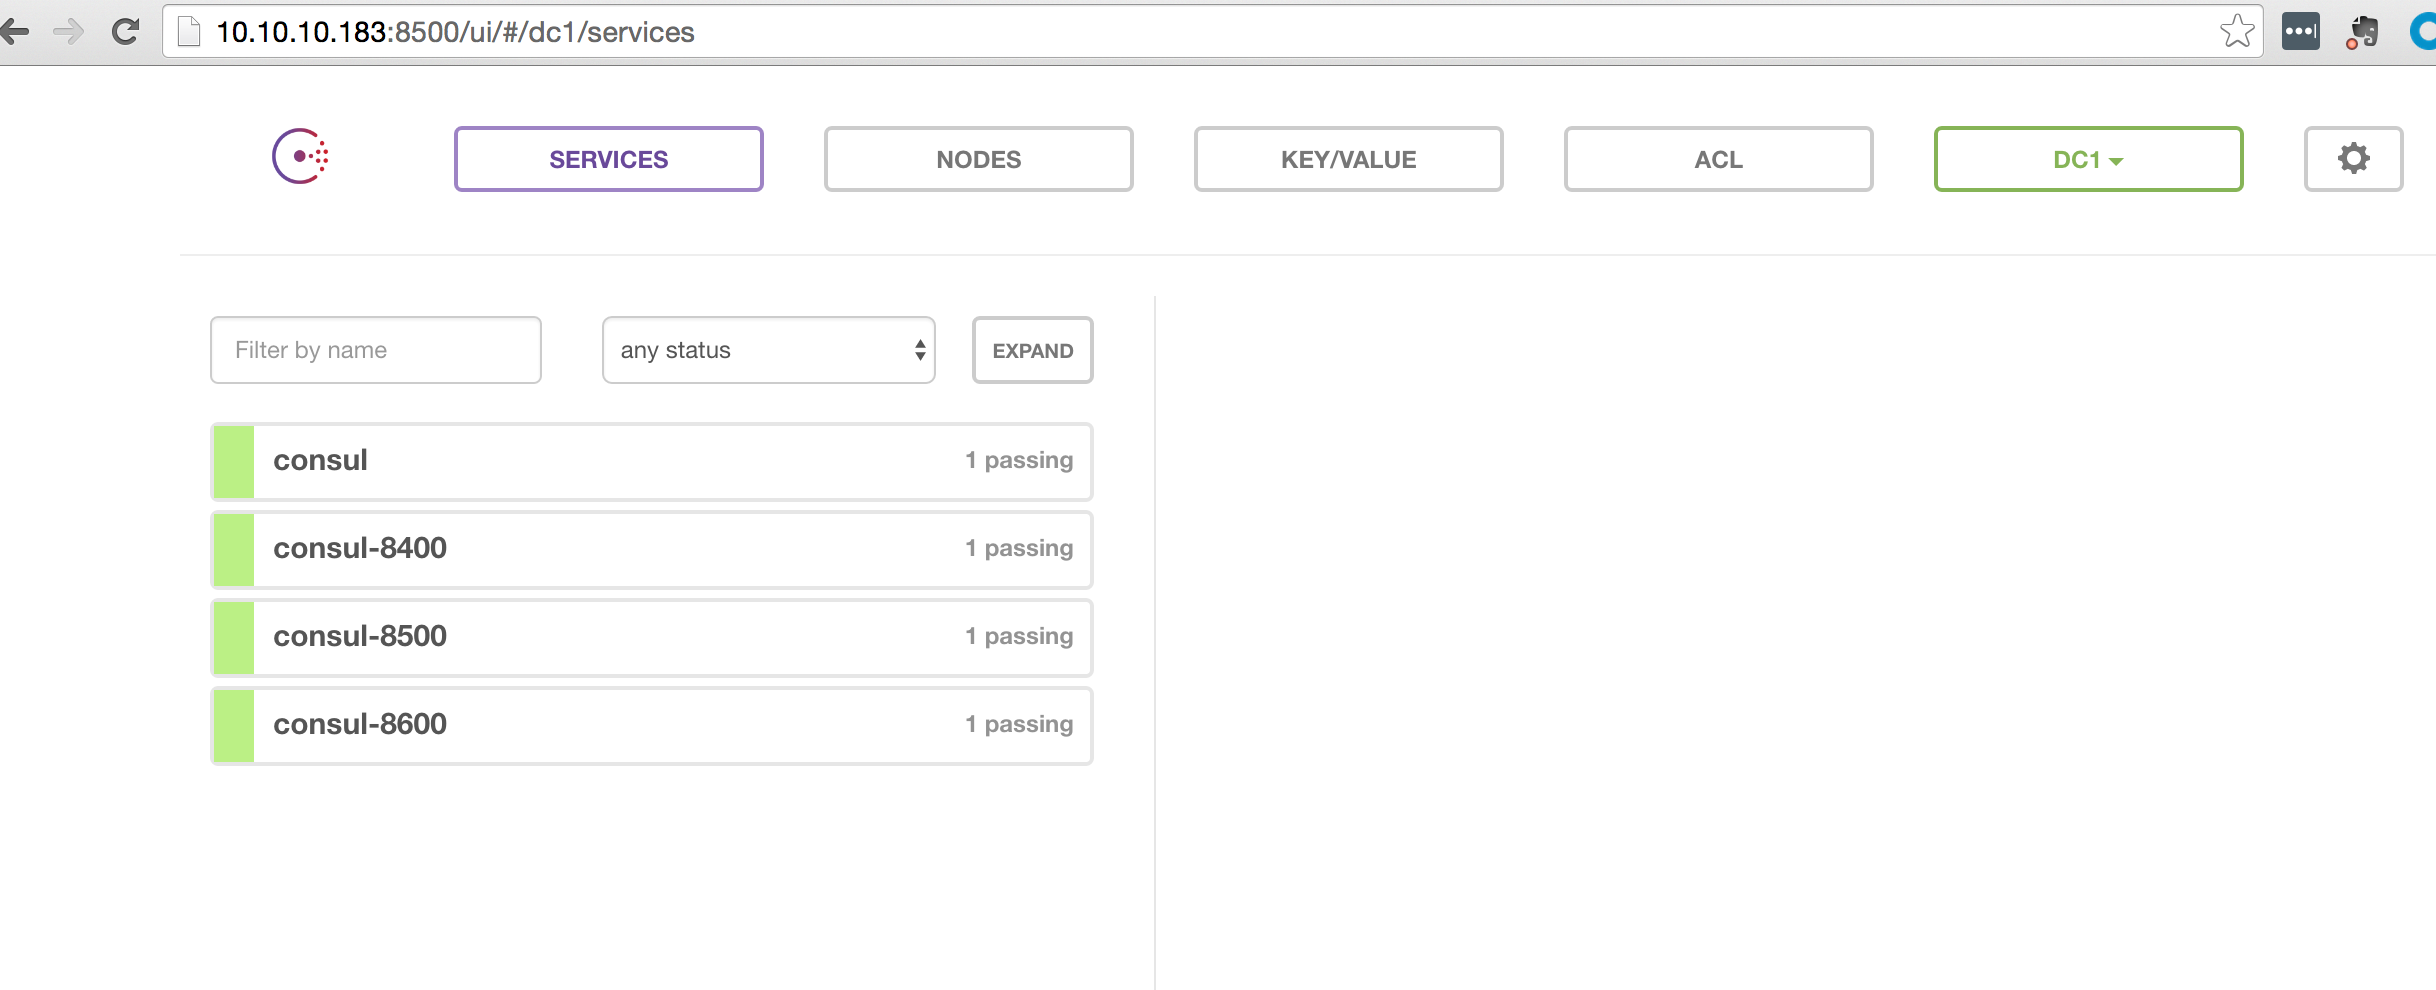
The above command will start the cluster and make the Consul web interface available on the host machine via port 8500 and make a DNS interface available to us on port 8600. Below is a screenshot of the Consul web interface after running the above command.

picture of the consul UI when it first starts

Now we need to have a mechanism to automatically register Asterisk servers with the cluster and specify the SIP ports that the server is listening on. For example, we might want to spin up 3 Asterisk servers to handle the load. We need to have a way to tell the cluster the IP address and the Asterisk SIP port number of these servers without having to manually configure the cluster. This is done using Registrator, which was developed by GliderLabs.

You can start Registrator by by running:

docker run -d -v /var/run/docker.sock:/tmp/docker.sock --privileged gliderlabs/registrator:latest consul://10.10.10.183:8500

The above command will start the Registrator container and listen for Docker events using the Unix socket (/var/run/docker.sock). This port acts as a control port for Docker. We will dig deeper into this socket in upcoming articles. All we need to understand right now is that start/stop events is sent via this socket each time a Docker container is started or stopped. We use the volume option (-v) to make the socket available to the Registrator container on /tmp/docker.sock. The last parameter specifies the registry that events should be sent to. In our case, we are using consul as the registry, but Registrator is designed to use other registries. The ip of our registry is the exposed ip address of the Consul server that we started earlier in the article. Here a picture of what Consul looks like after starting the Registrator container

picture of the consul URI after starting the Registrator

Now we need to registrator a coupe of media server, which can be done using:

docker run -d -p 35061:5060 -e "SERVICE_NAME=mediaserver" docker.io/cleardevice/docker-cert-asterisk13-ubuntu

docker run -d -p 35062:5060 -e "SERVICE_NAME=mediaserver" docker.io/cleardevice/docker-cert-asterisk13-ubuntu

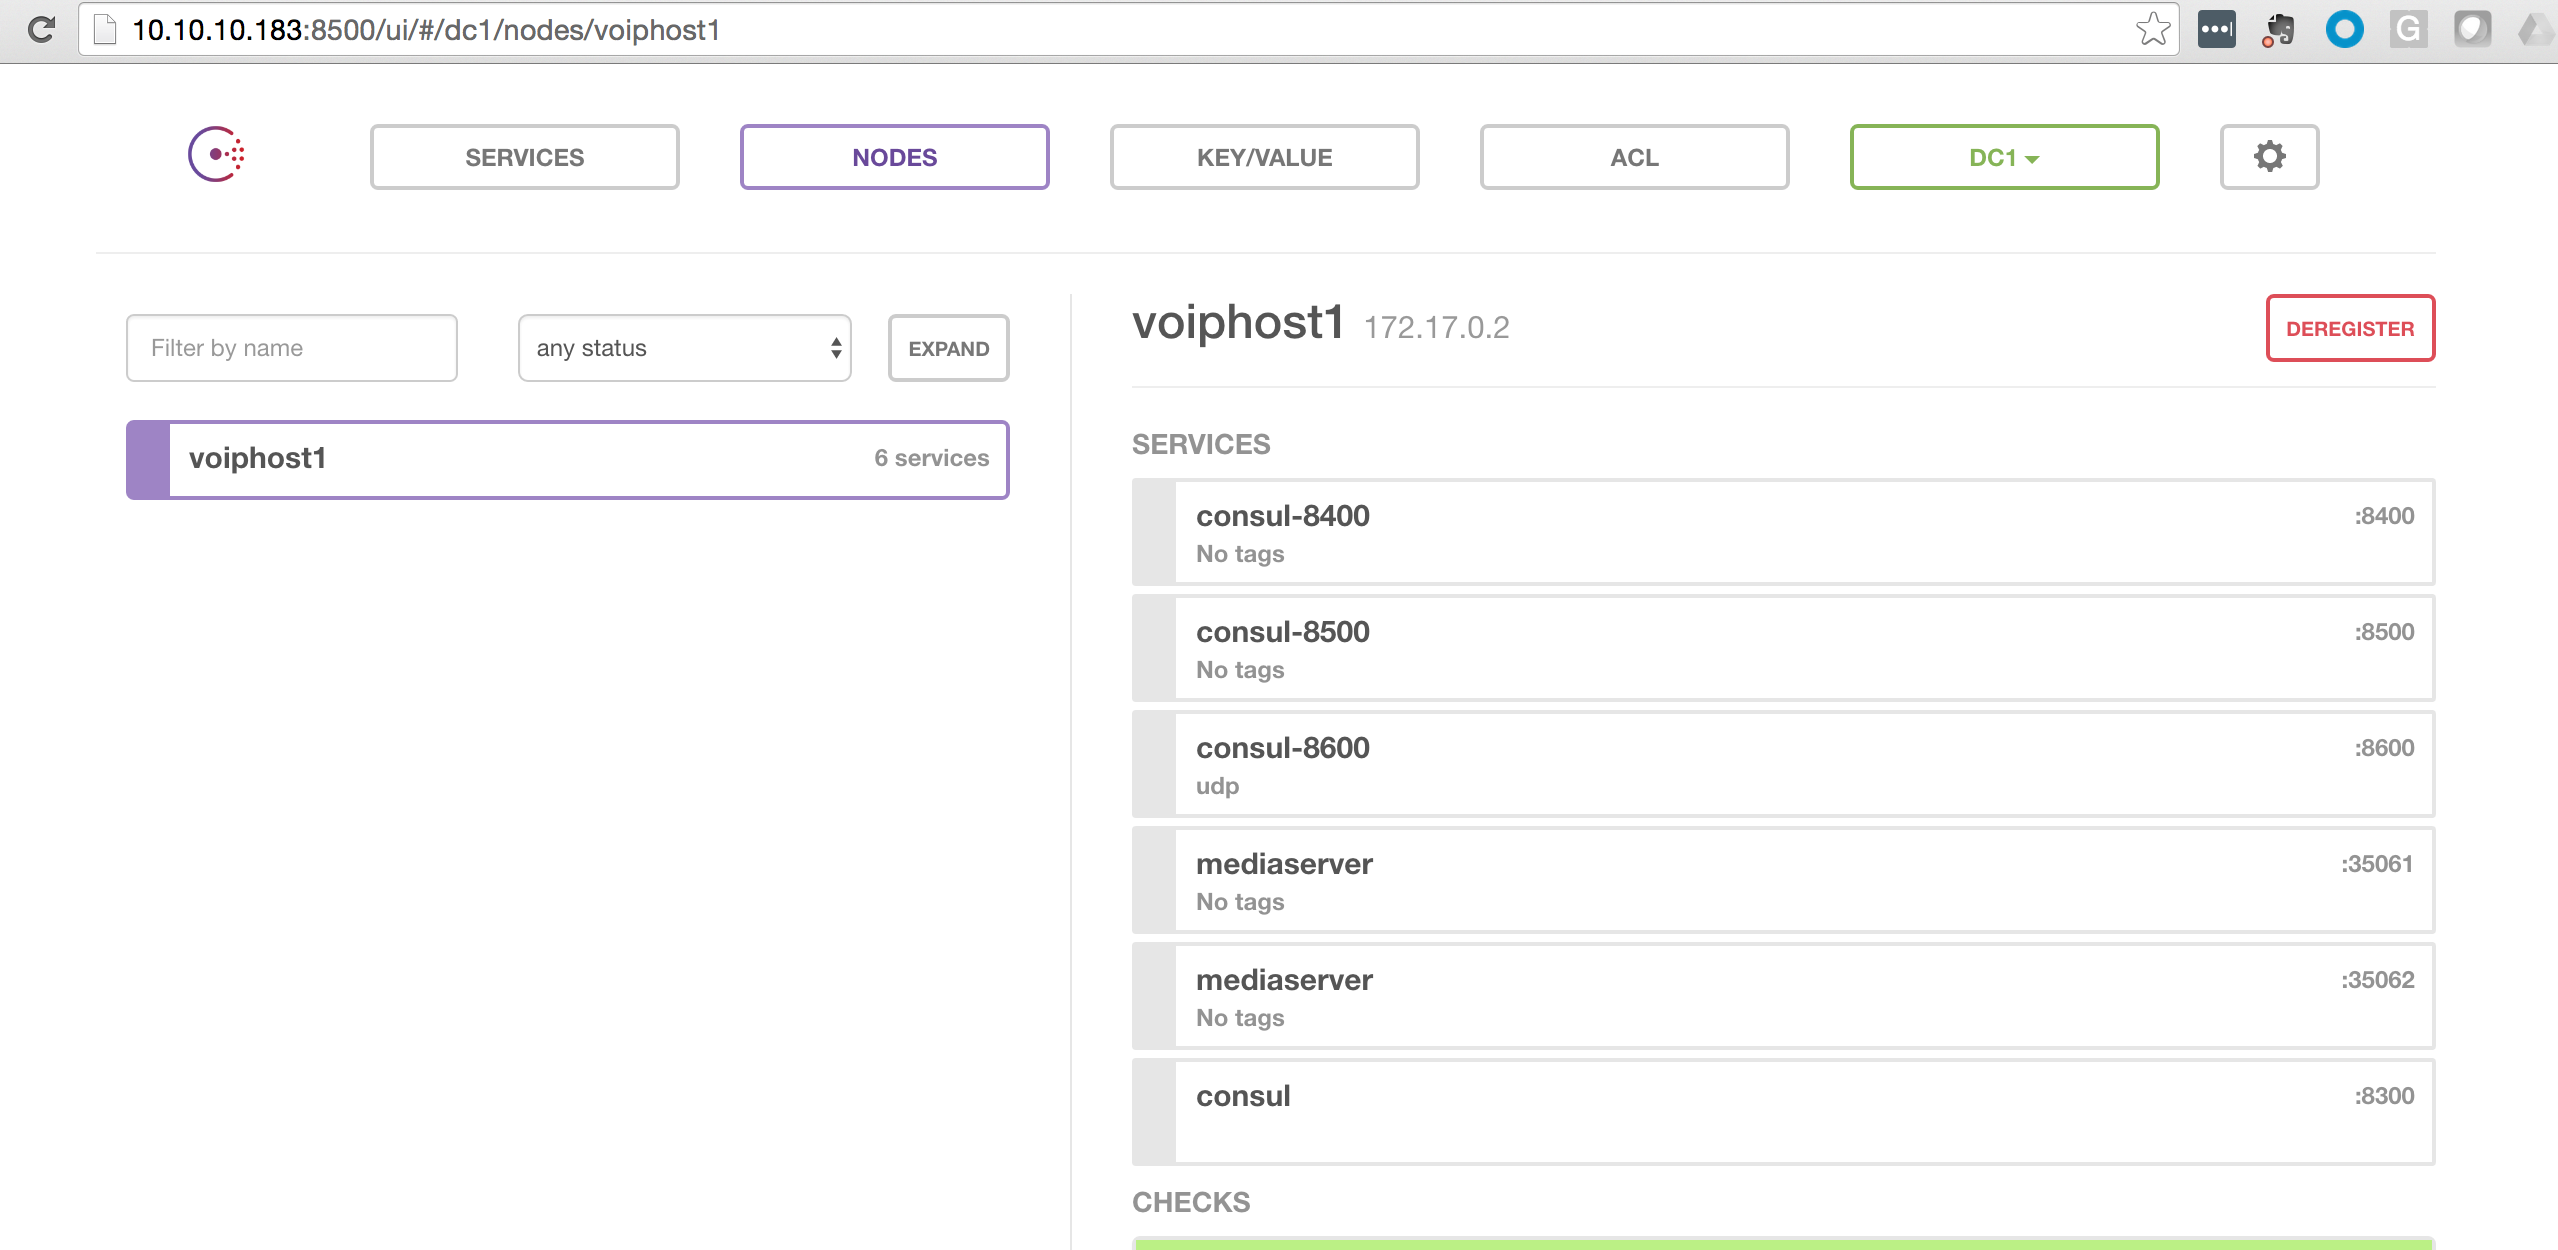
The above commands will start two (2) Asterisk servers with a service name of “mediaserver”. In this example we had to specify the exposed port numbers, but this will typically be done randomly and automatically so that we don’t have to keep track of which port numbers are already in use versus what’s available. We will release our own asterisk server containers for these articles that will handle this for us – we will update the article once that is complete.

Here’s a picture of what Consul looks like now:

picture of the consul after starting media server

In Part II we will discuss how to deploy a SIP Proxy service ran by Kamailio that will automatically know how to route SIP traffic to Asterisk containers that are available on the cluster.