Archives May 2016

Autoscaling an Asterisk Cluster Using Docker Images – Part 1: Setting Up the Plumbing

Series Intro

This series of articles will give you the information you need to standup a cluster of Asterisk servers using Docker containers, which we categorize as media servers where traffic will be load balanced by Kamailio.

Part I Intro

In this article we will configure the plumbing of the cluster and deploy a couple of Asterisk containers (media servers). At the end of this article you will understand how to setup a basic Docker cluster that can automatically discover and auto register Asterisk servers to the cluster.

Bootstrapping the Cluster

Let’s start by setting up the main components of the cluster. We will use Consul, which was developed by HashiCorp to provide the plumping for our cluster. This plumbing includes Service Discovery, DNS, Event notification and other services that we may discuss later on in this series. The documentation for Consul can be found at <https://www.consul.io/docs/index.html>

The prerequisite is to have docker installed

We can start the cluster by running:

docker run -d -p 0.0.0.0:8400:8400 -p 0.0.0.0:8500:8500 -p 0.0.0.0:8600:8600/udp --volume=/var/run/docker.sock:/tmp/docker.sock --name consul -h voiphost1 docker.io/consul agent -ui -server -bootstrap-expect 1 -client 0.0.0.0

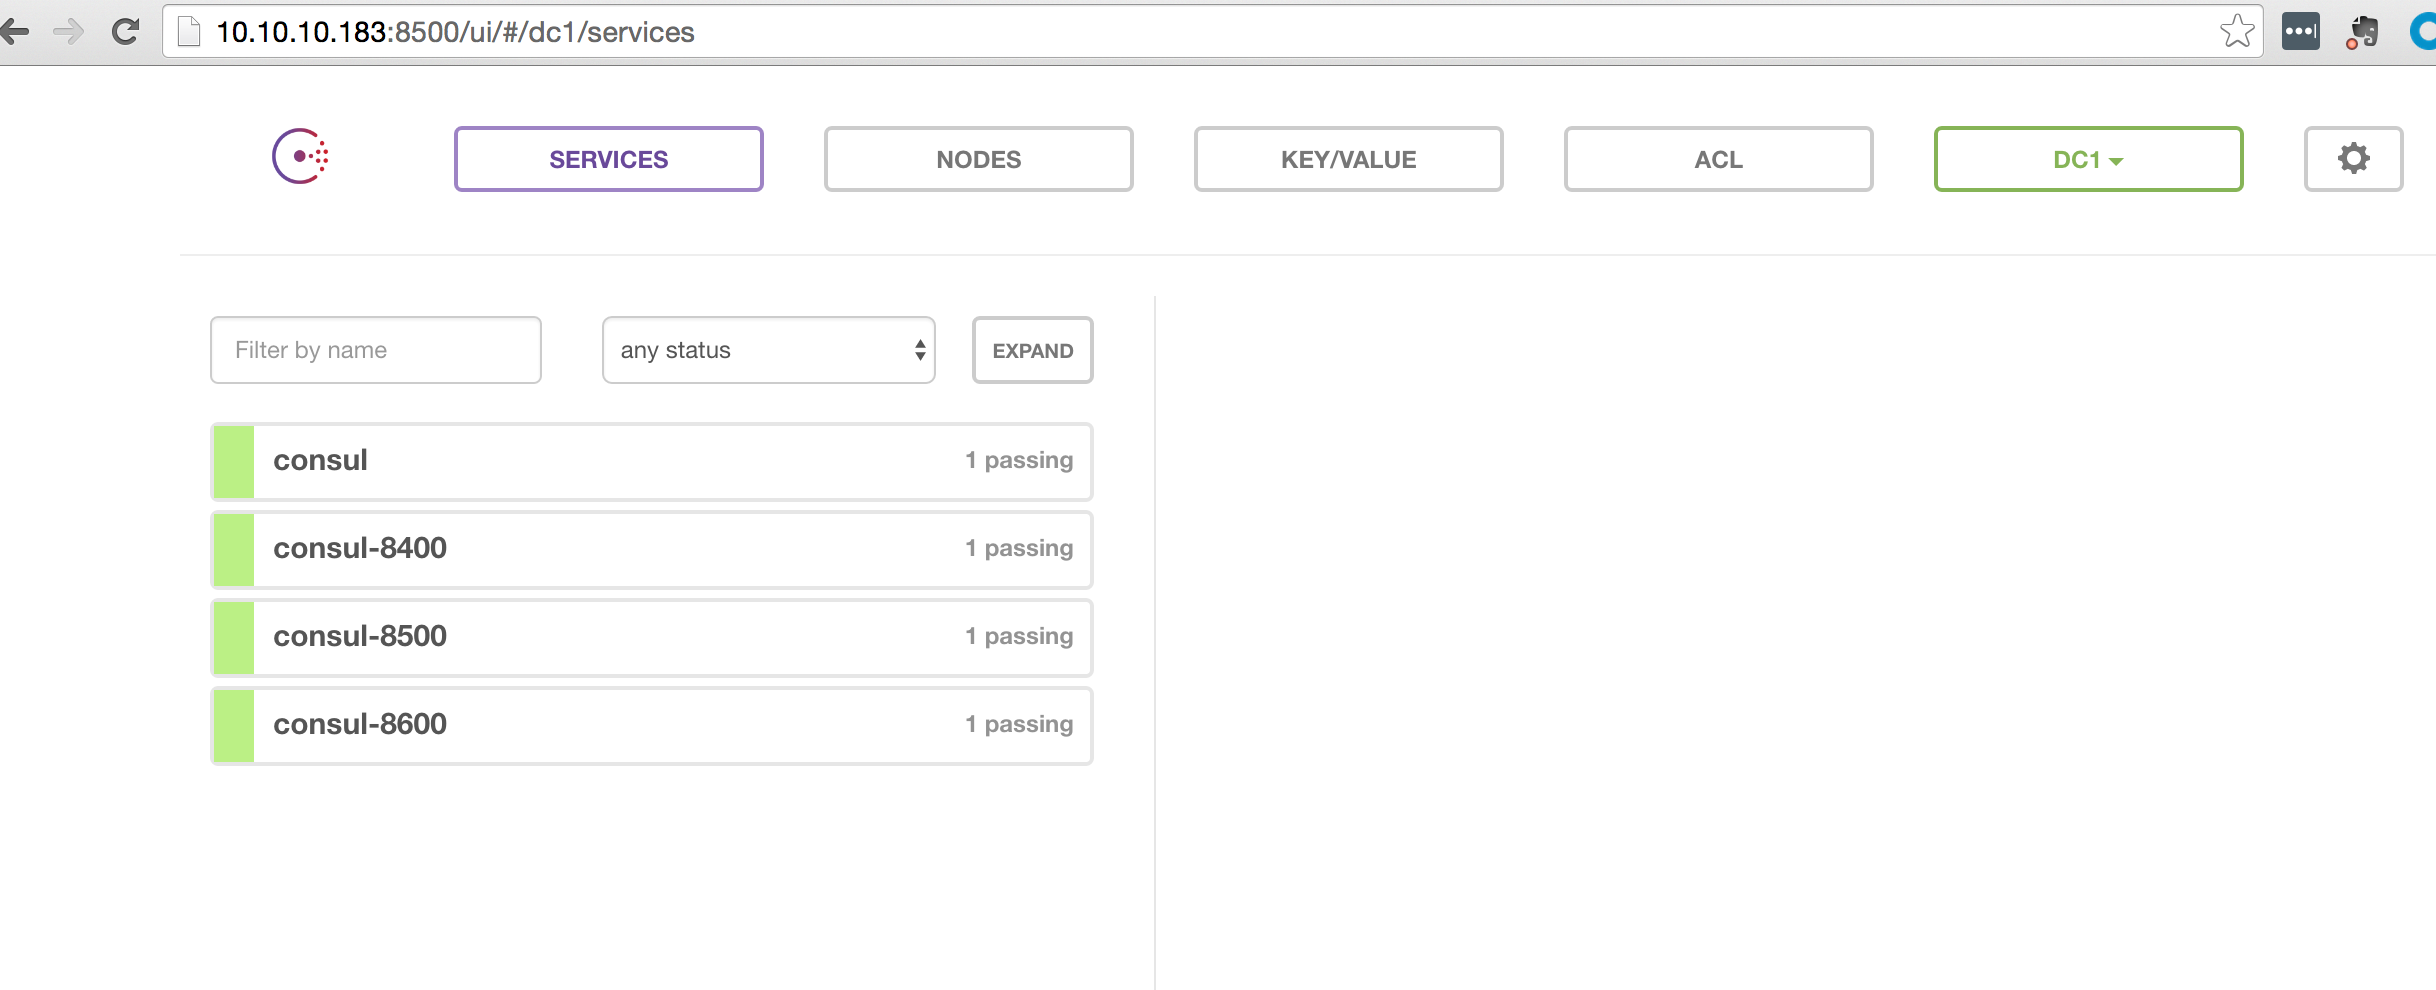
The above command will start the cluster and make the Consul web interface available on the host machine via port 8500 and make a DNS interface available to us on port 8600. Below is a screenshot of the Consul web interface after running the above command.

picture of the consul UI when it first starts

Now we need to have a mechanism to automatically register Asterisk servers with the cluster and specify the SIP ports that the server is listening on. For example, we might want to spin up 3 Asterisk servers to handle the load. We need to have a way to tell the cluster the IP address and the Asterisk SIP port number of these servers without having to manually configure the cluster. This is done using Registrator, which was developed by GliderLabs.

You can start Registrator by by running:

docker run -d -v /var/run/docker.sock:/tmp/docker.sock --privileged gliderlabs/registrator:latest consul://10.10.10.183:8500

The above command will start the Registrator container and listen for Docker events using the Unix socket (/var/run/docker.sock). This port acts as a control port for Docker. We will dig deeper into this socket in upcoming articles. All we need to understand right now is that start/stop events is sent via this socket each time a Docker container is started or stopped. We use the volume option (-v) to make the socket available to the Registrator container on /tmp/docker.sock. The last parameter specifies the registry that events should be sent to. In our case, we are using consul as the registry, but Registrator is designed to use other registries. The ip of our registry is the exposed ip address of the Consul server that we started earlier in the article. Here a picture of what Consul looks like after starting the Registrator container
picture of the consul URI after starting the Registrator

Now we need to registrator a coupe of media server, which can be done using:

docker run -d -p 35061:5060 -e "SERVICE_NAME=mediaserver" docker.io/cleardevice/docker-cert-asterisk13-ubuntu

docker run -d -p 35062:5060 -e "SERVICE_NAME=mediaserver" docker.io/cleardevice/docker-cert-asterisk13-ubuntu

The above commands will start two (2) Asterisk servers with a service name of “mediaserver”. In this example we had to specify the exposed port numbers, but this will typically be done randomly and automatically so that we don’t have to keep track of which port numbers are already in use versus what’s available. We will release our own asterisk server containers for these articles that will handle this for us – we will update the article once that is complete.

Here’s a picture of what Consul looks like now:
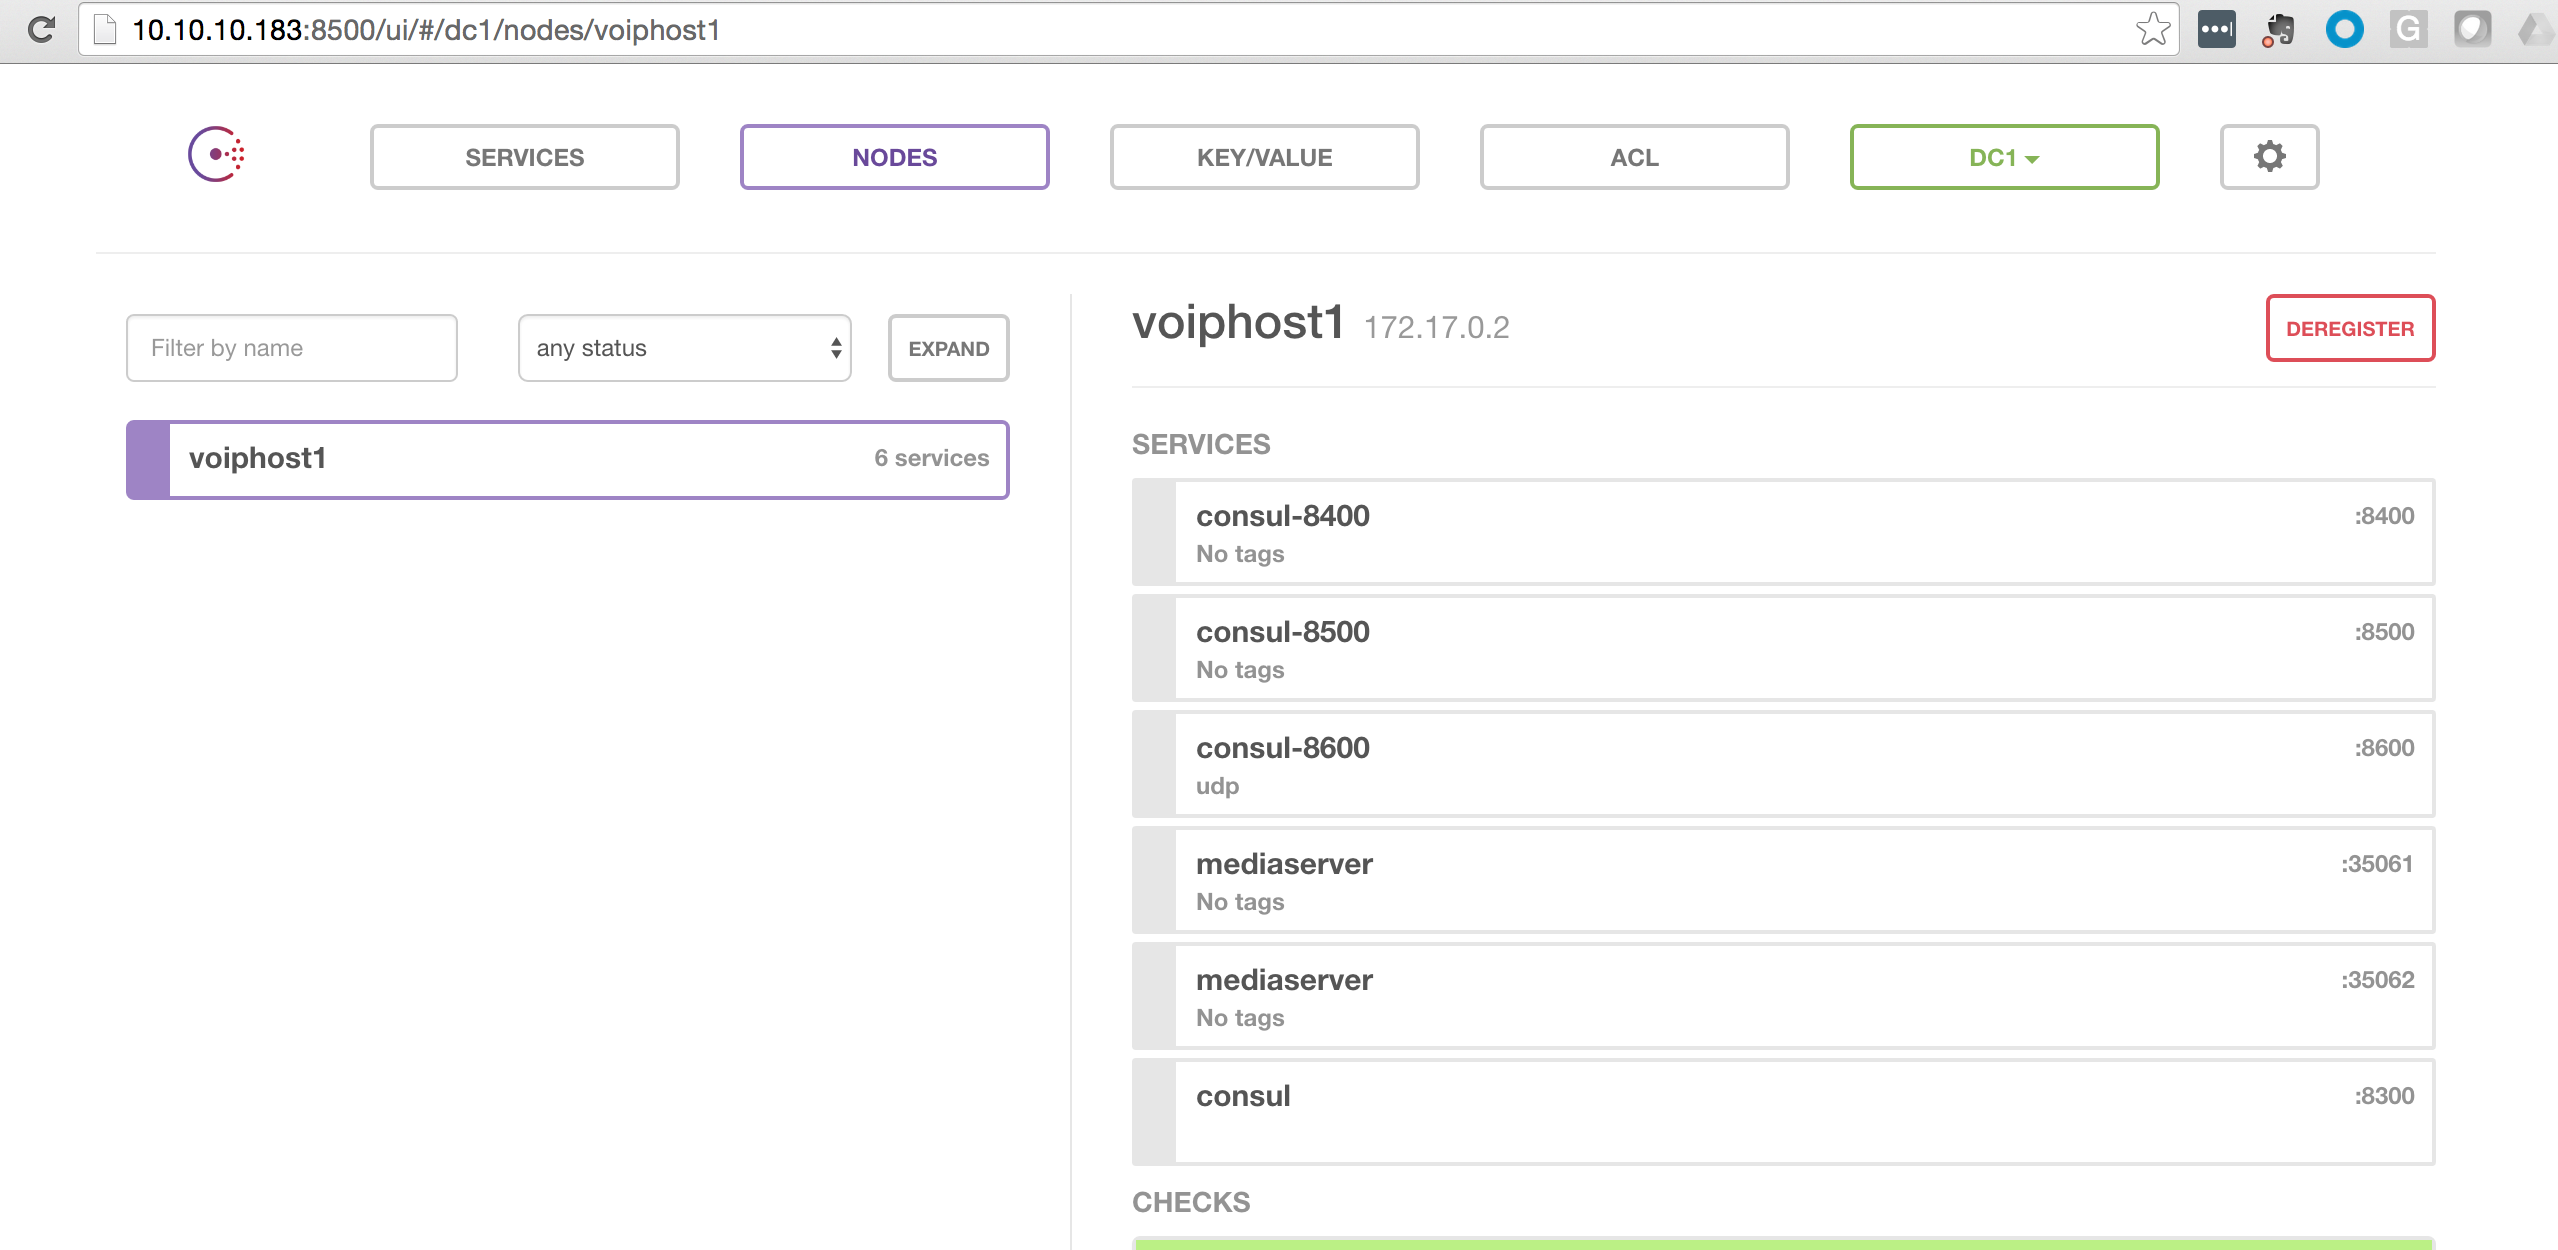
picture of the consul after starting media server

In Part II we will discuss how to deploy a SIP Proxy service ran by Kamailio that will automatically know how to route SIP traffic to Asterisk containers that are available on the cluster.
Moving to Docker – Practicing What We Preach (Work in Progress)

We have made a decision to jump head first into containers with a focus on providing Enterprise Grade Docker and Kubernetes Support.  It’s only right to convert our infrastructure into containers.  We are going to start with our bread and butter, which is our phone system.  Being a support company with a strong focus on helping companies deploy VoIP means that this is huge risk for us – we have to get this right or we will literally lose money.  But, if you never jump you will not soar.  In other words, if we are going to provide support for Docker, Kubernetes and in general Microservices we need to go through the process ourselves so that we can help others navigate the waters.

Current Environment

We currently use the FreePBX distribution as our PBX and Flowroute as our carrier (we love Flowroute by  the way).  We only use an handful of the options in FreePBX.  To be precise, we use:

  • IVR
  • Extension Management
  • Voicemail
  • Follow-me
  • Queues
  • Ring Groups
  • Conferences

If you think about it…each one of these features could become a container, but does that really make sense….not really sure yet.

Project Goals

We have decided to break this project into phases and we will make each new phase better by incorporating what we learned from the previous phases.

Phase I – Create a conference container and have all conference traffic be routed to 1 or more containers that just handles conferencing.  There are times when we had multiple conferences happening all at the same time, which causes performance issues.  We want a solution that would realize that the existing conference server has too many requests and it automatically spins up another conference server and start routing requests to the newly created instance.

More phases to come…

Proposed Components

  • Kamailio – to provide load balancing and routing of calls to one or more Asterisk servers
  • Asterisk – Media server
  • Docker
  • Consul – Will keep track of all Asterisk servers that are up and available

We will also need a Web GUI for managing the conferences and the other features that we need.  FreePBX is not container aware, so we are toying with the idea of developing a simple Web GUI that knows how to deal with functionality being containerized.

Building a Kamailio Docker image

In this tutorial we will go over how to create a Dockerfile for Kamailio and build our own Kamailio image. If you want to learn more about Dockerfile’s you can read through our other post on creating a Dockerfile.

Setup Dockerfile

  1. First thing we need to do is create a new directory for our Dockerfile.
mkdir docker_kamailio
  1. We then need to make our Dockerfile.
touch docker_kamailio/Dockerfile
  1. Next, open up the Dockerfile with your favorite editor so we can start building.
vim docker_kamailio/Dockerfile

Installing Kamailio

  1. We will be installing Kamailio on a CentOS 6 container. First thing we need to do is specify what docker image we want to start with. Add the following to your Dockerfile.
FROM centos:6
  1. Next, we need to add the Kamailio 4.4 Open Build Service repository to our yum.repos.d list.
RUN yum -y install wget
RUN wget -O /etc/yum.repos.d/home:kamailio:v4.4.x-rpms.repo http://download.opensuse.org/repositories/home:/kamailio:/v4.4.x-rpms/CentOS_6/home:kamailio:v4.4.x-rpms.repo
RUN yum -y update
  1. Now that the Kamailio 4.4 repository is added to our system, it is time to install the kamailio packages. For simplicity of running the whole Kamailio stack on one container, we will be using SQLite as our back end database.
RUN yum install -y kamailio kamailio-debuginfo kamailio-utils gdb kamailio-sqlite

Setting up kamctlrc

We need to configure kamctlrc to use SQLite and to not prompt us during the database creation.

  1. Set the DBENGINE, DBHOST, and DB_PATH.
WORKDIR /etc/kamailio/

RUN echo "DBENGINE=SQLITE" >> kamctlrc
RUN echo "DBHOST=localhost" >> kamctlrc
RUN echo "DB_PATH="/usr/local/etc/kamailio/kamailio.sqlite"" >> kamctlrc
  1. Next, we ne need to specify the following options so that kamdbctl won’t prompt us during the database creation.
RUN echo "INSTALL_EXTRA_TABLES=no" >> kamctlrc
RUN echo "INSTALL_PRESENCE_TABLES=no" >> kamctlrc
RUN echo "INSTALL_DBUID_TABLES=no" >> kamctlrc

Creating Back End Database

  1. SQLite requires a file it can write the database to. We need to make a directory and file, which was already specified in the DB_PATH variable added to the kamctlrc file.
RUN mkdir /usr/local/etc/kamailio
RUN touch /usr/local/etc/kamailio/kamailio.sqlite
  1. If all the settings in kamctlrc are correct, and /usr/local/etc/kamailio/kamailio.sqlite exists, we should be able to create the Kamailio Database without any prompts interrupting our automated build.
RUN /usr/sbin/kamdbctl create

Running Kamailio

  1. Add the following kamctl command to create a user for testing.
RUN kamctl add 1000@dopensource.com opensourceisneat
  1. Next, we need to specify which ports to expose. Because Kamailio does not handle media, we only need to open up port 5060 for SIP.
EXPOSE 5060/udp
  1. Finally, we need to specify what command to run when the container is started up
CMD["/usr/sbin/kamailio", "-m 64", "-M 8", "-D"]

Finished Dockerfile

Now that we have a finished Dockerfile, you can exit out of your editor, saving any changes. The file should look something like this.

FROM centos:6

RUN yum -y install wget
RUN wget -O /etc/yum.repos.d/home:kamailio:v4.4.x-rpms.repo http://download.opensuse.org/repositories/home:/kamailio:/v4.4.x-rpms/CentOS_6/home:kamailio:v4.4.x-rpms.repo
RUN yum -y update
RUN yum install -y kamailio kamailio-debuginfo kamailio-utils gdb kamailio-sqlite

WORKDIR /etc/kamailio/

RUN echo "DBENGINE=SQLITE" >> kamctlrc
RUN echo "DBHOST=localhost" >> kamctlrc
RUN echo "DB_PATH="/usr/local/etc/kamailio/kamailio.sqlite"" >> kamctlrc
RUN echo "INSTALL_EXTRA_TABLES=no" >> kamctlrc
RUN echo "INSTALL_PRESENCE_TABLES=no" >> kamctlrc
RUN echo "INSTALL_DBUID_TABLES=no" >> kamctlrc

RUN mkdir /usr/local/etc/kamailio
RUN touch /usr/local/etc/kamailio/kamailio.sqlite

RUN /usr/sbin/kamdbctl create

RUN kamctl add 1000@dopensource.com opensourceisneat

EXPOSE 5060/udp

CMD ["/usr/sbin/kamailio", "-m 64", "-M 8", "-D"]

Building and running the new image

  1. Build the image using the docker build command. This will build an image called dopensource/kamailio4.4.
cd docker_kamailio
docker build -t dopensource/kamailio4.4 .
  1. Run a Kamailio container to test out our new image. Remember to map the SIP port to your docker host.
docker run -dit -p 5060:5060/udp dopensource/kamailio4.4
  1. You should now be able to register a softphone to your new Kamailio instance. Because we mapped 5060 to 5060 on the Docker host, you will be using your Docker host’s ip address for registration.
User ID: 1000
Domain:
Password: opensourceisneat

Kamailio Quick Install Guide for v4.4

Kamailio 4.4 on CentOS 6.

Are you looking for the CentOS 7.x version?  It can be found here

Setup YUM Repository

  1. Install wget so we can pull down the rpm.
yum install wget
  1. Let’s download the yum repo file for our Cent OS version.
cd /etc/yum.repos.d/
wget http://download.opensuse.org/repositories/home:/kamailio:/v4.4.x-rpms/CentOS_6/home:kamailio:v4.4.x-rpms.repo
  1. Update system so yum is aware of the new repository.
yum update
  1. You can look at the kamailio packages in the YUM repository by typing:
yum search kam

Install Kamailio and Required Database Modules

  1. Install the following packages from the new repo.
yum install -y kamailio kamailio-mysql kamailio-debuginfo kamailio-unixodbc kamailio-utils gdb
  1. Set kamailio to start at boot.
chkconfig kamailio on
  1. The Kamailio configuration files will be owned by the root user, rather than the kamailio user created by the Kamailio package. We will need to change the ownership of these files.
chown kamailio:kamailio /etc/default/kamailio
chown -R kamailio:kamailio /etc/kamailio/
chown -R kamailio:kamailio /var/run/kamailio

Install MySQL

  1. Since we plan on using MySQL, we will need to instal the MySQL server as well as the client.
yum install -y mysql-server mysql
  1. Next we need to start up MySQL:
service mysqld start
  1. And enable mysqld at boot.
chkconfig mysqld on
  1. Now we can set a root password for mysql:

You can hit yes to all the options. There is no root password as of yet, so the first question will be blank. Be sure to use a secure unique password for your root user.

[root@localhost yum.repos.d]# sudo /usr/bin/mysql_secure_installation

NOTE: RUNNING ALL PARTS OF THIS SCRIPT IS RECOMMENDED FOR ALL MySQL
SERVERS IN PRODUCTION USE! PLEASE READ EACH STEP CAREFULLY!

In order to log into MySQL to secure it, we'll need the current
password for the root user. If you've just installed MySQL, and
you haven't set the root password yet, the password will be blank,
so you should just press enter here.

Enter current password for root (enter for none):
OK, successfully used password, moving on...

Setting the root password ensures that nobody can log into the MySQL
root user without the proper authorisation.

Set root password? [Y/n]
New password:
Re-enter new password:
Password updated successfully!
Reloading privilege tables..
... Success!

By default, a MySQL installation has an anonymous user, allowing anyone
to log into MySQL without having to have a user account created for
them. This is intended only for testing, and to make the installation
go a bit smoother. You should remove them before moving into a
production environment.

Remove anonymous users? [Y/n]
... Success!

Normally, root should only be allowed to connect from 'localhost'. This
ensures that someone cannot guess at the root password from the network.

Disallow root login remotely? [Y/n]
... Success!

By default, MySQL comes with a database named 'test' that anyone can
access. This is also intended only for testing, and should be removed
before moving into a production environment.

Remove test database and access to it? [Y/n]
- Dropping test database...
... Success!
- Removing privileges on test database...
... Success!

Reloading the privilege tables will ensure that all changes made so far
will take effect immediately.

Reload privilege tables now? [Y/n]
... Success!

Cleaning up...

All done! If you've completed all of the above steps, your MySQL
installation should now be secure.

Thanks for using MySQL!

Configure Kamailio to use MySQL

  • By default, Kamailio does not use MySQL. To change this we need to edit one of Kamailio’s configuration files.
vi /etc/kamailio/kamctlrc
  1. Uncomment the DBENGINE parameter by removing the pound symbol and make sure the value equals MYSQL. The parameter should look like this afterwards:
DBENGINE=MYSQL
  1. To have the kamdbctl command create the mysql database with the correct permissions, we will want to set the databaseusers and passwords in kamctlrc
## database read/write user
DBRWUSER="kamailio"

## password for database read/write user
DBRWPW="kamailiorw"

## database read only user
DBROUSER="kamailioro"

## password for database read only user
DBROPW="kamailioro"

Create the Kamailio Database Schema

  • The Command will create all the users and tables needed by Kamailio. You will be prompted to put in the MySQL root password that you created in the Install MySQL section of this document. You will be asked if you want to install different tables – just say “yes” to all the questions.
/usr/sbin/kamdbctl create
  • Below are all the prompts you will be presented:
MySQL password for root: ''
Install presence related tables? (y/n):
Install tables for imc cpl siptrace domainpolicy carrierroute userblacklist htable purple uac pipelimit mtree sca mohqueue rtpproxy?
(y/n):
Install tables for uid_auth_db uid_avp_db uid_domain uid_gflags uid_uri_db? (y/n):
  • The following MySQL users and passwords are created (please change these in a production environment).

  • kamailio – (With default password ‘kamailiorw’) – user which has full access rights to ‘kamailio’ database.

  • kamailioro – (with default password ‘kamailioro’) – user which has read-only access rights to ‘kamailio’ database.

Enable the mysql and auth modules.

Add the following to the beginning of the kamailio.cfg after #!KAMAILIO

#!define WITH_MYSQL
#!define WITH_AUTH

Update the DBURL line to match the username and password you set in kamctlrc before running kamdbctl

#!define DBURL "mysql://kamailio:kamailioro@localhost/kamailio"

Start the Kamailio Server

service kamailio start

We also need to edit /etc/default/kamailio to notify Kamailio that is is configured and ready to go.

Uncomment the following:

RUN_KAMAILIO=yes

Test Kamailio

  • In order to test that Kamailio is working correctly, I’m going to create a SIP user account and register that account using a softphone such as X-Lite, Linphone, or Zoiper.

Create SIP User Accounts

  • The following command will create a new SIP User. Note, that hte domain portion has to be specified unltess you export hte SIP_DOMAIN environment variable.
kamctl add <extension@domain>
  • Here is what I created
kamctl add 1001@dopensource.com opensourceisneat

Registering a SIP Softphone

  • configure whichever softphone you choose with the following options:
User ID: 1001
Domain:
Password: opensourceisneat
  • Once you are registered, you can view all the registered extensions in kamailio with the following command.
kamctl ul show

Make a Test Call

  • You can call yourself by entering 1001 into your softphone. If it rings then you have a basic Kamailio server installed and ready to be configured to provide load balancing, failover, accounting, etc. As an exercise, you should create another SIP user account and register that user using another softphone and try calling between the two SIP users.

References

  • Install And Maintain Kamailio v4.1.x From GIT – http://www.kamailio.org/wiki/install/4.1.x/git

Publishing Docker Image to the Docker Hub

In this tutorial we will go over how to publish an image you have created to the public docker hub. You will need to create a docker hub account to continue.

Login to your Docker Hub account on your docker host.

Simply execute the following and input your credentials:

docker login

Create Repository

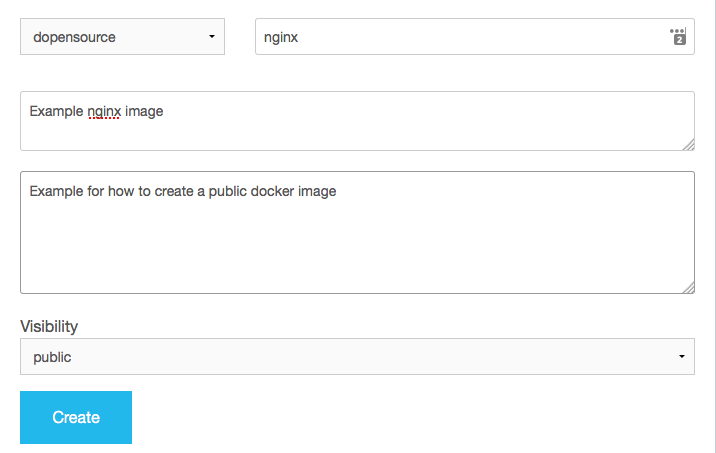
One of docker’s advantages is it’s git like work flow. If you are a git user, this process should look familiar. We will need to create a repository on the Docker Hub. This can be done by logging into the Docker Hub, hitting create repository, and filling out the necessary information. For simplicity, I named my repository the same as our image from the previous tutorial (nginx). You will need to change dopensource to whatever your account name is.


Screen Shot 2016-05-01 at 3.57.02 PM


Push image to repository.

You will need an image on your system to push to the Docker Hub. If you followed our previous tutorials, you should have an nginx image built on CentOS 7.

  1. Print local docker images available:
    docker images
    

    Screen Shot 2016-05-01 at 3.59.22 PM

  2. Now, push the dopensource/nginx image to our docker repository.

    docker push dopensource/nginx
    
  3. Pull your public image

    You should already have your image on your docker host, as that is where you created it from. You can either delete the local image, or try pulling from another host.

    docker rmi -f dopensource/nginx
    

    Now pull your public image to confirm everything is working as intended:

    docker pull dopensouce/nginx
    

    You should now have a runable nginx container on your system.

Creating a Docker file

The recommended way to create images for sharing is from a docker file. A docker file is essentially a script which can recreate the building of your image. We will go over how to create one for nginx on CentOS in this tutorial.

Creating the docker file.

It is recommended that each docker file is contained in a separate directory. This will help keep everything organized and give you a place to store any extra files if needed.

  1. Create a new directory for your docker build file.
    mkdir nginx_docker
    
  2. Create the docker file
    cd nginx_docker
    vim Dockerfile
    

Dockerfile format

The dockerfile format is fairly straightforward. Each line has an instruction and argument. You can read more about instructions and arguments in the dockerfile reference documentation

In this tutorial we will be using the following instructions:

FROM
RUN
ADD
EXPOSE
CMD

FROM

The FROM instruction specifies the base image to use as a foundation to our new image. In our example, we will be using the official CentOS image from our previous tutorials. The FROM instruction needs to be the first instruction in your Dockerfile, as it is the environment all subsequent instructions will be ran in.

  • Add the following to the beginning of your Dockerfile to use the official CentOS 7 image from the Docker Hub.
    FROM centos:7
    

RUN

The RUN instruction will run a command in your image environment. By default, any arguments will be ran in shell. Each argument is technically passing the following command to the environment.

/bin/sh -c <argument>
  • We need to run the necessary commands to install nginx on our CentOS environment. This will include:
    • Installing epel-release
    • Updating to notify yum of the new repository
    • Installing nginx.
  • Add the following to your Dockerfile on the line after the FROM instruction:
    RUN yum -y install epel-release
    RUN yum -y update
    RUN yum -y install nginx
    

ADD

The ADD instruction copies files to the image’s file system. This is useful for adding configuration files, scripts, or any other files needed in your environment. We will create a sample html file to add to the nginx root directory.

  • First we will need to create a basic html file in our Dockerfile directory.
    printf "<header>\n <h1>Docker ADD is neat</h1>\n</header>" > html
    
    • This will create a file called html, and show look like this:
    <header>
     <h1>Docker ADD is neat</h1>
    </header>
    
  • Add the following to your Dockerfile on the line after the last RUN instruction:
    ADD index.html /usr/share/nginx/html/index.html
    

EXPOSE

The EXPOSE instruction tells docker which network ports the container will listen on. We are setting up an http server, so we will need to have the container listen on port 80/tcp.

  • Add the following to your Dockerfile on the line after the ADD instruction:
    EXPOSE 80/tcp
    

CMD

Finally, we need to tell docker what command to run when the container is started up with the CMD instruction. The argument for this instruction will differ depending on what application you want your container to run. In this example, we will start nginx in non-daemon mode, so that when we attach to the running container, we will see the nginx console.

  • The CMD syntax is as follows:
    CMD ["executable","param1","param2"]
    
  • Add the following to your Dockerfile after the EXPOSE instruction:
    CMD ["nginx", "-g daemon off;"]
    

Finished Dockerfile

When you are finished, your docker file should look something like this.

FROM centos:7
RUN yum -y install epel-release
RUN yum -y update
RUN yum -y install nginx
ADD index.html /usr/share/nginx/html/index.html
EXPOSE 80/tcp
CMD ["nginx", "-g daemon off;"]

Building the Image

Now that we have a docker file and any needed files in our directory, it is time to build the image. From within the docker file directory, execute the following:

docker build -t dopensource/nginx .
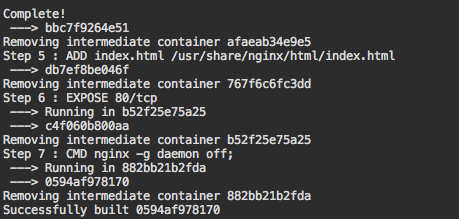
  • This will run each instruction in your docker file sequentially, and create a local docker image called dopensource/nginx.
    • You will see each instruction executed in your console, which is very helpful for debugging any issues with your build file.
  • Here is what the end of my build process looks like.

Screen Shot 2016-05-01 at 3.23.28 PM

Running your new image.

Now that you have built your image, it is time to run the image as a new docker container. Remember, we will need to expose port 80 in our run command and specify which port on the host to bind to.

docker run -dit -p 8081:80 dopensource/nginx
  • This will run our new image, and bind the container’s port 80 to our host’s port 8081.
    • Browse to your docker hosts ip adress, specifying port 8081. You should see the basic html header we created prior.
    http://<host_ip_addr>:8081
    

    Screen Shot 2016-05-01 at 3.22.40 PM

References

https://docs.docker.com/engine/reference/builder/