Blog

Publishing Docker Image to the Docker Hub

In this tutorial we will go over how to publish an image you have created to the public docker hub. You will need to create a docker hub account to continue.

Login to your Docker Hub account on your docker host.

Simply execute the following and input your credentials:

docker login

Create Repository

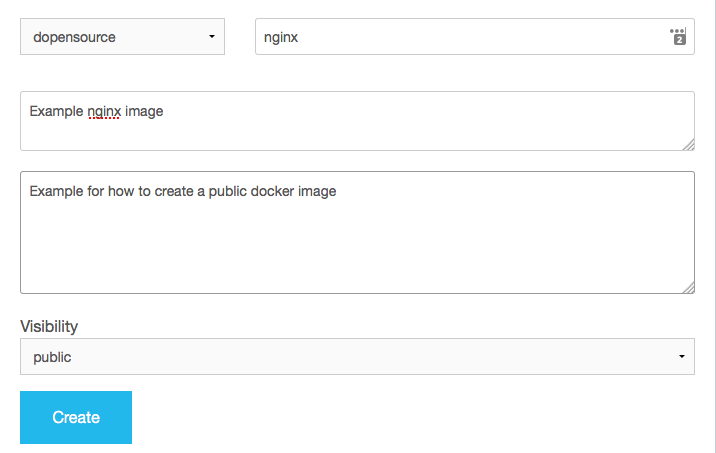
One of docker’s advantages is it’s git like work flow. If you are a git user, this process should look familiar. We will need to create a repository on the Docker Hub. This can be done by logging into the Docker Hub, hitting create repository, and filling out the necessary information. For simplicity, I named my repository the same as our image from the previous tutorial (nginx). You will need to change dopensource to whatever your account name is.


Screen Shot 2016-05-01 at 3.57.02 PM


Push image to repository.

You will need an image on your system to push to the Docker Hub. If you followed our previous tutorials, you should have an nginx image built on CentOS 7.

  1. Print local docker images available:
    docker images
    

    Screen Shot 2016-05-01 at 3.59.22 PM

  2. Now, push the dopensource/nginx image to our docker repository.

    docker push dopensource/nginx
    
  3. Pull your public image

    You should already have your image on your docker host, as that is where you created it from. You can either delete the local image, or try pulling from another host.

    docker rmi -f dopensource/nginx
    

    Now pull your public image to confirm everything is working as intended:

    docker pull dopensouce/nginx
    

    You should now have a runable nginx container on your system.

Creating a Docker file

The recommended way to create images for sharing is from a docker file. A docker file is essentially a script which can recreate the building of your image. We will go over how to create one for nginx on CentOS in this tutorial.

Creating the docker file.

It is recommended that each docker file is contained in a separate directory. This will help keep everything organized and give you a place to store any extra files if needed.

  1. Create a new directory for your docker build file.
    mkdir nginx_docker
    
  2. Create the docker file
    cd nginx_docker
    vim Dockerfile
    

Dockerfile format

The dockerfile format is fairly straightforward. Each line has an instruction and argument. You can read more about instructions and arguments in the dockerfile reference documentation

In this tutorial we will be using the following instructions:

FROM
RUN
ADD
EXPOSE
CMD

FROM

The FROM instruction specifies the base image to use as a foundation to our new image. In our example, we will be using the official CentOS image from our previous tutorials. The FROM instruction needs to be the first instruction in your Dockerfile, as it is the environment all subsequent instructions will be ran in.

  • Add the following to the beginning of your Dockerfile to use the official CentOS 7 image from the Docker Hub.
    FROM centos:7
    

RUN

The RUN instruction will run a command in your image environment. By default, any arguments will be ran in shell. Each argument is technically passing the following command to the environment.

/bin/sh -c <argument>
  • We need to run the necessary commands to install nginx on our CentOS environment. This will include:
    • Installing epel-release
    • Updating to notify yum of the new repository
    • Installing nginx.
  • Add the following to your Dockerfile on the line after the FROM instruction:
    RUN yum -y install epel-release
    RUN yum -y update
    RUN yum -y install nginx
    

ADD

The ADD instruction copies files to the image’s file system. This is useful for adding configuration files, scripts, or any other files needed in your environment. We will create a sample html file to add to the nginx root directory.

  • First we will need to create a basic html file in our Dockerfile directory.
    printf "<header>\n <h1>Docker ADD is neat</h1>\n</header>" > html
    
    • This will create a file called html, and show look like this:
    <header>
     <h1>Docker ADD is neat</h1>
    </header>
    
  • Add the following to your Dockerfile on the line after the last RUN instruction:
    ADD index.html /usr/share/nginx/html/index.html
    

EXPOSE

The EXPOSE instruction tells docker which network ports the container will listen on. We are setting up an http server, so we will need to have the container listen on port 80/tcp.

  • Add the following to your Dockerfile on the line after the ADD instruction:
    EXPOSE 80/tcp
    

CMD

Finally, we need to tell docker what command to run when the container is started up with the CMD instruction. The argument for this instruction will differ depending on what application you want your container to run. In this example, we will start nginx in non-daemon mode, so that when we attach to the running container, we will see the nginx console.

  • The CMD syntax is as follows:
    CMD ["executable","param1","param2"]
    
  • Add the following to your Dockerfile after the EXPOSE instruction:
    CMD ["nginx", "-g daemon off;"]
    

Finished Dockerfile

When you are finished, your docker file should look something like this.

FROM centos:7
RUN yum -y install epel-release
RUN yum -y update
RUN yum -y install nginx
ADD index.html /usr/share/nginx/html/index.html
EXPOSE 80/tcp
CMD ["nginx", "-g daemon off;"]

Building the Image

Now that we have a docker file and any needed files in our directory, it is time to build the image. From within the docker file directory, execute the following:

docker build -t dopensource/nginx .
  • This will run each instruction in your docker file sequentially, and create a local docker image called dopensource/nginx.
    • You will see each instruction executed in your console, which is very helpful for debugging any issues with your build file.
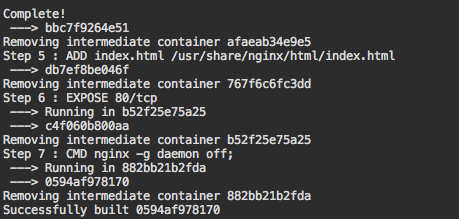
  • Here is what the end of my build process looks like.

Screen Shot 2016-05-01 at 3.23.28 PM

Running your new image.

Now that you have built your image, it is time to run the image as a new docker container. Remember, we will need to expose port 80 in our run command and specify which port on the host to bind to.

docker run -dit -p 8081:80 dopensource/nginx
  • This will run our new image, and bind the container’s port 80 to our host’s port 8081.
    • Browse to your docker hosts ip adress, specifying port 8081. You should see the basic html header we created prior.
    http://<host_ip_addr>:8081
    

    Screen Shot 2016-05-01 at 3.22.40 PM

References

https://docs.docker.com/engine/reference/builder/

Accessing Docker containers over the network

Run the container so that it can be reached on port 80

  1. The ports a container can be accessed on are determined when the container is initially ran with the -p flag.
    • The following command will run our image created in the previous lab and forward traffic on port 8080 of our host to the docker container on port 80. You can get your image name with docker images. If you followed our example prior, the image name will be dopensource/nginx.
    docker run -dit -p 8080:80 <image name>
    
  2. Your container should now be bound to port 8080 on your host system.
    • Try opening up a browser and typing in http://:8080
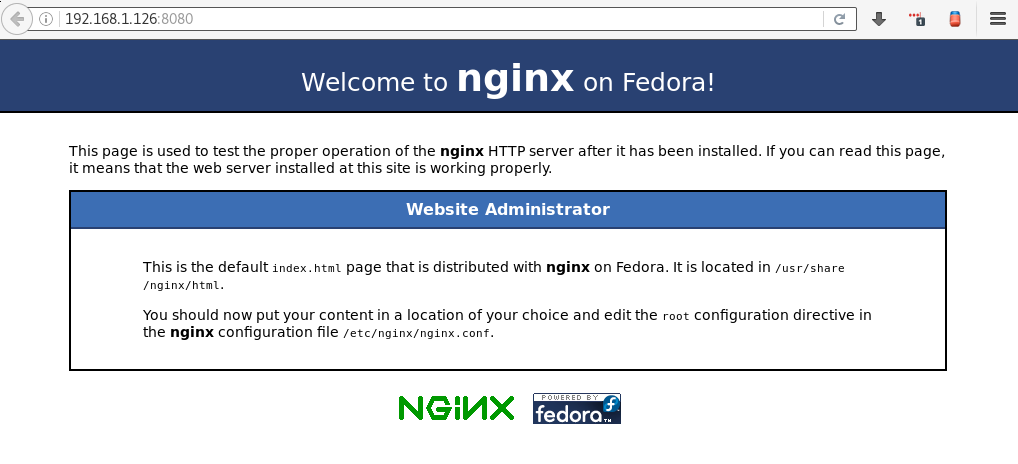
    • You should see the default nginx page, which is being served by the nginx container we created earlier.

nginx_def

Creating a Docker image based on another image

In this tutorial we will go over how to make changes to a running container while attached, then saving our progress. This will result in a new deployable image.

Install the nginx server to your container and commit the changes.

  1. First attach to the running CentOS container, like we did in the last tutorial.
    docker attach <container name>
    

    (You can use either container name or container id number. Look at the running container and find this information with docker ps)

  2. Install nginx via yum. You will also need to install the epel-release package to get access to nginx.

    yum install epel-release
    yum update
    yum install nginx
    
  3. Now that nginx is installed, exit out of the container with the following key combination:
    CTRL` + `P` and `CTRL` + `Q`
    
  4. Commit your changes to a new image with the following command:
    docker commit -m 'added nginx' --change='CMD ["nginx", "-g daemon off;"]' <container name> dopensource/nginx
    
  • Notice the similarities in syntax to git.
  • -m 'added nginx' creates a comment for this commit.
  • --change='CMD ... is changing the CMD command, which is what the image will run when it is first started up. In this example, we are telling the image to run nginx in the forground. Most base os images have CMD set to bash so you can interact with the os when attaching.
  • <container name> is the name of the container you want to commit from. You can again, get this from docker ps
  • dopensource/nginx is our name for the new image. dopensource is our organization and nginx is the name of the container.
  1. You can now view your new image with the following command:
    docker images
    

docker_images

  • Notice there are two images here. One for the base CoreOS image, which we pulled from the docker hub, and the image we just created.

Run the new image

docker run -dit dopensource/nginx

In the next tutorial we will go over how to allow access to the container over the network.

Running and Connecting to a Docker Container

Connect to your running container

Now that we have a list of running containers, we can use this information to connect. When connecting to a container, you will have different types of interfaces depending on what software the container is running. Most base OS containers, such as Debian or CentOS, will give you a bash shell. Projects such as Asterisk or FreeSWITCH will give you access to the applications CLI, such as fs_cli or asterisk -rv.

  1. You can connect to the container previously listed with the docker ps command using the follwing:

    docker attach <container id>

  • You can either use the container id or container name.
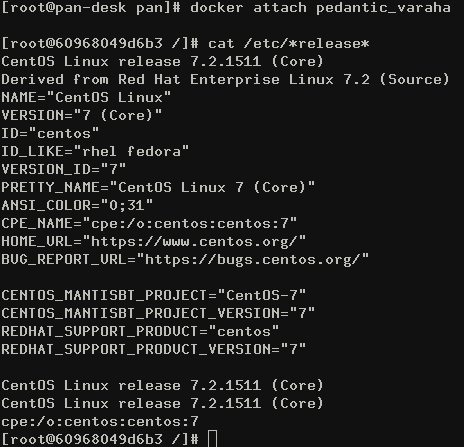
  • In my previous image, the container id would be 60968049d6b3 and the container name would be pedantic_varahamihira
  • If you do not specify a name, docker will randomly assign one.
    • You can assign a container name when running with the --name flag.
  • Once you have ran the docker attach command, you will probably need to hit enter a couple times to see a prompt.

    release_docker

  1. To detach your terminal from the running container, use the follwoing key combination:

    CTRL + P and CTRL + Q

  2. If you type exit while attached to the container, the container will stop running. You can also use the following command, which will send a sigterm message to the container:

    docker stop <container name>

Creating a Docker container from an existing image

In this tutorial we will go over how to search and pull down an existing docker image from the docker hub to run it on your server or local system.

Prerequisites

  • You will need to have docker running and installed on your system.

Searching the Docker Hub

  • You can search the Docker Hub for pre made images. These images are either made by the community, or official builds of different projects.
    docker search centos
    
  • You will get the following response. Notice what it shows you. This will include the following:

  1. A description
  2. Number of stars voted by the community
  3. Indication if the image is official and built by the organization in charge of the project
  4. Indication if the build is automated or not
  • Below is an example of what you will see when searching the Docker Hub.

docker_search

  • Notice the first image is marked as the official CentOS docker image.

Creating a container from a remote image

  • Let’s create a container based on the official CenOS build.
    docker run -dit docker.io/centos
    

docker_run

  • Note, Docker will automatically download the image from the Docker Hub if the image is not installed on the host. Once completed, the image will be ran.

  • Here are the what the flags used in the previous command do:

Flag Function
-d Run container in background
-i Keep STDIN open, even if not attached
-t Allocate a pseudo-TTY

View running containers

  • Validate the container is running by getting a list of all running containers:
    docker ps
    

docker_ps

In our next tutorial we will go over how to attach to a container.

Setting Up Your Kamailio Development Envionment

The purpose of this document is to explain how to install Kamailio and setup your development environment to make it easier to start configuring Kamailio to fit your requirements.  In this document I will explain how to install Kamailio on CentOS 6.6 and configuring VIM to make it easier to do development.

Assumptions:

  • MySQL is installed

Installing Kamailio 4.2 from source on CentOS 6.6 (for some reason we love CentOS)

I used the instructions located at http://www.kamailio.org/wiki/install/4.2.x/git as my basis.

You first need to install some packages that will be need for compiling Kamailio

yum install -y gcc flex bison mysql-libs make openssl-devel libcurl libxml2 expat-devel

Next we need to create a location for the Kamailio source

mkdir -p /usr/local/src/kamailio-4.2
cd /usr/local/src/kamailio-4.2

We now can use GIT to grab the source and checkout the latest 4.2 release

git clone --depth 1  git://git.sip-router.org/kamailio kamailio
cd kamailio
git checkout -b 4.2 origin/4.2

Continue with the installation by starting at step 3 thru step 7 in the instructions located at http://www.kamailio.org/wiki/install/4.2.x/git

Setup Development Environment

We personally like using the VIM autocomplete plugin for Kamailio that was created by Daniel-Constantin Mierla (co-founder of Kamailio).  It makes development much easier.

The vim extensions that handle syntax highlighting and file type auto detection is shipped part of the source. So you just need to install it

cd /usr/local/src/kamailio-4.2/kamailio/utils/misc/vim/
make install

If you want to have autocomplete you will need to grab it from Daniel’s GIT repository

git clone https://github.com/miconda/vim-extensions.git
cd vim-extensions
make install-kamailio-plugin

Now you can have autocomplete turn on automatically when you edit a Kamailio file in VIM by running this command which will create a ~/.virmrc file with the command to turn on autocomplete for Kamailio functions and reserved words

echo '" custom complete function for kamailio config
 autocmd FileType kamailio setlocal completefunc=KamailioComplete' >> ~/.vimrc'

Test that it’s working

vim /usr/local/etc/kamailio/kamailio.cfg

You should see #!KAMAILIO in purple. You can test autocomplete by starting hit “i” on the keyboard to enter insert mode and then hit CTRL+x, then CTRL+u.  You will see a list of Kamailio functions that will pop up.  See my screenshot below:

Kamailio Autocomplete

References

  • http://www.kamailio.org/w/tag/4-2/
  • https://github.com/miconda/vim-extensions/blob/master/plugin/kamailio/README.md

Load balancing traffic with Kamailio v4.1

Load balancing traffic with Kamailio

Note: We assume you have Asterisk/Freeswitch setup to handle inbound traffic from Kamailio

In part 3 of our Kamailio series we will explain how to load balance calls from users between several different media servers. For this part in the series we will use the “dispatcher” module. The dispatcher module provides us with several different ways to load balance calls from round-robin to weight based routing.

Getting Started

For this tutorial, you’ll only need one thing besides Kamailio and that is a list of media servers. If you don’t have any media servers, we recommend using Freeswitch and/or Asterisk.

Configuring Kamailio

By default, Kamailio does not load the dispatcher module or any of the modules respective settings. Let’s start with loading the module into Kamailio. Open up your kamailio configuration file (/etc/kamailio/kamailio.cfg), find the load modules section and add the following line:

 loadmodule “dispatcher.so”

Scroll down further in the file until you locate the module parameters section. Go the bottom of that list and add the following:

modparam("dispatcher", "db_url", "mysql://kamailioro:kamailioro@localhost/kamailio")
modparam("dispatcher", "table_name", "dispatcher")
modparam("dispatcher", "flags", 2)
modparam("dispatcher", "dst_avp", "$avp(AVP_DST)")
modparam("dispatcher", "grp_avp", "$avp(AVP_GRP)")
modparam("dispatcher", "cnt_avp", "$avp(AVP_CNT)")

Save the file and restart Kamailio to make sure there are no errors. You can restart kamailio with:

# kamctl restart

If that didn’t work, go back and make sure you have everything entered properly. Once it’s running with no problem open back up the configuration file and proceed to the “request_route” section. Comment out the following line by appending a “#” pound symbol to the front of it.

 route(PSTN);

Right below add the following line:

 route(DISPATCHER);

It’s time to add the actual code that will do the dispatching. Go to the code block below “route[RELAY]” and add the following:

route[DISPATCHER] {
  # round robin dispatching on gateways group '1'
  if(!ds_select_dst("1", "4"))
  {
    send_reply("404", "No destination");
    exit;
  }
  xlog(“ —— DISPATCH: going to <$ru> via <$du>n");
  route(RELAY);
  exit;
}

In the above code, we chose to use the round-robin algorithm for routing calls. Basically, our calls will cycle between the media servers we chose to setup. If we have 2 media servers setup our calls will process like so, call 1 will go out of MS1, call 2 out of MS2, call 3 out of MS1 and so on.

With the dispatching code in place, we’ll need to add the actual destinations into the Kamailio database. Login to your MySQL database and execute the following commands. You can replace the destination and description with your media servers.

mysql> INSERT into dispatcher (setid, destination, flags, priority, attrs, description) VALUES (1, “sip:asterisk.example.com:5060”, 0, 0, "", "Endpoint: Asterisk Media Server");
mysql> INSERT into dispatcher (setid, destination, flags, priority, attrs, description) VALUES (1, “sip:freeswitch.example.net:5060”, 0, 0, "", "Endpoint: Freeswitch Media server");

With that completed, we’ll need to reload Kamailio. Since we haven’t restarted Kamailio since adding the dispatch route let’s just restart Kamailio using the same command as before. However, if you restarted Kamailio since adding the dispatch route you can just use the following command to reload the dispatcher info.

# kamctl dispatcher reload

Now that the routes are loaded into Kamailio, all you’ll need to do is push some calls through to Kamailio and they will be routed in a round-robin fashion like we stated above.

Reference

  • Dispatcher Modules Documentation – http://kamailio.org/docs/modules/4.1.x/modules/dispatcher.html


Least-Cost Routing with Kamailio v4.1

The goal of this document is to explain how to get Kamailio to route traffic to the carrier with the least cost. This is part 2 in our Kamailio series.

 Getting Started

You don’t need much for this tutorial. All you’ll need is 2 carrier endpoints and their rates for calling a certain area code. Other than a Kamailio server, you can proceed with the rest of the tutorial.

 Configuring Kamailio 

Before we start setting up the LCR module, we first need to make some changes to the Kamailio configuration file. First off, we will need to modify the listen parameter. Open up your Kamailio configuration (kamailio.cfg) and look for the “listen” line.

If your Kamailio instance is behind a firewall make your line look like this:

listen=udp:<internal address>:5060 advertise <external address>:5060

Else if your Kamailio instance is on the public internet make it look like this:

listen=udp:<external address>:5060

By default Kamailio does not load the LCR module so we will need to add it.  In the same config file, locate the section where it says “loadmodule” and go to the bottom of that list and add:

loadmodule “lcr.so”

We can now begin setting up the LCRs module parameters.

Configuring LCR Module 

Now that we’ve configured Kamailio, we need to configure the LCR module. Back in the configuration file, look for the module parameters section.  At the bottom of that section, add the following values:

modparam("lcr", "db_url", "mysql://kamailioro:kamailioro@localhost/kamailio")
modparam("lcr", "gw_uri_avp", "$avp(i:709)")
modparam("lcr", "ruri_user_avp", "$avp(i:500)")
modparam("lcr", "tag_avp", "$avp(lcr_tag)")
modparam("lcr", "flags_avp", "$avp(i:712)")
modparam("lcr", "lcr_id_avp", "$avp(s:lcr_id_avp)")
modparam("lcr", "defunct_gw_avp", "$avp(s:defunct_gw_avp)")

With the module configured, it’s time to setup the actual routing of the SIP requests. In the “request_route” above the line that says:

 # dispatch request to foreign domains

Add the following line:

 route(LCR);

Then add a new route using the code below, put this at the end of the file:

route[LCR] {
if (status=="200")
{
  xlog("LCR: Inside the LCR routen");
}

if(method=="INVITE")
{
  xlog("We got an invite");
  if(!load_gws(1, $rU, $var(caller_uri))) {
    xlog("Couldn't load gateways");
    sl_send_reply("500", "Server Internal Error - Cannot load gateways");
    exit;
  } else {
        xlog("GW Selected '$avp(i:709)'n");
        xlog("Domain of destination: $ddn");
        xlog("To URI: $tun");
  }

  if(!next_gw()) {
    xlog("Couldn't proceed to next gateway");
    sl_send_reply("503", "Service not available, no gateways found");
    exit;
  } else {
        xlog("Calling the first matched gatewayn");
        xlog("ruri_user_avp: '$avp(i:500)'n");
        xlog("To URI after next_gw: $tun");
        xlog("Request URI: $rUn");

  }

}
}


Adding LCR Data

With our routing code in place, we need to add some data to LCR tables. Before we do that let’s go over what tables the LCR module uses and how they all fit together.

There are 3 tables that the LCR module uses:

  • lcr_gw  – holds the gateways or endpoints where we can send our requests
  • lcr_rule – holds all the rules we will match against. Our area codes. 
  • lcr_rule_target – holds the rule to gateway matchings.

The most important table is the lcr_rule_target table. In this table, we take the ID of the rule from the lcr_rule table and connect it to the ID of the gateway we want all requests to go out of of it the request matches that rule.

For instance, if we setup a rule in the table that matches all request that start with 734 with an ID of 12, we can match that to a gateway ID in the lcr_rule_target table. So when a request comes in that starts with 734, it will be sent to that gateway.

For this example, we will be using 734 as the area code and 192.168.1.112 as the carrier. You can replace these values with your own in the steps below.

  1.   Login to MySQL
 # mysql -u root -p
  1.   Connect to the Kamailio DB
 mysql> use kamailio;
  1.   Let’s insert a gateway.
mysql> INSERT INTO lcr_gw (lcr_id, gw_name, ip_addr, port, uri_scheme, transport, strip, flags) VALUES (1, “Carrier1”, “192.168.1.112”, 5060, 1, 1, 0, 1);
  1.   Next let’s add an LCR rule.
mysql> INSERT INTO lcr_rule (lcr_id, prefix, stopper, enabled) VALUES (1, “734”, 1, 1);
  1.   Finally let’s add rule to gateway matching.
mysql> INSERT INTO lcr_rule_target (lcr_id, rule_id, gw_id, priority, weight) VALUES (1, 1, 1, 1, 1);

Repeat these steps for each of your carriers. Increase the weight for the carrier with the cheaper weight.

Testing Kamailio

Before we begin testing we need to make sure a few other things are in order. You’ll need to make sure that your ITSP knows you’re going to be sending traffic from your Kamailio IP address. You’ll also need a SIP phone pointed at Kamailio or have Kamailio setup as a trunk in a PBX.

With that said, we need to refresh what Kamailio has in memory. We can do this with:

# kamctl lcr reload


Now just call that area code from a phone and your call should go out of the carrier with the higher weight.