Hands-on Kamailio Deployment Course

The self-paced videos for this course are below. Thank you for purchasing the course! Enjoy -Mack Hendricks Section 1 – Intro: This video provides an overview of the course. The video mentions dSIPRouter.org, which is a UI built for Kamailio that makes it easier to install, configure and manage Kamailio. Section 2 – Kamailio Architecture: […]
To access this post, you must purchase Hands-on Kamailio Deployment Course - Self Paced.

Using SIPp To Load Test With a Kamailio Proxy

SIPp is a free open source tool for generating SIP traffic usually for the purpose of load testing SIP components such as a PBX.  In this walkthrough we will detail two methods of running tests using built in settings, or alternatively a generated SIPp xml file. It includes basic user agent scenarios (UAC and UAS). Also, you can use these basic agent scenarios to build call flow scenarios that fit your use cases. The scenario files are basic files that allows you to subscribe simple to very complex call flows. We will touch on a couple scenarios with a focus on load testing a SIP element such as a PBX with a Kamailio Proxy in front of it. SIPp generates SIP traffic according to the scenario specified. You can control the number of calls that are started per second. We will focus on the use of the builtin UAC scenario. At starting time, you can control the rate by specifying parameters on the command line:
  • “-sn” to specify the built in call flow scenario
  • “-sf” to specify a custom scenario file
  • “-r” to specify the call rate in number of calls per seconds
  • “-rp” to specify the “rate period” in milliseconds for the call rate (default is 1000ms/1sec). This allows you to have n calls every m milliseconds (by using -r n -rp m).
In our example, we will run SIPp at 7 calls every 2 seconds (3.5 calls per second) to a SIP Server, without a proxy:
sipp -sn uac -r 7 -rp 2000 <ip of server>
In another example, we will run SIPp at 7 calls every 2 seconds using a SIP Proxy such as Kamailio and OpenSIPS friendly scenario file. If you need help building a scenario file please contact us and we can estimate the about of hours needs to build a scenario file to meet your requirements :
sipp -sf sipproxyfriendly.xml -r 7 -rp 2000 <ip of server>
You can pause the traffic by pressing the ‘p’ key. SIPp will stop placing new calls and wait until all current calls end. You can resume the traffic by pressing ‘p’. To quit SIPp, press the ‘q’ key. SIPp will stop placing new calls and wait until all current calls end. SIPp will then exit. You can also force SIPp to quit immediately by pressing the ‘Q’ key. Current calls will be terminated by sending a BYE or CANCEL message (depending if the calls have been established or not). The same behaviour is obtained by pressing ‘q’ twice.

dSIPRouter Media Server API v1

We are introducing a new API that will enable the provisioning of extensions within a backend media server. The API will provide an abstraction layer for provisioning different backend media servers. The first release will focus on FusionPBX.

dSIPRouter has a concept of an Endpoint Group. An endpoint group can be mapped to a FusionPBX Cluster. When this happens the domains from FusionPBX is automatically sync’d with dSIPRouter. We will leverage the existing connection to enable the ability to provision and update Domains and Extensions within FusionPBX. In the future, we will support FreePBX and other media servers as well. Hence, giving users one API for provisioning users and dSIPRouter handles the complexity of translating the request into the backend media server.

The feature will be available in 0.642. You can provide comments and feedback on the API by submitting comments in the GitHub issue which can be found here

The API endpoints for this release are:

/mediaserver/domain/
/mediaserver/extension/

The Payload for this release:

Payload for Domain

{
   domain_id:
   name: string,
   enabled: boolean,
   description: string,
   config_id: endpointgroup_id | conf_id
}

Payload for Extension

{
    type: single| multiple,
    num_of_extensions: integer,
    attributes: {

      domain_id: string | null,
      account_code: string,
      extension: string,
      password: string|null ,
      outbound_caller_number: string|null,
      outbound_caller_name: string:null,
      vm_enabled: boolean,
      vm_password: string,
      vm_notify_email: string,
      enabled: boolean,
      config_id: endpointgroup_id | conf_id
    }
}

Example Usage

The following example will provision a new Endpoint Group in dSIPRouter and a Domain and Extension in FusionPBX. Note, that the API will also support updating and deleting as well.

1) The user will create an endpoint group to represent a FusionPBX standalone instance or a FusionPBX cluster

https://{{DSIP_ADDR}}:5000/api/v1/endpointgroups

They will receive an endpoint group id, which will be used for provisioning the backend media server

2) The user can then create a new domain

https://{{DSIP_ADDR}}:5000/api/mediaserver/domain/

{
   domain_id: null
   name: AprilandMackCo,
   enabled: true,
   description: "April and Mack Co,
   config_id: 64
}

The user will receive the domain_id, let’s assume its 98

3) The user can create one user or a set of users. We are going to create 10 users

https://{{DSIP_ADDR}}:5000/api/mediaserver/extension/

{
    type: "multiple",
    num_of_extensions: 10,
    attributes: {

      domain_id: 98,
      account_code: "124-24245",
      extension: "1000",
      password: "starterpassword" ,
      outbound_caller_number: "8889072085",
      outbound_caller_name: "dOpenSource",
      vm_enabled: true,
      vm_password: "94145",
      vm_notify_email: "",
      enabled: true,
      config_id: 64
    }
}

This API will create 10 extensions starting from 1000 with the same attributes. You can also create a single extension.

Twilio Elastic SIP Trunking and dSIPRouter

dSIPRouter 0.63 was recently released with out of the box support for Twilio Elastic SIP Trunking. The design goal for the first release of this feature was to make it simple for a user to download dSIPRouter and setup Twilio as the carrier.

Assumptions:

  • dSIPRouter is installed. If not, you can install it within 12 minutes. There is a one-line command that will kick-off the installer and it will take about 12 minutes to install. The details can be found here{:target=”_blank”}

  • You have a Twilio account. It only takes a few minutes to create an account. You can create an account by going here

Setting up Twilio Elastic SIP Trunking

  1. Login to Twilio
  2. Enter Elastic SIP Trunks in the top right search bar and click enter.  Notice that Twilio gives you a double digit Trial Balance.  This is better then most SIP providers that I worked with in the past.

  3. Click the + sign to create a new SIP Trunk.  Enter a name for your SIP Trunk and click “Create”

  4. You will see a screen that looks like this

  5. Since we are focused on sending calls outbound we are going to click on the “Termination” menu option.  We are going to use IP Authentication.  So, we just need to define a unique SIP URI for signaling to Twilio. Twilio doesn’t accept SIP requests that come from an IP address.  Also, we need to define an Access Control List that contains the IP address of your dSIPRouter instance.  If you have multiple instances of dSIPRouter then define all of the IP addresses.

This is all we need to do on the Twilio side.  In the next section we will focus on configuring dSIPRouter

Setting up dSIPRouter to work with Twilio Elastic SIP Trunking

Setting up the Carrier Group

  1. Login to dSIPRouter
  2. Click Carrier Groups
  3. Click Add
  4. Provide a name for the Carrier Group and click Add

  5. Click on the Carrier Group that you just added

  6. Click on Endpoint and click Add.
  7. Enter the Twilio SIP URI that you defined in the Twilio portal

  8. Click “Reload Kamailio”

Make the Twilio Carrier Group the Default Outbound Carrier

  1. Click on Global Outbound Routes
  2. Click on the Default Outbound Route and select Twilio Outbound

Making an Outbound Call

In this section we are going to use IP authentication to send a call using a softphone.

  1. Click Endpoint Groups
  2. Click Add enter “Test Endpoint” as the Friendly Name
  3. Click the Endpoint Tab and enter the IP address you will send calls from
  4. Click Add

  5. Click “Reload Kamailio”

  6. Start your softphone and configure it to send a call to dSIPRouter

Kamailio Quick Install Guide for v5.2.x – Debian 9

This article will provide step-by-step instructions on how to install Kamailio 5.2.x on Debian using apt packages. This article assumes you have a fresh install of Debian 9.x.

Add Kamailio GPG Key

wget -O- https://deb.kamailio.org/kamailiodebkey.gpg | sudo apt-key add -

Add Kamailio 5.2 repo

vi /etc/apt/sources.list
Add the following lines to the file
deb http://deb.kamailio.org/kamailio52 stretch main
deb-src http://deb.kamailio.org/kamailio52 stretch main
Update the apt package manager so that it’s aware of the new repository.
apt update
You can look at the kamailio packages in the apt repository by typing:
apt search kam

Install Kamailio

apt install kamailio kamailio-mysql-module 

Set Kamailio to Start at Boot

systemctl enable kamailio

Install MariaDB

We will use MariaDB for the Kamailio database engine. Note, Kamailio has support for a number of database backends. But, we are going to use MariaDB
apt install mysql-server

Set MySQL to Start at Boot

systemctl enable mariadb

Start MySQL

systemctl start mariadb 

Configure Kamailio to use MariaDB

By default, Kamailio does not use MySQL. To change this we need to edit one of Kamailio’s configuration files.
vi /etc/kamailio/kamctlrc
Uncomment the DBENGINE parameter by removing the pound symbol and make sure the value equals MYSQL. The parameter should look like this afterwards:
DBENGINE=MYSQL
Uncomment and setup the Database Read/Write and Database Read/Only fields. You can just use the default values for right now and you can change them at a later time.
## database read/write user
DBRWUSER="kamailio"

## password for database read/write user
DBRWPW="kamailiorw"

## database read only user
DBROUSER="kamailioro"

## password for database read only user
DBROPW="kamailioro"

Create the Kamailio Database Schema

The command will create all the users and tables needed by Kamailio. You will be prompted to put in the MySQL root password that you created in the install MySQL section of this document. You will be asked if you want to install different tables – just say “yes” to all the questions.
/usr/sbin/kamdbctl create
Below are all the prompts you will be presented:
MySQL password for root: ''
Install presence related tables? (y/n): y
Install tables for imc cpl siptrace domainpolicy carrierroute userblacklist htable purple uac pipelimit mtree sca mohqueue rtpproxy?
(y/n): y
Install tables for uid_auth_db uid_avp_db uid_domain uid_gflags uid_uri_db? (y/n): y

The following MySQL users and passwords are created (please change these in a production environment).
kamailio - (With default password 'kamailiorw') - user which has full access rights to 'kamailio' database.
kamailioro - (with default password 'kamailioro') - user which has read-only access rights to 'kamailio' database.

Enable MariaDB module and auth modules in the Kamailio Configuration

vi /etc/kamailio/kamailio.cfg
Add the following after #!KAMAILIO
#!define WITH_MYSQL
#!define WITH_AUTH
Update the DBURL line to match the username and password you set in /etc/kamailio/kamctlrc earlier The line looks like this by default:
#!define DBURL "mysql://kamailio:kamailioro@localhost/kamailio
If you changed the username and password then the new user name and password would look like this
#!define DBURL "mysql://new_username:new_password@localhost/kamailio
The new_username and new_password fields would be replaced with the values you entered in the /etc/kamailio/kamctlrc file.

Start the Kamailio Server

service start kamailio
Note, the startup options for Kamailio is located at /etc/default/kamailio

Test Kamailio

In order to test that Kamailio is working correctly, I’m going to create a SIP user account and register that account using a softphone such as X-Lite, Linphone, or Zoiper

Create SIP User Accounts

The following command will create a new SIP User. Note, that the domain portion has to be specified unless you export the SIP_DOMAIN environment variable:
kamctl add extension@domain extension password
Here is what I created:
kamctl add 1001@dopensource.com opensourceisneat

Registering a SIP Softphone

Configure whichever softphone you choose with the following options: User ID: 1001
Domain:
Password: opensourceisneat Once you are registered, you can view all the registered extensions in kamailio with the following command:
kamctl ul show
You will get something like this:
Domain:: location table=1024 records=1 max_slot=1 
AOR:: 1001 Contact:: sip:1001@192.168.1.140:40587;
rinstance=636c6f6dedce9a2b;transport=UDP Q= Expires:: 3559 
Callid:: OWNlYzg2YThmMmI1MGM1YjMyZTk3NjU2ZTdhMWFlN2E. 
Cseq:: 2 
User-agent:: Z 3.3.21937 r21903 
State:: CS_NEW Flags:: 0 Cflag:: 0 
Socket:: udp:104.131.171.248:5060 Methods:: 5087 
Ruid:: uloc-5a2f0176-36a3-1 Reg-Id:: 0 
Last-Keepalive:: 1513030025 
Last-Modified:: 1513030025

Make a Test Call

You can call yourself by entering 1001 into your softphone. If it rings then you have a basic Kamailio server installed and ready to be configured to provide load balancing, failover, accounting, etc. As an exercise, you should create another SIP user account and register that user using another softphone and try calling between the two SIP users.

Kamailio Quick Install Guide for v4.4.x – CentOS 7

Are you looking for the CentOS 6 version?  It can be found here

This article will provide step-by-step instructions on how to install Kamailio 4.4.x on CentOS 7 using yum packages.

Setup YUM Repository

  1. Install wget so we can pull down the rpm.
    yum install wget
  2. Let’s download the yum repo file for our CentOS version and update the system so yum is aware of the new repository.
    cd /etc/yum.repos.d/
    wget http://download.opensuse.org/repositories/home:/kamailio:/v4.4.x-rpms/CentOS_7/home:kamailio:v4.4.x-rpms.repo
    
  3. Update system so yum is aware of the new repository.
    yum update
    
  4. You can look at the kamailio packages in the YUM repository by typing:
    yum search kam
    

Install Kamailio and Required Database Modules

  1. Install the following packages from the new repo.
    yum install -y kamailio kamailio-mysql kamailio-debuginfo kamailio-unixodbc kamailio-utils gdb
    
  2. Set kamailio to start at boot.
    chkconfig kamailio on
    
  3. The Kamailio configuration files will be owned by the root user, rather than the kamailio user created by the Kamailio package. We will need to change the ownership of these files.
    chown -R kamailio:kamailio /var/run/kamailio
    chown kamailio:kamailio /etc/default/kamailio
    chown -R kamailio:kamailio /etc/kamailio/
    echo "d /run/kamailio 0750 kamailio kamailio" > /etc/tmpfiles.d/kamailio.conf 

Install MySQL

  1. Since we plan on using MySQL, we will need to install the MySQL server as well as the client.
    yum install -y mariadb-server mariadb
    
  2. Next we need to start up MySQL:
    systemctl start mariadb 
    
  3. And enable mysqld at boot.
    systemctl enable mariadb
  4. Now we can set a root password for mysql:

You can hit yes to all the options. There is no root password as of yet, so the first question will be blank. Be sure to use a secure unique password for your root user.

[root@localhost yum.repos.d]# /usr/bin/mysql_secure_installation

NOTE: RUNNING ALL PARTS OF THIS SCRIPT IS RECOMMENDED FOR ALL MySQL
      SERVERS IN PRODUCTION USE!  PLEASE READ EACH STEP CAREFULLY!

In order to log into MySQL to secure it, we'll need the current
password for the root user.  If you've just installed MySQL, and
you haven't set the root password yet, the password will be blank,
so you should just press enter here.

Enter current password for root (enter for none):
OK, successfully used password, moving on...

Setting the root password ensures that nobody can log into the MySQL
root user without the proper authorisation.

Set root password? [Y/n] Y
New password: (enter password)
Re-enter new password: (enter password)
Password updated successfully!
Reloading privilege tables..
 ... Success!


By default, a MySQL installation has an anonymous user, allowing anyone
to log into MySQL without having to have a user account created for
them.  This is intended only for testing, and to make the installation
go a bit smoother.  You should remove them before moving into a
production environment.

Remove anonymous users? [Y/n] Y
 ... Success!

Normally, root should only be allowed to connect from 'localhost'.  This
ensures that someone cannot guess at the root password from the network.

Disallow root login remotely? [Y/n] Y
 ... Success!

By default, MySQL comes with a database named 'test' that anyone can
access.  This is also intended only for testing, and should be removed
before moving into a production environment.

Remove test database and access to it? [Y/n] Y
 - Dropping test database...
 ... Success!
 - Removing privileges on test database...
 ... Success!

Reloading the privilege tables will ensure that all changes made so far
will take effect immediately.

Reload privilege tables now? [Y/n] Y
 ... Success!

Cleaning up...

All done!  If you've completed all of the above steps, your MySQL
installation should now be secure.

Thanks for using MySQL!

Configure Kamailio to use MySQL

  • By default, Kamailio does not use MySQL. To change this we need to edit one of Kamailio’s configuration files.
vi /etc/kamailio/kamctlrc
  1. Uncomment the DBENGINE parameter by removing the pound symbol and make sure the value equals MYSQL. The parameter should look like this afterwards:
    DBENGINE=MYSQL
    
  2. To have the kamdbctl command create the mysql database with the correct permissions, we will want to set the databaseusers and passwords in kamctlrc
    ## database read/write user
    DBRWUSER="kamailio"
    
    ## password for database read/write user
    DBRWPW="kamailiorw"
    
    ## database read only user
    DBROUSER="kamailioro"
    
    ## password for database read only user
    DBROPW="kamailioro"
    

Create the Kamailio Database Schema

  • The Command will create all the users and tables needed by Kamailio. You will be prompted to put in the MySQL root password that you created in the Install MySQL section of this document. You will be asked if you want to install different tables – just say “yes” to all the questions.
    /usr/sbin/kamdbctl create
    
  • Below are all the prompts you will be presented:
    MySQL password for root: ''
    Install presence related tables? (y/n): y
    Install tables for imc cpl siptrace domainpolicy carrierroute userblacklist htable purple uac pipelimit mtree sca mohqueue rtpproxy?
    (y/n): y
    Install tables for uid_auth_db uid_avp_db uid_domain uid_gflags uid_uri_db? (y/n): y
    
  • The following MySQL users and passwords are created (please change these in a production environment).
  • kamailio – (With default password ‘kamailiorw’) – user which has full access rights to ‘kamailio’ database.
  • kamailioro – (with default password ‘kamailioro’) – user which has read-only access rights to ‘kamailio’ database.

Enable the mysql and auth modules.

Add the following to the beginning of the /etc/kamailio/kamailio.cfg after

#!KAMAILIO#!define WITH_MYSQL
#!define WITH_AUTH

Update the DBURL line to match the username and password you set in kamctlrc before running kamdbctl.

The line looks like this by default:

#!define DBURL "mysql://kamailio:kamailioro@localhost/kamailio"

If you changed the username and password then the new user name and password would look like this

#!define DBURL "mysql://new_username:new_password@localhost/kamailio"

The new_username and new_password fields would be replaced with the values you entered in the /etc/kamailio/kamctlrcfile.

Start the Kamailio Server

service start kamailio

Note, the startup options for Kamailio is located at /etc/default/kamailio

Test Kamailio

  • In order to test that Kamailio is working correctly, I’m going to create a SIP user account and register that account using a softphone such as X-Lite, Linphone, or Zoiper.

Create SIP User Accounts

  • The following command will create a new SIP User. Note, that the domain portion has to be specified unless you export the SIP_DOMAIN environment variable.
    kamctl add <extension@domain> <extension password>
    
  • Here is what I created
    kamctl add 1001@dopensource.com opensourceisneat
    

Registering a SIP Softphone

  • configure whichever softphone you choose with the following options:
    User ID: 1001
    Domain:
    Password: opensourceisneat
    
  • Once you are registered, you can view all the registered extensions in kamailio with the following command:
    kamctl ul show
    
    You will get something like this: Domain:: location table=1024 records=1 max_slot=1 AOR:: 1001 Contact:: sip:1001@192.168.1.140:40587;rinstance=636c6f6dedce9a2b;transport=UDP Q= Expires:: 3559 Callid:: OWNlYzg2YThmMmI1MGM1YjMyZTk3NjU2ZTdhMWFlN2E. Cseq:: 2 User-agent:: Z 3.3.21937 r21903 State:: CS_NEW Flags:: 0 Cflag:: 0 Socket:: udp:104.131.171.248:5060 Methods:: 5087 Ruid:: uloc-5a2f0176-36a3-1 Reg-Id:: 0 Last-Keepalive:: 1513030025 Last-Modified:: 1513030025

Make a Test Call

  • You can call yourself by entering 1001 into your softphone. If it rings then you have a basic Kamailio server installed and ready to be configured to provide load balancing, failover, accounting, etc. As an exercise, you should create another SIP user account and register that user using another softphone and try calling between the two SIP users.

References

  • Install And Maintain Kamailio v4.1.x From GIT – http://www.kamailio.org/wiki/install/4.4.x/git

Quick Guide To Installing and Configuring RTPProxy: CentOS 7.3

Configuring an RTP Proxy is one of the most confusing topic’s around setting up Kamailio. The goal of this article is to help you select the correct RTP Proxy implementation to install, discuss one common use case/pattern that RTP Proxy is used for and then setup up a RTP Proxy implementation to work with Kamailio.

Note: We offer paid support for designing, configuring and supporting VoIP infrastructures that contain Kamailio.   
You can purchase support from Here

The Scenario

There are multiple use cases for using a RTP Proxy. However, in efforts to demonstrate how to use a RTP Proxy we are going to look at a simple use case where Kamailio is handling user registration and then passing the call directly to a carrier for making the outbound call, which is depicted below:

rtpproxy diagram

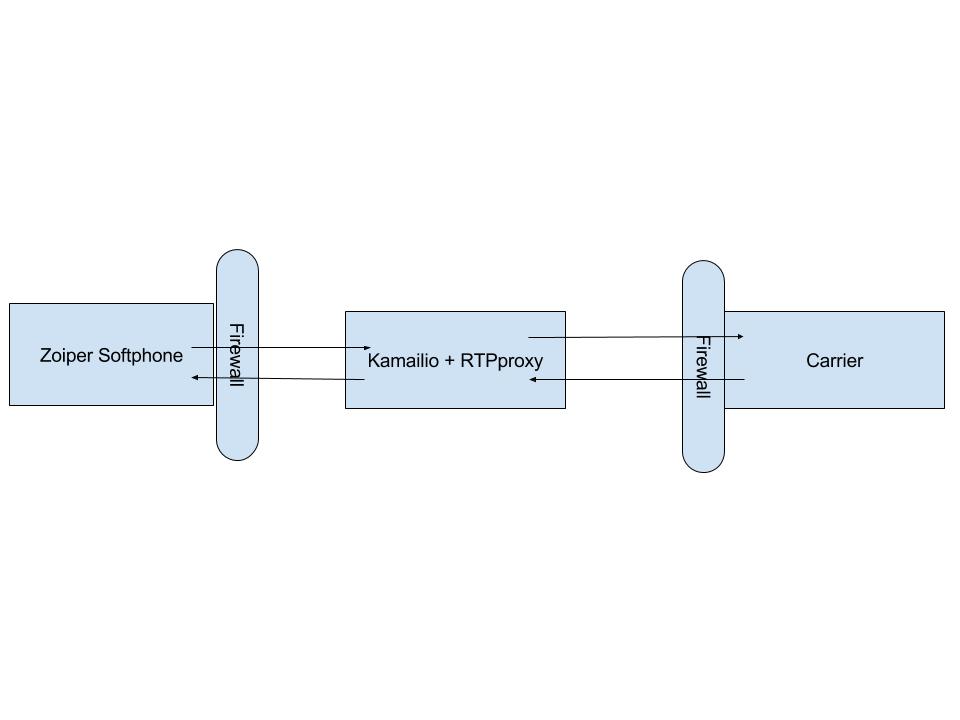
In this scenario, the User Agent is passing the SIP INVITE thru Kamailio. However, the SDP contains the local ip address of the User Agent because Kamailio is simply doing its job and passing the traffic thru without touching the requests. This means that the carrier can’t send the RTP traffic back to the User Agent because it’s sitting behind a firewall and the internal ip address is being sent in the SDP. Therefore, we need to install and configure a RTP Proxy. In the next section we will select the a RTP Proxy implementation to implement.

Select a RTP Proxy Implementation

There are 2 main versions of RTPProxy and it’s very confusing for a newbie to figure out which version you should implement.

Name Pro’s Con’s REPO
RTPProxy not sure Doesn’t seem to be well documented download
RTPEngine (formedly mediaproxy-ng) Works with WebRTC clients Not well documented download

Since we are not going to implement WebRTC we can use RTPProxy.

Installing RTPProxy

Install pre-req’s and rtpproxy repo using yum package manager:

yum -y update
yum -y install gcc gcc-c++ bison openssl-devel libtermcap-devel ncurses-devel doxygen      \
            curl-devel newt-devel mlocate lynx tar wget nmap bzip2 unixODBC unixODBC-devel      \
            libtool-ltdl libtool-ltdl-devel mysql-connector-odbc mysql mysql-devel mysql-server \
            flex libxml2 libxml2-devel pcre pcre-devel git

From here you can either install using yum or from source.
We recommend installing from src as there are needed patches in new releases.

Installing RTPProxy from Source

Clone and compile the latest from github

cd /usr/src/
git clone --recursive https://github.com/sippy/rtpproxy.git
cd rtpproxy
./configure
make
make install

Copy the init script to init.d/ directory

/bin/cp -f rpm/rtpproxy.init /etc/rc.d/init.d/rtpproxy &&
chmod +x /etc/rc.d/init.d/rtpproxy

Create the rtpproxy user and group

mkdir -p /var/run/rtpproxy
groupadd rtpproxy
useradd -d /var/run/rtpproxy -M -s /bin/false rtpproxy
chown rtpproxy:rtpproxy -R /var/run/rtpproxy

Change the config file to use the rtpproxy binary.
You may need to replace if you installed in custom location.

sed -i 's:rtpproxy=/usr/bin/:rtpproxy=/usr/local/bin/:' /etc/rc.d/init.d/rtpproxy

I had to manually add the path of the program, as follows:

cat << 'EOF' > /etc/profile.d/rtpproxy.sh
#!/bin/sh
#
# Set an alias for compiled version of rtpproxy

# Change if installed in custom location
rtpproxy_prog="/usr/local/bin/rtpproxy"

if [ -f "$rtpproxy_prog" ] && [ -x "$rtpproxy_prog" ]; then
    export PATH=$PATH:$rtpproxy_prog
fi
EOF

Source your global shell environment configs;

source /etc/profile & source ~/.bashrc

Make rtpproxy start on boot:

chkconfig rtpproxy on

Replace startup options with whatever you want rtpproxy to start with:

local_ip=your.local.i.p
external_ip=your.external.i.p
echo 'OPTIONS="-F -s udp:127.0.0.1:7722 -l $local_ip -A $external_ip -m 10000 -M 20000 -d DBUG:LOG_LOCAL0"' > /etc/sysconfig/rtpproxy

Enabling NAT within Kamailio Configuration File

We used Flowroute for our carrier here. other carriers would be similar. If using Flowroute, you will need to login to your Flowroute account and obtain your techprefix.

We will assume that you are using the default kamailio.cfg file that ships with Kamailio.

  1. vi /etc/kamailio/kamailio.cfg
  2. add the following to the top of your config, beneath #!KAMAILIO
#!define WITH_MYSQL
#!define WITH_AUTH
#!define WITH_NAT
#!define WITH_USRLOCDB
#!define WITH_FLOWROUTE
  1. save the configuration

Update the port kamailio listens on:

  1. vi /etc/kamailio/kamailio.cfg
  2. find the line that starts with: #listen=udp:10.0.0.10:5060
  3. after that line add: listen=udp:yourlocalip:5060 advertise yourpublicip:5060
  4. save the file

Add the carrier routing logic:

  1. vi /etc/kamailio/kamailio.cfg
  2. in the routing logic section find “route[PSTN] {“
  3. add the following inside that function, replace with your own values:
#!ifdef WITH_FLOWROUTE
        $var(sip_prefix) = "<Flowroute carrier prefix>";  #Leave empty if your carrier doesn't require it
        $var(carrier_ip) = "216.115.69.144"; #Signaling IP for Flowroute. Replace with your carrier info

        # add prefix to rU
        $rU = $var(sip_prefix) + $rU;

        # forward to flowroute
        forward($var(carrier_ip), 5060);
        exit;
#!endif

Startup

Start rtpproxy:

service rtpproxy start

Restart kamailio:

You need to restart Kamailio if you make changes to rtpproxy configuration. In our case, we just installed it. So, you need to restart Kamailio in order for it to connect to the RTPProxy.

kamctl restart

Testing RTPProxy and Kamailio

First off make sure both Kamailio and Rtpproxy are running:

ps -ef | grep rtpproxy
ps -ef | grep kamailio

If either service fails to start check your logs while starting the service.
Open another terminal and run the following:

# terminal 2
tail -f /var/log/messages

Then in your original terminal start the services one by one.
You will see errors labeled. One of those will lead to your problem.

Add a test extension to Kamailio

If you already have a test extension in Kamailio you can skip this section.
“test” is our pw for extension “1001”:

kamctl add 1001@your.domain.com test

Now try to register a softphone with the extension you added.

Once registered run the following cmd and you should see your extension:

kamctl ul show

Try to make calls using that extension and capture the traffic. We will assume that you have either sngrep or ngrep installed already.

Your INVITE and 200 OK messages should be rewritten correctly.

Sources:

RTPProxy Revisted
RTPProxy Control Protocol

Building a Kamailio Docker image

In this tutorial we will go over how to create a Dockerfile for Kamailio and build our own Kamailio image. If you want to learn more about Dockerfile’s you can read through our other post on creating a Dockerfile.

Setup Dockerfile

  1. First thing we need to do is create a new directory for our Dockerfile.
mkdir docker_kamailio
  1. We then need to make our Dockerfile.
touch docker_kamailio/Dockerfile
  1. Next, open up the Dockerfile with your favorite editor so we can start building.
vim docker_kamailio/Dockerfile

Installing Kamailio

  1. We will be installing Kamailio on a CentOS 6 container. First thing we need to do is specify what docker image we want to start with. Add the following to your Dockerfile.
FROM centos:6
  1. Next, we need to add the Kamailio 4.4 Open Build Service repository to our yum.repos.d list.
RUN yum -y install wget
RUN wget -O /etc/yum.repos.d/home:kamailio:v4.4.x-rpms.repo http://download.opensuse.org/repositories/home:/kamailio:/v4.4.x-rpms/CentOS_6/home:kamailio:v4.4.x-rpms.repo
RUN yum -y update
  1. Now that the Kamailio 4.4 repository is added to our system, it is time to install the kamailio packages. For simplicity of running the whole Kamailio stack on one container, we will be using SQLite as our back end database.
RUN yum install -y kamailio kamailio-debuginfo kamailio-utils gdb kamailio-sqlite

Setting up kamctlrc

We need to configure kamctlrc to use SQLite and to not prompt us during the database creation.

  1. Set the DBENGINE, DBHOST, and DB_PATH.
WORKDIR /etc/kamailio/

RUN echo "DBENGINE=SQLITE" >> kamctlrc
RUN echo "DBHOST=localhost" >> kamctlrc
RUN echo "DB_PATH="/usr/local/etc/kamailio/kamailio.sqlite"" >> kamctlrc
  1. Next, we ne need to specify the following options so that kamdbctl won’t prompt us during the database creation.
RUN echo "INSTALL_EXTRA_TABLES=no" >> kamctlrc
RUN echo "INSTALL_PRESENCE_TABLES=no" >> kamctlrc
RUN echo "INSTALL_DBUID_TABLES=no" >> kamctlrc

Creating Back End Database

  1. SQLite requires a file it can write the database to. We need to make a directory and file, which was already specified in the DB_PATH variable added to the kamctlrc file.
RUN mkdir /usr/local/etc/kamailio
RUN touch /usr/local/etc/kamailio/kamailio.sqlite
  1. If all the settings in kamctlrc are correct, and /usr/local/etc/kamailio/kamailio.sqlite exists, we should be able to create the Kamailio Database without any prompts interrupting our automated build.
RUN /usr/sbin/kamdbctl create

Running Kamailio

  1. Add the following kamctl command to create a user for testing.
RUN kamctl add 1000@dopensource.com opensourceisneat
  1. Next, we need to specify which ports to expose. Because Kamailio does not handle media, we only need to open up port 5060 for SIP.
EXPOSE 5060/udp
  1. Finally, we need to specify what command to run when the container is started up
CMD["/usr/sbin/kamailio", "-m 64", "-M 8", "-D"]

Finished Dockerfile

Now that we have a finished Dockerfile, you can exit out of your editor, saving any changes. The file should look something like this.

FROM centos:6

RUN yum -y install wget
RUN wget -O /etc/yum.repos.d/home:kamailio:v4.4.x-rpms.repo http://download.opensuse.org/repositories/home:/kamailio:/v4.4.x-rpms/CentOS_6/home:kamailio:v4.4.x-rpms.repo
RUN yum -y update
RUN yum install -y kamailio kamailio-debuginfo kamailio-utils gdb kamailio-sqlite

WORKDIR /etc/kamailio/

RUN echo "DBENGINE=SQLITE" >> kamctlrc
RUN echo "DBHOST=localhost" >> kamctlrc
RUN echo "DB_PATH="/usr/local/etc/kamailio/kamailio.sqlite"" >> kamctlrc
RUN echo "INSTALL_EXTRA_TABLES=no" >> kamctlrc
RUN echo "INSTALL_PRESENCE_TABLES=no" >> kamctlrc
RUN echo "INSTALL_DBUID_TABLES=no" >> kamctlrc

RUN mkdir /usr/local/etc/kamailio
RUN touch /usr/local/etc/kamailio/kamailio.sqlite

RUN /usr/sbin/kamdbctl create

RUN kamctl add 1000@dopensource.com opensourceisneat

EXPOSE 5060/udp

CMD ["/usr/sbin/kamailio", "-m 64", "-M 8", "-D"]

Building and running the new image

  1. Build the image using the docker build command. This will build an image called dopensource/kamailio4.4.
cd docker_kamailio
docker build -t dopensource/kamailio4.4 .
  1. Run a Kamailio container to test out our new image. Remember to map the SIP port to your docker host.
docker run -dit -p 5060:5060/udp dopensource/kamailio4.4
  1. You should now be able to register a softphone to your new Kamailio instance. Because we mapped 5060 to 5060 on the Docker host, you will be using your Docker host’s ip address for registration.
User ID: 1000
Domain:
Password: opensourceisneat

Kamailio Quick Install Guide for v4.4

Kamailio 4.4 on CentOS 6.

Are you looking for the CentOS 7.x version?  It can be found here

Setup YUM Repository

  1. Install wget so we can pull down the rpm.
yum install wget
  1. Let’s download the yum repo file for our Cent OS version.
cd /etc/yum.repos.d/
wget http://download.opensuse.org/repositories/home:/kamailio:/v4.4.x-rpms/CentOS_6/home:kamailio:v4.4.x-rpms.repo
  1. Update system so yum is aware of the new repository.
yum update
  1. You can look at the kamailio packages in the YUM repository by typing:
yum search kam

Install Kamailio and Required Database Modules

  1. Install the following packages from the new repo.
yum install -y kamailio kamailio-mysql kamailio-debuginfo kamailio-unixodbc kamailio-utils gdb
  1. Set kamailio to start at boot.
chkconfig kamailio on
  1. The Kamailio configuration files will be owned by the root user, rather than the kamailio user created by the Kamailio package. We will need to change the ownership of these files.
chown kamailio:kamailio /etc/default/kamailio
chown -R kamailio:kamailio /etc/kamailio/
chown -R kamailio:kamailio /var/run/kamailio

Install MySQL

  1. Since we plan on using MySQL, we will need to instal the MySQL server as well as the client.
yum install -y mysql-server mysql
  1. Next we need to start up MySQL:
service mysqld start
  1. And enable mysqld at boot.
chkconfig mysqld on
  1. Now we can set a root password for mysql:

You can hit yes to all the options. There is no root password as of yet, so the first question will be blank. Be sure to use a secure unique password for your root user.

[root@localhost yum.repos.d]# sudo /usr/bin/mysql_secure_installation

NOTE: RUNNING ALL PARTS OF THIS SCRIPT IS RECOMMENDED FOR ALL MySQL
SERVERS IN PRODUCTION USE! PLEASE READ EACH STEP CAREFULLY!

In order to log into MySQL to secure it, we'll need the current
password for the root user. If you've just installed MySQL, and
you haven't set the root password yet, the password will be blank,
so you should just press enter here.

Enter current password for root (enter for none):
OK, successfully used password, moving on...

Setting the root password ensures that nobody can log into the MySQL
root user without the proper authorisation.

Set root password? [Y/n]
New password:
Re-enter new password:
Password updated successfully!
Reloading privilege tables..
... Success!

By default, a MySQL installation has an anonymous user, allowing anyone
to log into MySQL without having to have a user account created for
them. This is intended only for testing, and to make the installation
go a bit smoother. You should remove them before moving into a
production environment.

Remove anonymous users? [Y/n]
... Success!

Normally, root should only be allowed to connect from 'localhost'. This
ensures that someone cannot guess at the root password from the network.

Disallow root login remotely? [Y/n]
... Success!

By default, MySQL comes with a database named 'test' that anyone can
access. This is also intended only for testing, and should be removed
before moving into a production environment.

Remove test database and access to it? [Y/n]
- Dropping test database...
... Success!
- Removing privileges on test database...
... Success!

Reloading the privilege tables will ensure that all changes made so far
will take effect immediately.

Reload privilege tables now? [Y/n]
... Success!

Cleaning up...

All done! If you've completed all of the above steps, your MySQL
installation should now be secure.

Thanks for using MySQL!

Configure Kamailio to use MySQL

  • By default, Kamailio does not use MySQL. To change this we need to edit one of Kamailio’s configuration files.
vi /etc/kamailio/kamctlrc
  1. Uncomment the DBENGINE parameter by removing the pound symbol and make sure the value equals MYSQL. The parameter should look like this afterwards:
DBENGINE=MYSQL
  1. To have the kamdbctl command create the mysql database with the correct permissions, we will want to set the databaseusers and passwords in kamctlrc
## database read/write user
DBRWUSER="kamailio"

## password for database read/write user
DBRWPW="kamailiorw"

## database read only user
DBROUSER="kamailioro"

## password for database read only user
DBROPW="kamailioro"

Create the Kamailio Database Schema

  • The Command will create all the users and tables needed by Kamailio. You will be prompted to put in the MySQL root password that you created in the Install MySQL section of this document. You will be asked if you want to install different tables – just say “yes” to all the questions.
/usr/sbin/kamdbctl create
  • Below are all the prompts you will be presented:
MySQL password for root: ''
Install presence related tables? (y/n):
Install tables for imc cpl siptrace domainpolicy carrierroute userblacklist htable purple uac pipelimit mtree sca mohqueue rtpproxy?
(y/n):
Install tables for uid_auth_db uid_avp_db uid_domain uid_gflags uid_uri_db? (y/n):
  • The following MySQL users and passwords are created (please change these in a production environment).

  • kamailio – (With default password ‘kamailiorw’) – user which has full access rights to ‘kamailio’ database.

  • kamailioro – (with default password ‘kamailioro’) – user which has read-only access rights to ‘kamailio’ database.

Enable the mysql and auth modules.

Add the following to the beginning of the kamailio.cfg after #!KAMAILIO

#!define WITH_MYSQL
#!define WITH_AUTH

Update the DBURL line to match the username and password you set in kamctlrc before running kamdbctl

#!define DBURL "mysql://kamailio:kamailioro@localhost/kamailio"

Start the Kamailio Server

service kamailio start

We also need to edit /etc/default/kamailio to notify Kamailio that is is configured and ready to go.

Uncomment the following:

RUN_KAMAILIO=yes

Test Kamailio

  • In order to test that Kamailio is working correctly, I’m going to create a SIP user account and register that account using a softphone such as X-Lite, Linphone, or Zoiper.

Create SIP User Accounts

  • The following command will create a new SIP User. Note, that hte domain portion has to be specified unltess you export hte SIP_DOMAIN environment variable.
kamctl add <extension@domain>
  • Here is what I created
kamctl add 1001@dopensource.com opensourceisneat

Registering a SIP Softphone

  • configure whichever softphone you choose with the following options:
User ID: 1001
Domain:
Password: opensourceisneat
  • Once you are registered, you can view all the registered extensions in kamailio with the following command.
kamctl ul show

Make a Test Call

  • You can call yourself by entering 1001 into your softphone. If it rings then you have a basic Kamailio server installed and ready to be configured to provide load balancing, failover, accounting, etc. As an exercise, you should create another SIP user account and register that user using another softphone and try calling between the two SIP users.

References

  • Install And Maintain Kamailio v4.1.x From GIT – http://www.kamailio.org/wiki/install/4.1.x/git

Setting Up Your Kamailio Development Envionment

The purpose of this document is to explain how to install Kamailio and setup your development environment to make it easier to start configuring Kamailio to fit your requirements.  In this document I will explain how to install Kamailio on CentOS 6.6 and configuring VIM to make it easier to do development.

Assumptions:

  • MySQL is installed

Installing Kamailio 4.2 from source on CentOS 6.6 (for some reason we love CentOS)

I used the instructions located at http://www.kamailio.org/wiki/install/4.2.x/git as my basis.

You first need to install some packages that will be need for compiling Kamailio

yum install -y gcc flex bison mysql-libs make openssl-devel libcurl libxml2 expat-devel

Next we need to create a location for the Kamailio source

mkdir -p /usr/local/src/kamailio-4.2
cd /usr/local/src/kamailio-4.2

We now can use GIT to grab the source and checkout the latest 4.2 release

git clone --depth 1  git://git.sip-router.org/kamailio kamailio
cd kamailio
git checkout -b 4.2 origin/4.2

Continue with the installation by starting at step 3 thru step 7 in the instructions located at http://www.kamailio.org/wiki/install/4.2.x/git

Setup Development Environment

We personally like using the VIM autocomplete plugin for Kamailio that was created by Daniel-Constantin Mierla (co-founder of Kamailio).  It makes development much easier.

The vim extensions that handle syntax highlighting and file type auto detection is shipped part of the source. So you just need to install it

cd /usr/local/src/kamailio-4.2/kamailio/utils/misc/vim/
make install

If you want to have autocomplete you will need to grab it from Daniel’s GIT repository

git clone https://github.com/miconda/vim-extensions.git
cd vim-extensions
make install-kamailio-plugin

Now you can have autocomplete turn on automatically when you edit a Kamailio file in VIM by running this command which will create a ~/.virmrc file with the command to turn on autocomplete for Kamailio functions and reserved words

echo '" custom complete function for kamailio config
 autocmd FileType kamailio setlocal completefunc=KamailioComplete' >> ~/.vimrc'

Test that it’s working

vim /usr/local/etc/kamailio/kamailio.cfg

You should see #!KAMAILIO in purple. You can test autocomplete by starting hit “i” on the keyboard to enter insert mode and then hit CTRL+x, then CTRL+u.  You will see a list of Kamailio functions that will pop up.  See my screenshot below:

Kamailio Autocomplete

References

  • http://www.kamailio.org/w/tag/4-2/
  • https://github.com/miconda/vim-extensions/blob/master/plugin/kamailio/README.md